- Services

Getting to know us
- Industries
Recent case study:
Oracle EBS Cloud Deployment
Consolidating and Migrating assets into Oracle Cloud Infrastructure.
.png?width=250&name=stonewater-logo%20(1).png)
Most Visited Pages
-
- Resources
DSP-Explorer acquires leading Oracle Applications Managed Services Provider, Claremont, to further extend its data management capabilities.

Resources
- Contact us
GCP pipeline without Cloud Composer
Contents
In this blog, I will discuss the process of creating a Google Cloud Platform (GCP) pipeline. We'll begin with ingesting data from our customer support ticketing system, Cherwell and finish with visualising data in Power BI.
You can take a look at our GCP services which complement what I'll be explaining in this blog, here.
This blog will be providing an alternative to orchestrating your pipeline with Cloud Composer by using Functions and Scheduled Queries instead. You may prefer this method because it is cheaper, however by not using Cloud Composer, you miss out on the built-in logging and monitoring.
This will be an ETL pipeline, which means the raw data will be stored outside the data warehouse, and transformations will be done before loading the data into the data warehouse. The alternative is an ELT pipeline, which means the raw data is loaded directly into the data warehouse and transformations are performed within.
I'm assuming you already have a functional GCP account, and a project set up. You can create a free account here with $300 worth of credits, but make sure you shut down all the resources we create in this blog once completed, otherwise you may be charged. Before you read on, check out our Google Cloud Consultancy Services to see how we could advise you.
Step 1) Create a service account
Initially, you need to create a service account to grant access between services used in the GCP pipeline.
- Navigate to IAM & Admin > Service Account
- Click on the 'create service account' button
- Choose a self-identifying name and ID for your service account e.g., <pipeline_name>-sa
- Grant the following permissions:

- Click on done
Step 2) Create secrets
In the API request, you may use confidential credentials, therefore, hiding them in plain text is essential; you can do this using 'secrets'. Secrets can password-protect confidential information, so only authorised users can see them.
- Navigate to 'Secret Manager'
- Click the button to create a new secret
- Choose a self-identifying name for your secret
- Enter your confidential information
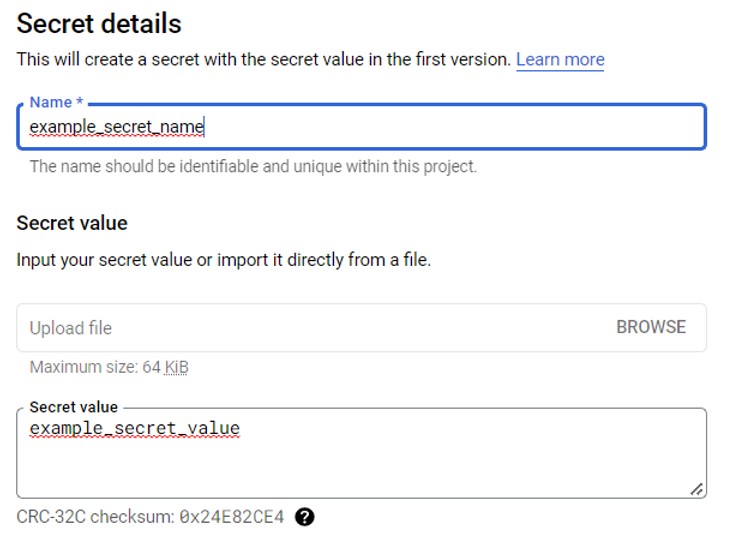
- Click on the secret you just created
- Click on the permissions tab
- Assign the service account that you created in step 1 to this secret
Step 3) Cloud Storage
The function used in step 4 not only makes an API request to third-party software but also saves the results of this API request to Cloud Storage in a JSON file. To do this, we need to create a bucket and a directory to store these JSON files.
- Navigate to 'Cloud Storage'
- Click the button to create a bucket
- Choose a self-identifying name for your bucket e.g., <pipeline_name>_data_lake
- Choose the region closest to you
- Create a standard bucket as you will be accessing it frequently
- Click 'create bucket'
- You can also create a folder in the storage bucket to store the JSON files for better organisation
Step 4) Cloud Function
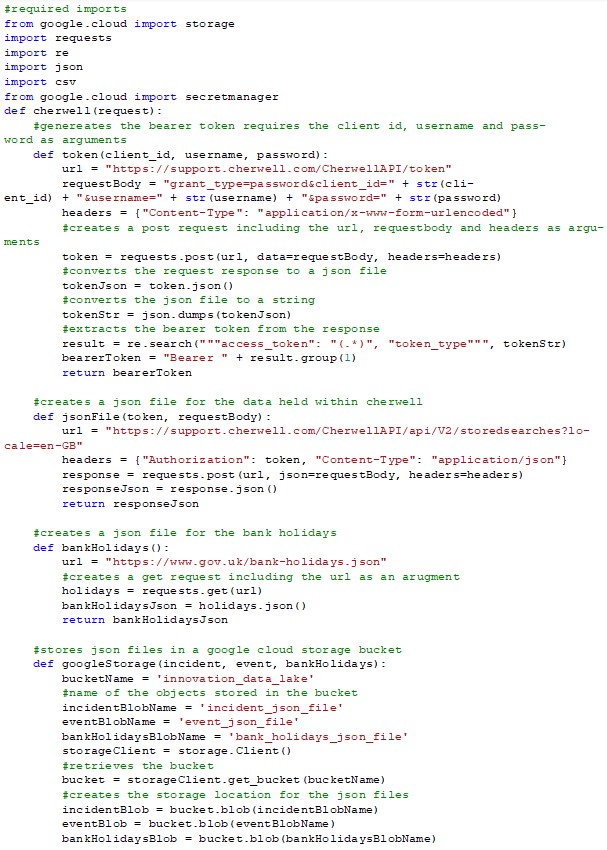
To kick off the pipeline, I created a Cloud Function to create an API request for the third-party software. In this example, the third-party software will be the managed service 'Cherwell'.
- First, make your way to the function tab
- Click the button to create a function
- Choose a self-identifying name for your function, e.g., <Third-Party Application>_API
- Select the region closest to you
- Choose the trigger type HTTP
- Select the 'require authentication' option
- Expand the runtime, build, connections, and security settings
- Select the RUNTIME tab
- Choose 512MB for memory allocation to provide the function with enough memory to run the API request
- Choose the service account you created in step 1
- Choose the latest version of Python to write the API request.
Below is the code used to create API requests to Cherwell and UK bank holidays:
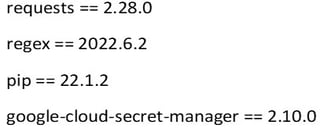
Below are the modules I used in the requirements.txt:
- Once you are happy with your API Request, click deploy
- To ensure that this function executes successfully, click on the function, and make your way to the test function. Then click on the test function button ("Success!" should be returned in the output if the execution is successful).
Step 5) BigQuery
BigQuery is used as a Data Warehouse in GCP to store data that will be displayed in the reports. It is important to manually create a dataset that will be used to store tables generated from the dataflow transformations in step 6.
- First, click on the three dots next to your project and select Create Dataset
- Choose a self-identifying name for your Dataset
- Click on the Create Dataset button
Step 6) Dataflow
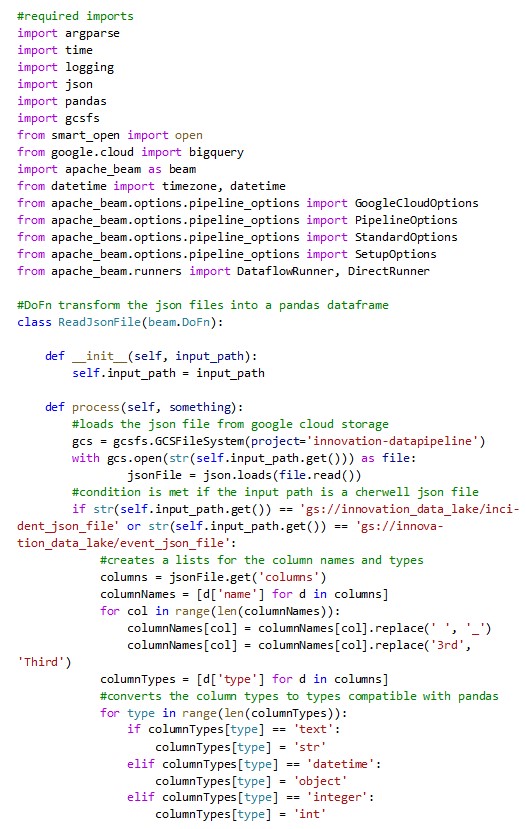
To be able to run a dataflow job that transforms your data, you first need to create a classic template in the programming language of your choice (Java or Python) and then stage this template using the Cloud Shell. This means it can be run by the Cloud Function in Step 6 using the Dataflow REST API.
- First, Activate the Cloud Shell
- Click on the 'Open Editor' button
- Here you can create your template
Below is the code I used to create my template in Python called dataflow-cherwell.py:
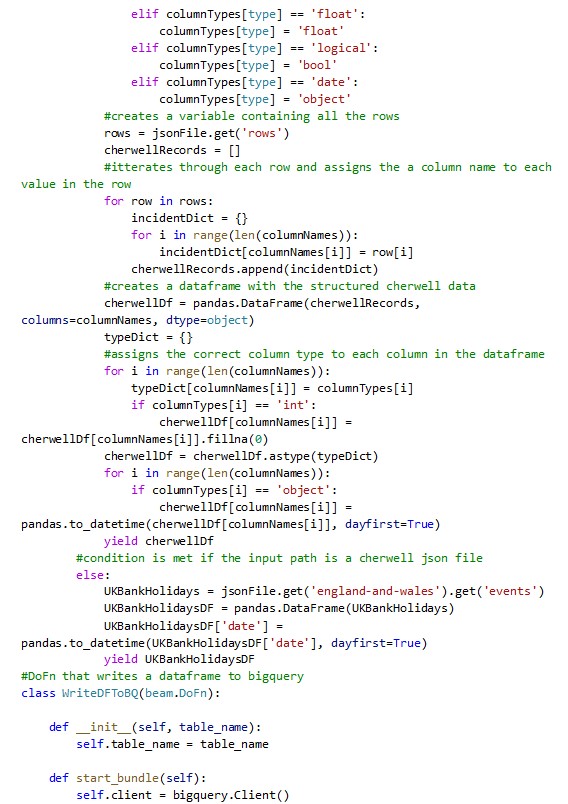
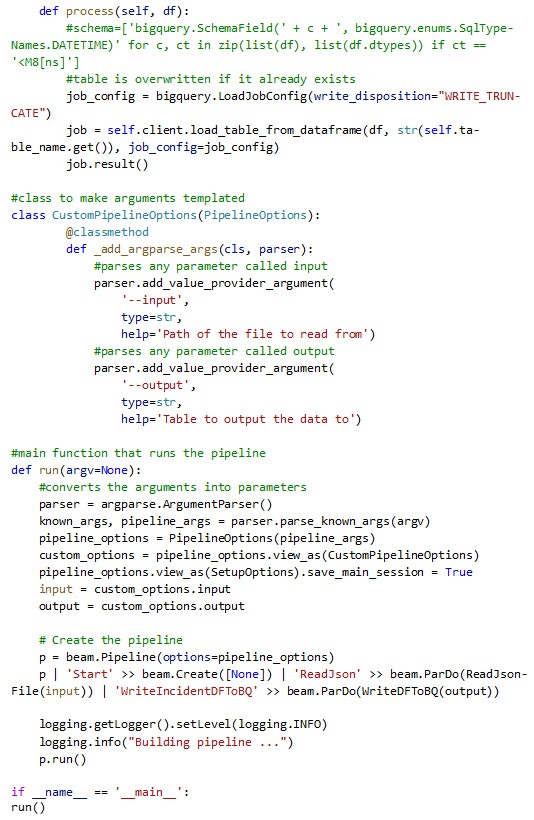
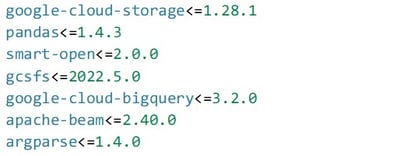
Below are the modules I used in the requirements.txt:
Below are the arguments I used to stage the template in the Cloud Shell:

Step 7) Cloud Function
The next step of the pipeline is to trigger a dataflow job that transforms the JSON files stored in the cloud storage. This function should trigger as soon as the data arrives at the cloud storage bucket.
- Go through the same steps that you went through for creating a function in step 4, but this time choose the trigger type as Cloud Storage
- Choose the event type of On (finalising/creating) file in the selected bucket
- Choose the bucket that you created in step 3
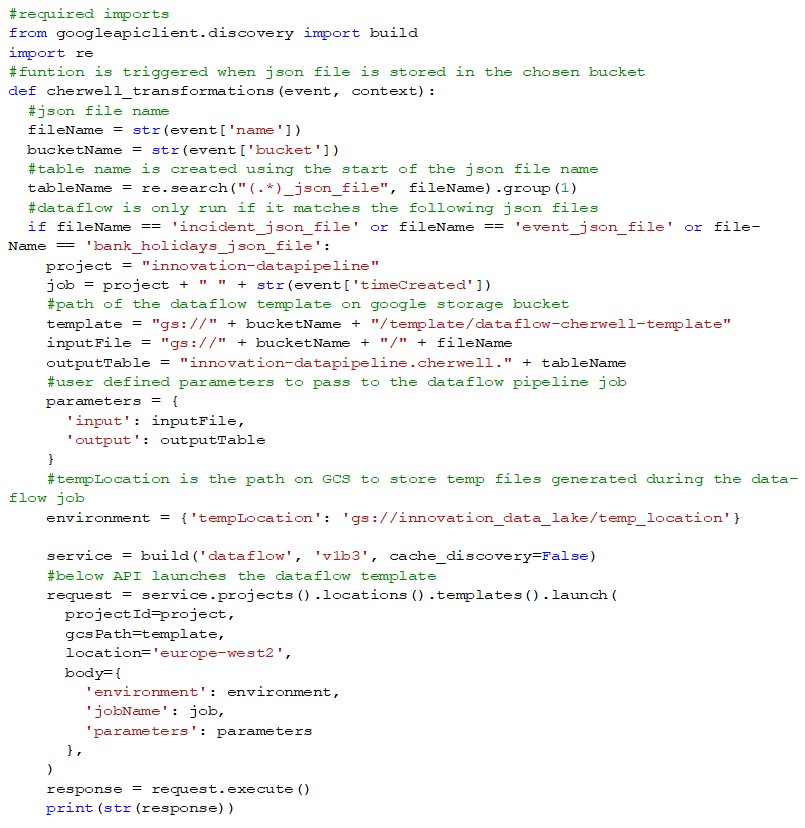
Below is the code used to trigger the dataflow job once the files have been stored in the cloud storage bucket:
Below are the modules used in the requirements.txt:

- Once you are happy with your cloud function trigger, click 'deploy'
- Unfortunately, you cannot test this function without first storing the JSON files in a bucket. Therefore, to test this function, trigger the function created in step 5. If this is successful, you will see running dataflow jobs.
Step 8) BigQuery
BigQuery allows you to perform SQL queries and transformations on the stored data. It can also connect to data analytics software, such as Power BI. Table transformations should be stored as views rather than tables. This is because they take up significantly less storage space while still being able to run queries and connect them to reports.
- Click on the three dots next to your project and select 'Create Dataset'
- Choose a self-identifying name for your Dataset
- Once the dataflow job stores data in a table within your Dataset, click on the 'compose new query' button to run SQL transformations and queries on the data
- Write SQL code to perform the desired data transformations
- You can schedule this query by clicking the schedule button on the toolbar

- Choose a self-identifying name for your scheduled query
- Select the option to run the queries on-demand
- Choose the same data location as your dataset
- Click on save
Step 9) Cloud Logging/PubSub
Cloud logging will allow you to retrieve the exact point in time your tables were created in BigQuery. You can then create a sink in cloud logging to create a PubSub topic every time this log is generated.
- Go to the 'Cloud Logging' tab
- Go to the 'Logs Router' tab
- Click the 'Create Sink' button at the top
- Choose a self-identifying name for your sink e.g., pubsub_table_creation_sink
- Choose Cloud Pub/Sub topic as the sink service
- Create a new topic and give it a name you will remember
- Copy/paste the following filters in the command box under the logs to include in the sink section:
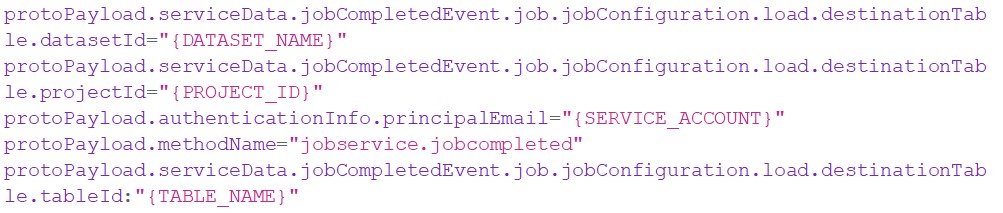
- Replace the 'DATASET_NAME' with the Dataset you created the table in.
- Replace the 'PROJECT_ID' with the project you are working in.
- Replace the 'SERVICE_ACCOUNT' with the service account you created in step 1.
- Replace the 'TABLE_NAME' with the table you created.
Doing this will create a PubSub topic if that specific table is created.
- Click the create sink button
Step 10) Cloud Functions
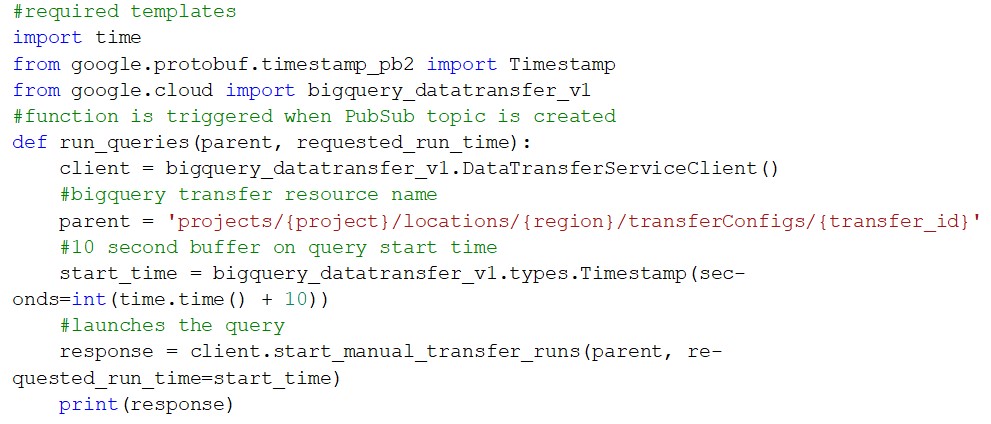
You will now need to create a cloud function that will be triggered based on the PubSub topic created in step 8. This cloud function will run the scheduled query you created in step 8.
- Go through the same steps that you went through for creating a function in steps 5 and 7, but this time choose the trigger type as 'Cloud Pub/Sub'
- Choose the Cloud Pub/Sub topic that you created in step 9
Below is the code used to run the scheduled query you created in step 8:
- You can find the transfer resource name by heading to BigQuery > Scheduled queries > Schedule query created in step 7 > configuration, and it should look something like this:

Below is the module I used in the requirements.txt:
![]()
- Click the deploy button
Step 11) Power BI
BigQuery can connect to many different data analytic tools, but in my pipeline, I decided to use Power BI because I had the most familiarity with this software. You can connect Power BI to BigQuery using DirectQuery, which allows Power BI to run reports directly on the data held within BigQuery. The benefits of this are the report runs on the current data, you don't have to wait on the report to load the data, and it takes up less storage.
- Create a new report in Power BI
- Click on Get data
- Click on more
- Search for BigQuery
- Choose Google BigQuery
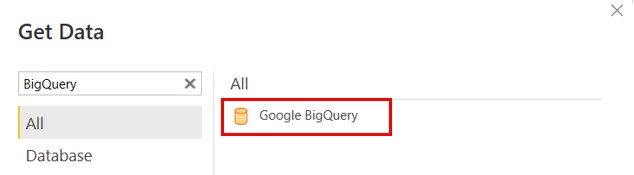
- Click on OK
- Sign in when prompted to
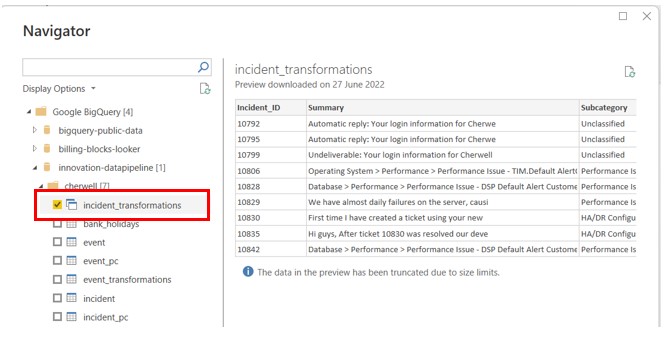
- Expand the project that you're working on in
- Expand the desired Dataset
- Select the table/view that was created
- Click on the load button
- Click on the DirectQuery option
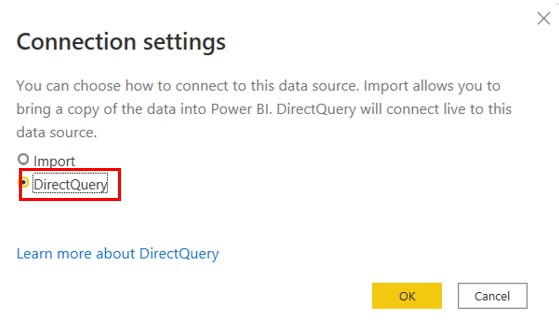
- Click on OK, and this will run the report on the current data held in BigQuery
Step 12) Cloud Scheduler
Finally, we will create a Cloud Schedule that will kick off the pipeline at a frequency of your choice.
- Make your way to the 'Cloud Scheduler' tab
- Click on Create Job
- Choose a self-identifying name for the scheduler e.g., <pipeline_name>_scheduler
- Choose the region closest to you
- Choose a frequency of your choice e.g., 30 8 * * * will run the pipeline every day at 8:30
- Choose your time zone
- Choose the target type as HTTP
- Copy/Paste the trigger URL for the function you created in step 4
- You can find the trigger URL by navigating to Cloud Functions > function created in step 4 > Trigger
- Choose the HTTP Method of GET
- Choose the Auth Header of the OIDC token
- Choose the service account you created in step 1
- Click on Create
You now have developed a scheduled pipeline which fetches raw data from Cherwell, stores it in Cloud Storage, transforms it using Dataflow, stores it again in BigQuery and displays the data in Power BI without the need for Cloud Composer.
I have not compared the data pipeline with and without the use of Cloud Composer. Therefore, I would highly recommend weighing up the pros and cons of each before picking a solution.
Feel free to change Cherwell to a third-party software of your choice with changes to the API, such as changing the authentication method and endpoints, which can be found within the software's API documentation. Furthermore, if you decide to use another third-party software, storing data in Cloud Storage and transforming the data using Dataflow may not be necessary. This is because the data retrieved from Cherwell was not in a suitable format to be stored directly in BigQuery. However, this may not be the case when using another third-party software, and it would change the pipeline's architecture from ETL to ELT.
Power BI can also be replaced with any data analytics software that has a supported connector to GCP.
For more information, get in touch with our experts to find out more about our Google Cloud Services or book a meeting...