- Services

Getting to know us
- Industries
Recent case study:
Oracle EBS Cloud Deployment
Consolidating and Migrating assets into Oracle Cloud Infrastructure.
.png?width=250&name=stonewater-logo%20(1).png)
Most Visited Pages
-
- Resources
DSP-Explorer acquires leading Oracle Applications Managed Services Provider, Claremont, to further extend its data management capabilities.

Resources
- Contact us
Oracle APEX 23.2 New Page Items
With release 23.2 of APEX, Oracle has added three new page items. Throughout this blog, I will explain the three new page items, detail some of their features and guide you through how to implement them in your applications.
What are the new page items?
With mobile devices being used much more frequently, two of the three new page items focus on mobile device users to enhance the end-user experience whilst providing the developers with an easier development route. The first item is the Combobox, similar to the Select List page item but allowing significant customisation options. It also enables end users to add their own values, which can in turn be added to the database for future use. The second new page item is the Image Upload item, which allows end users to crop, resize and upload images using on-device processing and reduce the need for complex, custom-written routines. The final new page item is the QR Code Generator page item, which lets you embed QR codes into your application and can be scanned by an end user for access to a range of embedded data.
Combobox
The new Combobox page item type is similar to the Select List or Popup LOV page items, however, there are some considerable differences. Firstly, the end users can add their own values, which, with some written code, then get stored in the database for future use.
There are two main types of Combobox. The first allows the end user to select multiple values, whereas the other only allows a single value to be selected. Both types are handled through page item properties instead of multiple page items, allowing for a quick and easy transformation if needed.
Creating a single selection Combobox
To create a Combobox, you will need two items on your page. The first will be the new Combobox page item, but you will also need a hidden item to add any new items created by the end user. I've called my Combobox P2_COMBOBOX and the hidden item P2_MANUAL_ENTRIES. The Combobox comes with a selection of new settings as below:
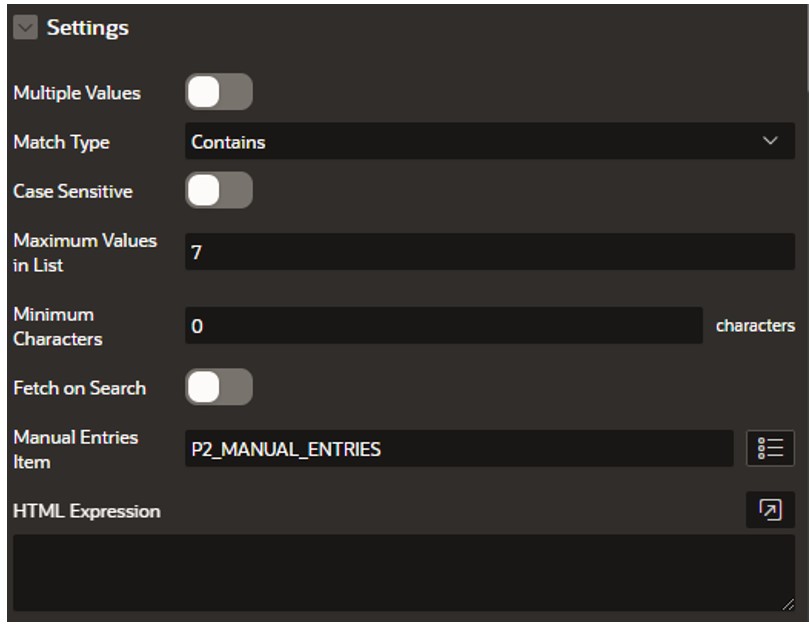
Under the Manual Entries Item, enter the name of the hidden item you created (P2_MANUAL_ENTRIES in my example, as in the screenshot above). Leave the other values as they are for now, but I will explain what they do further on.
For this example, I've created a simple table called COUNTRIES and added a selection of countries. It only has an ID and a description, but for the purposes of the example, it's enough. Here is the SQL to create the COUNTRIES table and populate it with my example data:
CREATE TABLE countries
   ("COUNTRY_ID" NUMBER(10),
    "COUNTRY_NAME" VARCHAR2(50 CHAR),
   CONSTRAINT "COUNTRIES_PK" PRIMARY KEY ("COUNTRY_ID") USING INDEX ENABLE);
--
INSERT INTO countries(1, ‘France’);
INSERT INTO countries(2, ‘Spain’);
INSERT INTO countries(3, ‘United Kingdom’);
INSERT INTO countries(4, ‘USA’);
INSERT INTO countries(5, ‘Germany’);
INSERT INTO countries(6, ‘Portugal’);
INSERT INTO countries(7, ‘Netherlands’);
INSERT INTO countries(8, ‘Belgium’);
INSERT INTO countries(9, ‘China’);
INSERT INTO countries(10, ‘India’);
INSERT INTO countries(11, ‘Australia’);
INSERT INTO countries(12, ‘Russia);
--
COMMIT;
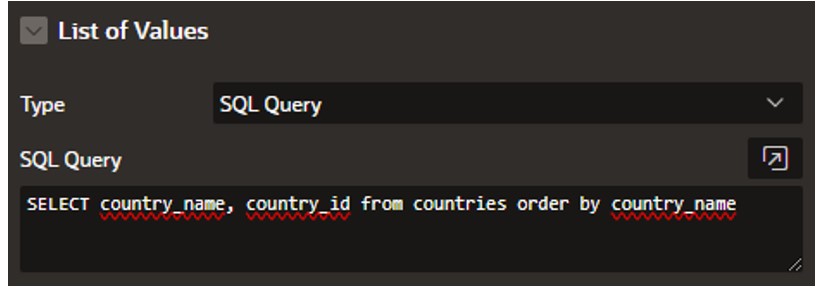
I've added a standard LOV SELECT statement as below for the List Of Values on the Combobox:
This is enough for the Combobox to be rendered on the page; however, we want to allow the end user to add their own values that will be stored in the database for future use. First, we need to create a button on the page that the end user can use to add the new value and leave the On Click event as "Submit Page". After, we now need to create a page process and add the following code:
DECLARE
   l_new_country_id       countries.country_id%TYPE;
BEGIN
   --
   SELECT MAX(country_id)+1
   INTO   l_new_country_id
   FROM   countries;
   --
   INSERT INTO countries (country_id, country_name)
   VALUES (l_new_country_id, :P2_MANUAL_ENTRIES);
   --
   :P2_MANUAL_ENTRIES := NULL;
   --
END;
For simplicity, I've selected the maximum current value and added one to get the new ID, but usually, you would use a sequence or the auto-increment table column option to ensure uniqueness, as well as maintain performance. Note that I've reset the hidden value to NULL at the end to ensure that the same value does not get added multiple times if the end user clicks the button again. You might also want to add validation to ensure that the end user can't add a value that is already present in the database.
I've created a button to add the new value, but this could be handled by a dynamic action or AJAX callback to improve the end user experience. Because this process is executed using standard APEX tools, it is possible to add server-side conditions to only permit authorised users the ability to add new values whilst still allowing all users the ability to select from the list.
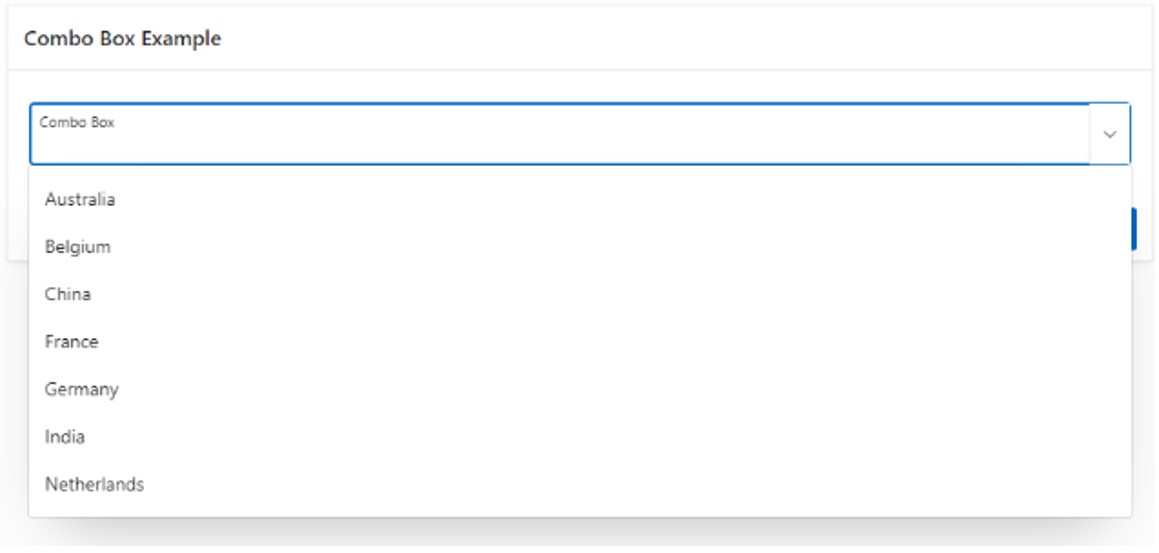
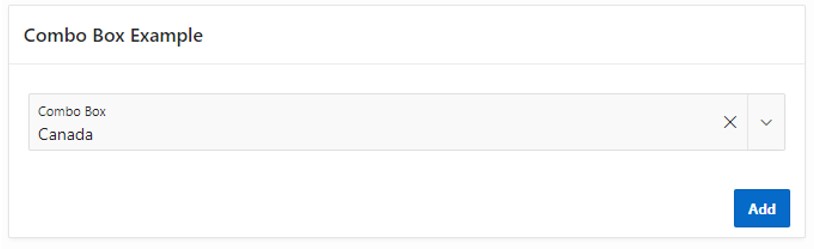
Running the page, you should see a Combobox with the list of countries. Typing into the Combobox automatically filters the list.
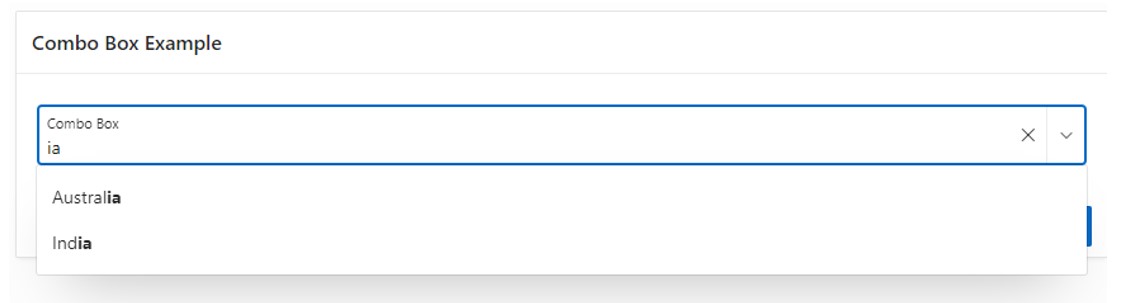
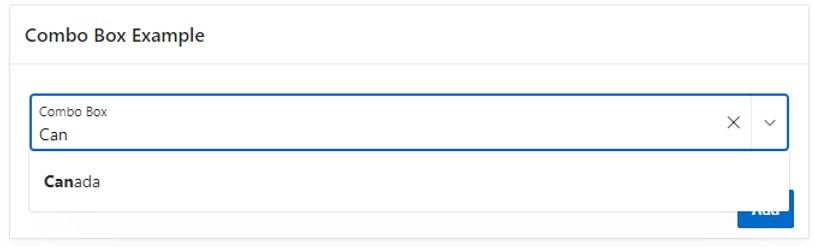
Now let's add a new value. Canada is not currently on the list, so type "Canada" in the Combobox and click the Add button. Once the screen refreshes, type the first three letters "Can" into the Combobox, and you should see that Canada has been added to the database and is displayed in the filtered list.
 Customising the Combobox

Remember those settings on the item properties from earlier? Well, here I'll explain what they do, as it's these properties that enable the power of the Combobox.
- Multiple Values – This switch converts the Combobox from a single selectable value to allowing several values to be selected. It's that easy!
- Multi Selection – This is only an option if Multiple Values is selected. It allows the end user to select several values using a checkbox instead of the filtered list being reset after selecting a single value, so data entry is much quicker.
- Match Type – This defaults to "Contains", which identifies matching values where the value typed by the end user exists somewhere within it. The other value of "Starts With" matches values that start with the typed value.
- Case Sensitive – Forces the match to ignore the case (default value) or to only match where the case matches as well as the typed value.
- Maximum Values In List – Numeric to only show the first n entries that match the typed-in value.
- Minimum Characters – Numeric to state how many characters the end user must type before the list of matching entries is shown. This is very useful for large lists that need reducing before being displayed.
- Fetch on Search – When turned off (default), this fetches all the values on the page load. When turned on, it performs a dynamic lookup for each character typed by the end user. For large lists, this can reduce the size of the data being downloaded by the device and, therefore, improve the initial load speed of the page.
- Manual Entries Item – The item on the page that will be used to add additional values. This would usually be a hidden item.
- HTML Expression – Used to apply HTML styling.
The number of options, coupled with the fact that this Combobox effectively replaces Select Lists, Popup LOV and to some extent, Shuttle (selecting multiple values), means that this new page item will probably end up being the go-to page item for all large list items in future, especially when you need the ability to add new values.
Image Upload
The new Image Upload page item allows for a more modern approach to images. Modern user interfaces allow users to preview the image being uploaded and adjust it if required. Even more so, users on mobile devices are used to taking a photo and uploading it directly to the application. These are all now available in the new Image Upload page item. Additionally, the old File Browse page item has been replaced with File Upload to unify the descriptions and to give you a better sense of when you should use each type.
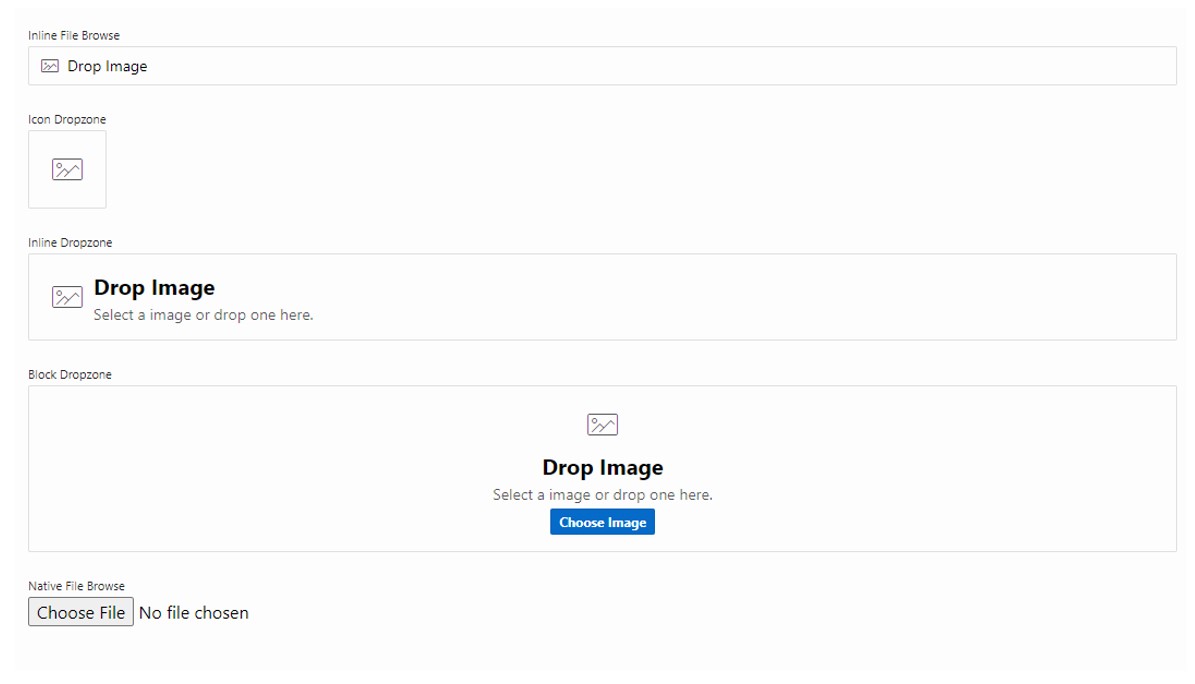
There are five types of image upload available to allow you to find a style that suites your application:
- Inline File Browse
- Icon Dropzone
- Inline Dropzone
- Block Dropzone
- Native File Browse
This is how those five different types look on the page:
By using the Storage Settings in the item properties, you can specify where the image will be stored. Similar to the file upload (which replaces file browse), this is in the APEX_APPLICATION_TEMPFILES table or a BLOB column on the table specified in the item source.
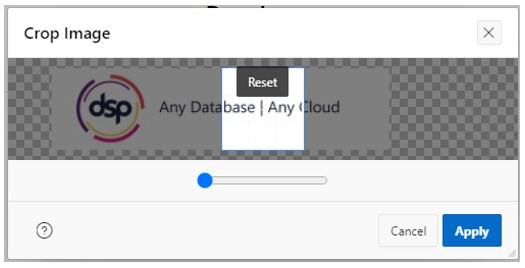
As I said earlier, the new Image Upload page item allows the end user to alter the image before upload, utilising the power of the device being used rather than the browser or server using custom routines. To enable this, set the "Allow Cropping" setting to on. You can also enforce an aspect ratio, which is very useful for images of a specific size, such as face images.

Now, when you drag and drop an image onto the Image Upload page item, a popup is displayed allowing the end user to amend the image to fit the aspect ratio specified by cropping and/or zooming the image as required. In the image below, I've used our DSP logo and strapline and set up the aspect ratio to square so you can see how this would look.
In the item properties, you can easily restrict the image size to prevent huge file sizes by setting the three properties: Maximum File Size, Maximum Width and Maximum Height. You do not need to enter all three properties. Entering a maximum width with an aspect ratio will also enforce a maximum height. Another property is to select the front or rear camera. This allows an end user on a mobile device to use the camera of their mobile phone or tablet to take a photo and upload it to the APEX application in one action.
The Image Upload is a welcome addition to the APEX Page Items. It brings a standard look and feel and provides additional powerful capabilities when dealing with end-user images.
QR Code Generator
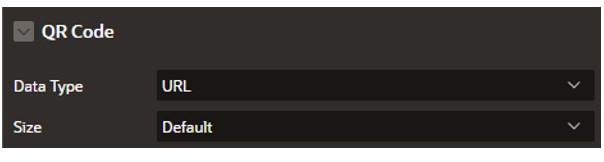
The final new page item introduced in APEX 23.2 is the QR Code Generator. This brings QR code generation native to APEX, previously only possible using third-party libraries. The page item allows you to render the QR Code in one of three sizes (small, medium or large) and allows for six different data types to be depicted by the QR Code (plain text, URL, phone, email, SMS or geolocation).
So, how do you get a QR Code into your application, rendered how you want it and linked to the data you would like the end user to use?
In Page Designer, you will find the new QR Code page item in the list of items, simply drag it to the location you want.
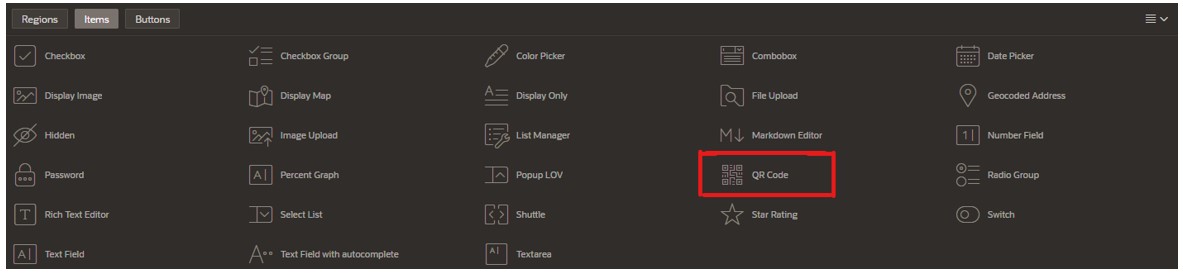
First, you will want to select the type of data that the QR Code will represent. In the new QR Code section of the item properties, choose the correct data type you will be using (in this example, I will be using a URL to our blog page).
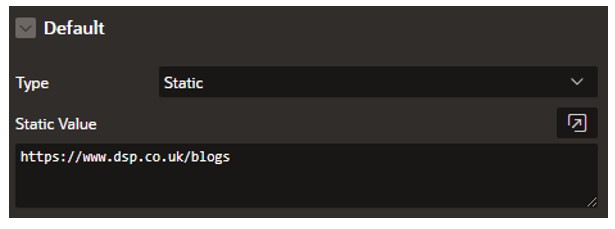
 Then, set the Default Type to "Static" and enter the data you want the QR Code to represent.
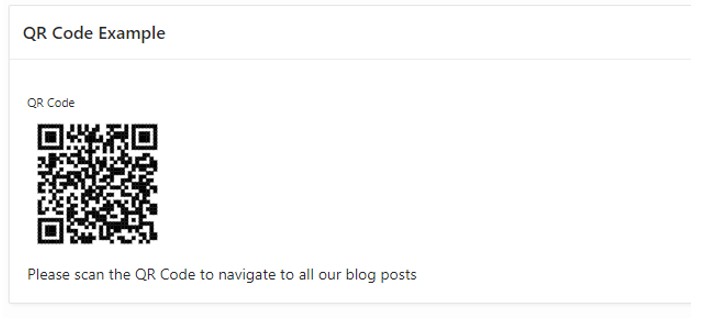
Now let's look at how this is displayed on our page. Run your page, and you should now see the QR Code.
Customisation
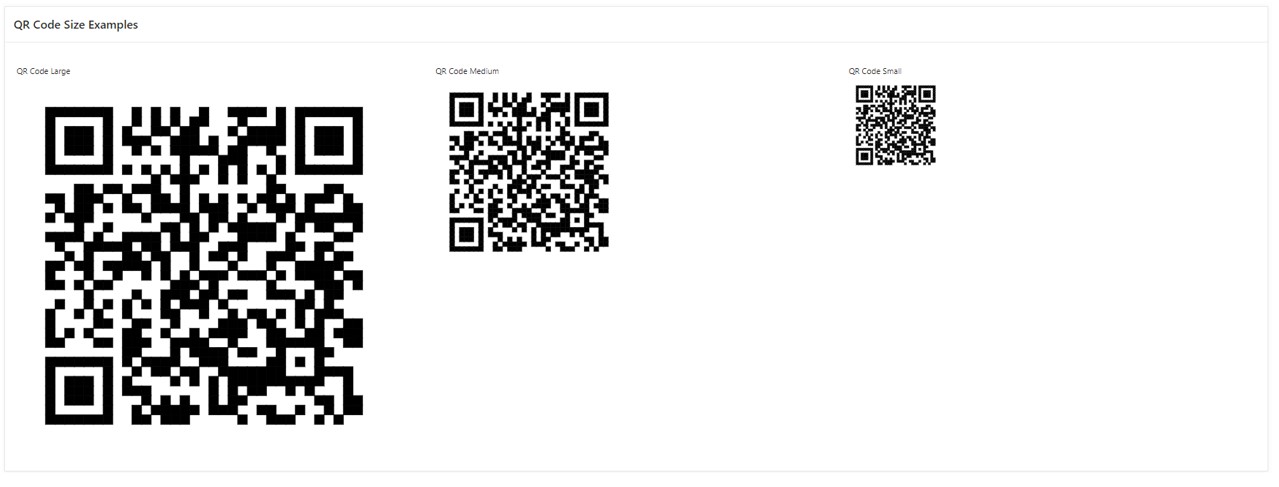
Once your QR Code is displayed where you want it, APEX provides some simple customisation options. The first is the size can be adjusted by selecting the size in the dropdown list of the "QR Code" section of the item properties. Here is a look at the different sizes on offer.
The size of the QR Code can also be controlled using a CSS variable, which will set the size of the small, medium and large QR Codes. It can also be used to set the size of an individual item through CSS. To do so, add the CSS to the inline page level CSS as follows.
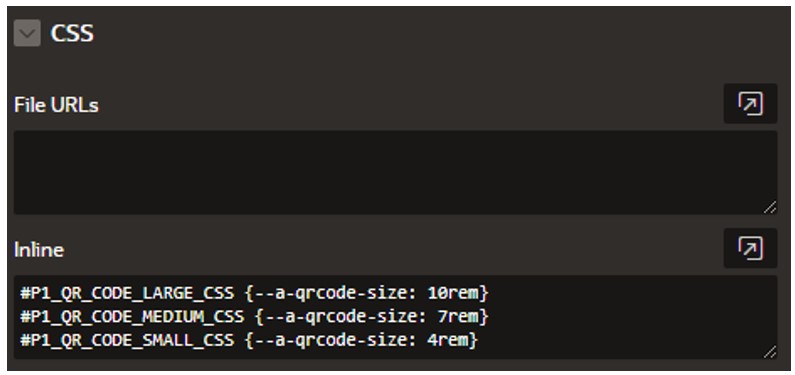
This will set the sizes of the large, medium and small QR Codes. In the example above, I have reduced the sizes, and you can see the difference with the originals above.

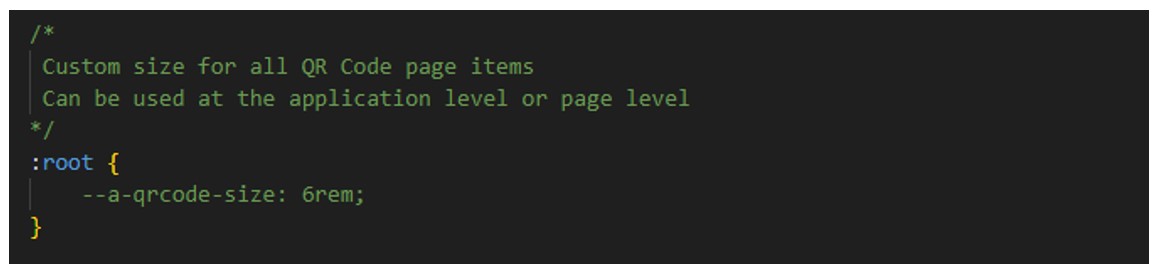
To amend all QR Code sizes, either on a page or at the application level, you can use the same CSS variable, but this time at the root. Adding this to the inline page CSS will affect QR Code items on a page. Adding it to an application-level CSS file will then amend all QR Codes throughout the application. There are two ways to set the sizes, either all QR Codes.
Or individual settings for the small, medium and large QR Codes.
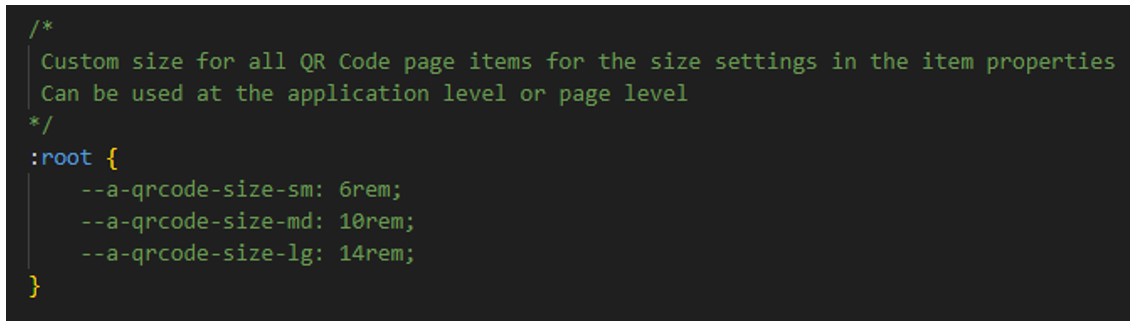
As you can see, this is a powerful but easy way to size the QR Code to your needs and can be applied to an individual QR Code, all large/medium/small QR Codes in an application or just those on an individual page.
PL/SQL Package
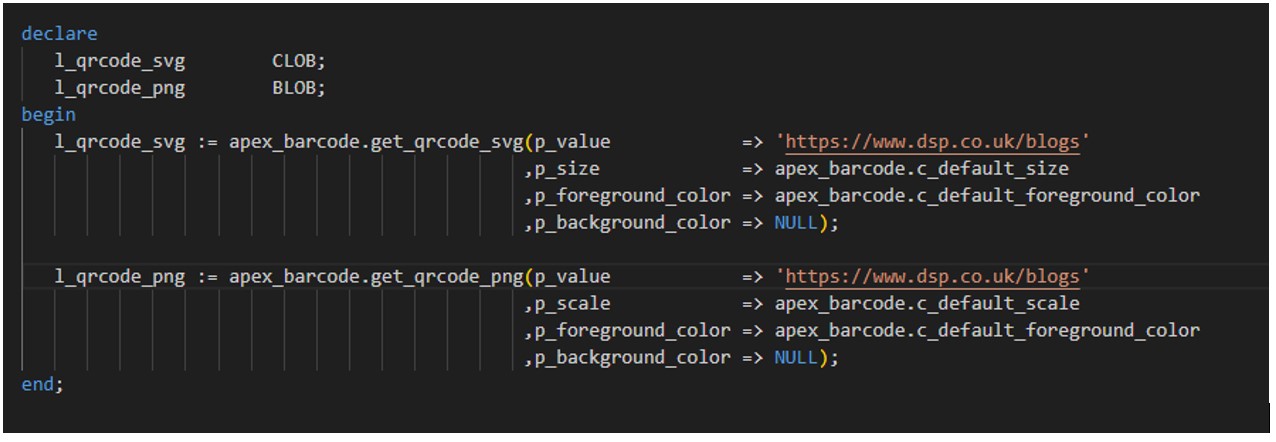
Along with the APEX page item, QR Codes can also be generated by calling the new PL/SQL package apex_barcode. Two different formats are generated through two functions: SVG for text-based QR Codes (returning a CLOB) and PNG for an image-based QR Code (returning a BLOB). These two functions accept a variety of parameters to customise the QR Code, including the ability to colour the QR Code, which is not available using the page item.
When generating the QR Codes, the available parameters are as follows:
- p_value - The value that you want the barcode to represent, with a maximum of 8 numbers, passed in as characters (VARCHAR2).
- p_size - Numeric value representing the size in pixels. The default value can be passed through using apex_barcode.c_default_size and represents 256 pixels, only used for SVG.
- p_quiet – Numeric value used to apply a blank border (represents pixel thickness) around the QR code to enable the scanner to identify the QR Code.
- p_eclevel – Character representing the error correction level.
- p_foreground_color - hexadecimal colour with the default value available as apex_barcode.c_default_foreground_color.
- p_background_color - hexadecimal colour with the default value available as apex_barcode.c_default_background_color.
Example code to generate QR Codes is as follows:
Additionally, this PL/SQL Package allows for two types of barcodes and a QR Code. These are Code 128 and EAN 8 and can be generated in SVG or PNG formats using a different function.
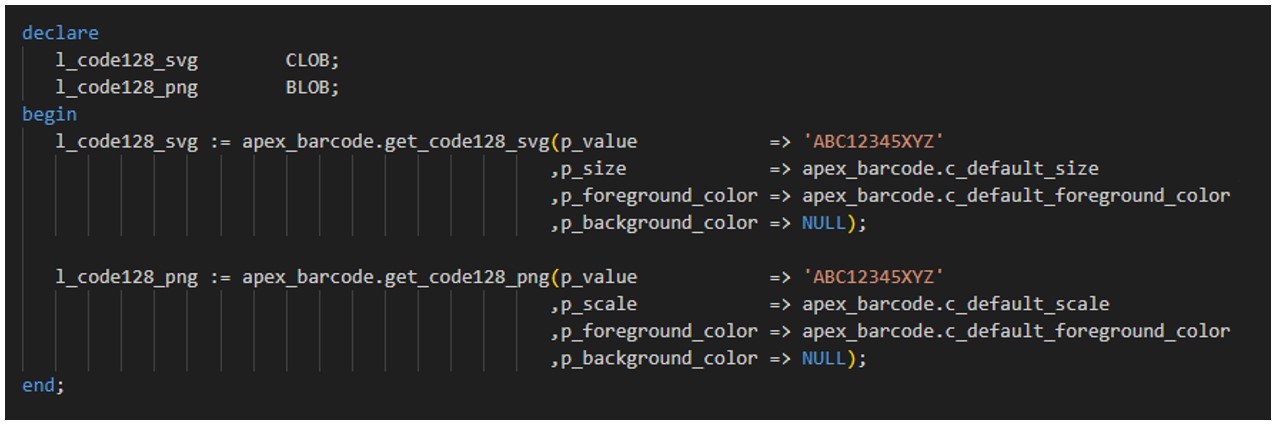
Code 128 is a widely used barcode format, and the available parameters are as follows:
- p_value - The value you want the barcode to represent, passed in as characters (VARCHAR2).
- p_size - Numeric value representing the size in pixels. The default value can be passed through using apex_barcode.c_default_size, only used for SVG.
- p_scale - Numeric value representing the number of times larger than the image will be rendered. The default value can be passed through using apex_barcode.c_default_scale, only used for PNG.
- p_foreground_color - hexadecimal colour with the default value available as apex_barcode.c_default_foreground_color.
- p_background_color - hexadecimal colour with the default value available as apex_barcode.c_default_background_color.
Example code for generating a Code 128 barcode is as follows:
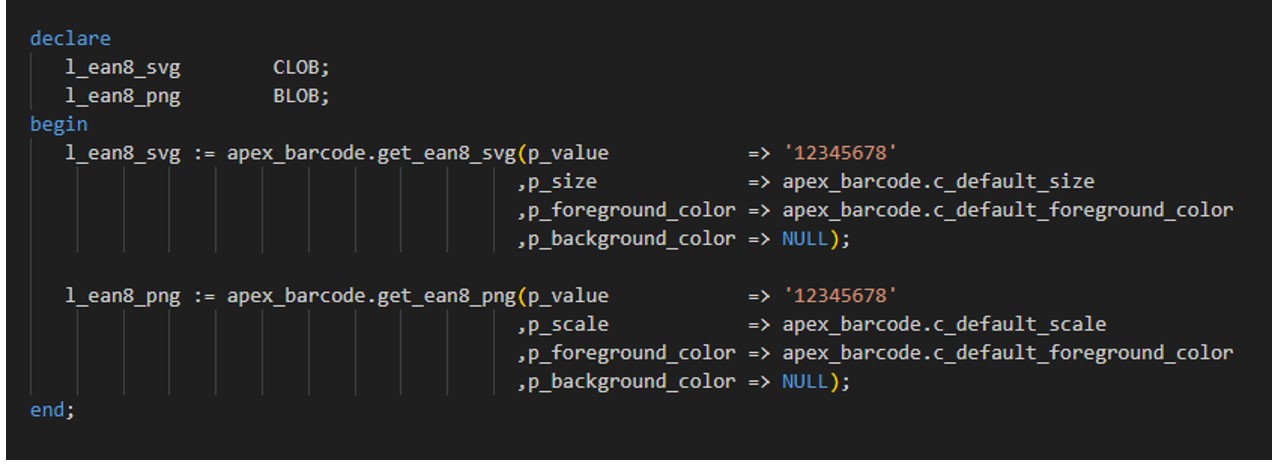
EAN 8 is a barcode format used to represent numerical data only and can only contain eight digits. The available parameters are:
- p_value - The value that you want the barcode to represent, with a maximum of 8 numbers, passed in as characters (VARCHAR2).
- p_size - Numeric value representing the size in pixels. The default value can be passed through using apex_barcode.c_default_size, only used for SVG.
- p_scale - Numeric value representing the number of times larger than the image will be rendered. The default value can be passed through using apex_barcode.c_default_scale, only used for PNG.
- p_foreground_color - hexadecimal colour with the default value available as apex_barcode.c_default_foreground_color.
- p_background_color - hexadecimal colour with the default value available as apex_barcode.c_default_background_color.
Example code for generating an EAN8 barcode is as follows:
Final Thoughts
The three new page items are welcome additions to the development toolset. Although these features already existed, they were only available through third-party plug-ins or custom code. Now that these are natively built into APEX, it brings a more standard look and feel for the end user and makes the development task straightforward and less time-consuming.
In future releases of APEX, it’s likely to see Oracle expand on these features, especially the QR Code page item, which would benefit from being able to generate the bar codes that the PL/SQL allows by adding additional options into the item properties.
For more information, check out our APEX services, and if you liked this blog, check out our other APEX blogs here.
Remember to follow us on LinkedIn. We publish insight blogs on the latest technology developments every week.