- About

Getting to know us
- Industries
Recent case study:
Oracle EBS Cloud Deployment
Consolidating and Migrating assets into Oracle Cloud Infrastructure.
.png?width=250&name=stonewater-logo%20(1).png)
Most Visited Pages
-
- Resources
DSP-Explorer acquires leading Oracle Applications Managed Services Provider, Claremont, to further extend its data management capabilities.

Resources
- Contact us
Integrating NetSuite with Oracle APEX
Contents
I recently worked on a project which involved generating a sales dashboard in APEX, for which the source data resided in NetSuite. There is a fair amount of documentation out there that deals with NetSuite APIs as well as, of course, restful services in Oracle, but a definitive guide to combining the two was not immediately forthcoming. I thought it would be useful to share my findings on this subject.
At a high level, I was required to access a number of reports that had been set up in NetSuite as ‘Saved Searches’ and pull the data into Oracle via APEX_WEB_SERVICE, by using a NetSuite Restlet script (in my case, JavaScript that calls a NetSuite saved search and returns the results as a JSON object). The results were either a single figure (e.g. a count of item sales in a given week) or a multi-column list (e.g. items and prices). A pl/sql package handled the conversion of the json results so I could store them in a collection and ultimately access them in APEX using sql.
NetSuite allows the use of oAuth1 and oAuth2 authentication. I actually ended up configuring both during the project, so I have shared the method for both below. I won’t go into the details of oAuth1 vs oAuth2 here as there is plenty of info already available, other than to say that while oAuth2 is more secure, it requires a certain level of manual intervention to keep the access tokens alive, which was not entirely practical for the nature of my project.

NetSuite setup
- A User account needs to be set up that represents the data consumer. When logged into this account, the URL will be something like https://12345678.app.netsuite.com/ where 12345678 is the NetSuite user-id allocated to the account. This value is used when accessing data via a web service call.
- An integration record must be set up for the NetSuite user, that allows oAuth1 token-based authentication and/or oAuth2 access (as required). A consumer key and a consumer secret will be generated at this point - make sure you take a record of these as they are not accessible after initial creation.
- For oAuth1 access and token must be then created against the integration record, a token key and token secret are generated at this point - make sure you take a record of these as they are not accessible after initial creation.
- Generate and deploy a Restlet .js script that will return the desire data. In our case, the code runs a NetSuite Saved Search and returns the results as a json object. It requires a parameter of ‘id’ that represents the id of the saved search (found when viewing saved searches in the front end) (see attached example). This will generate a script id and deploy id
OAuth1 approach - Postman
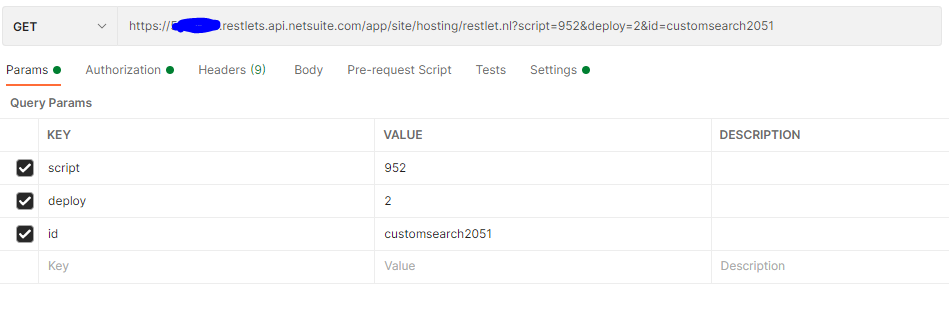
In Postman set up a Get request as below:
https://<netsuite_user_id>.restlets.api.netsuite.com/app/site/hosting/restlet.nl?script=<script_id>&deploy=<deploy_id>&id=<report_param>

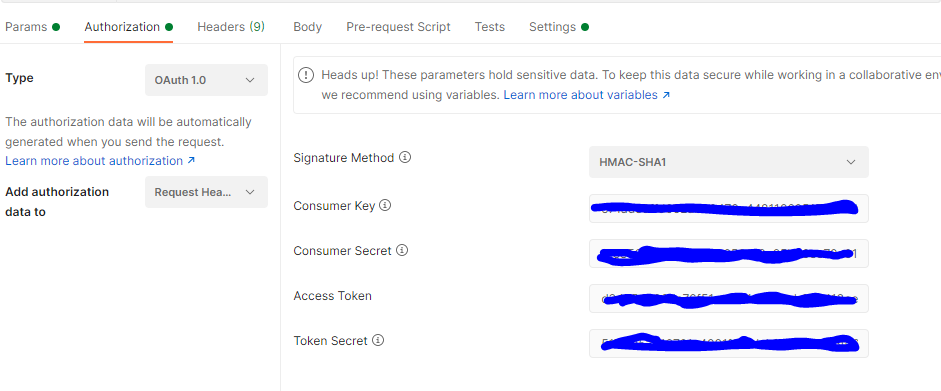
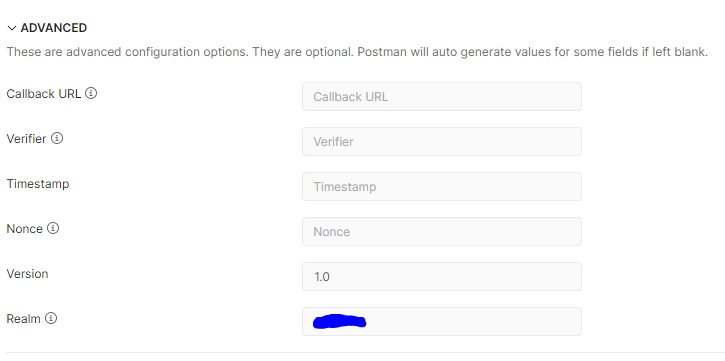
Note ‘Realm’ should be the NetSuite user id.
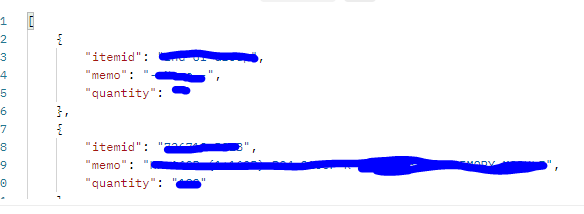
This should then return the results of the report in json format, e.g.
OAuth 1 - Oracle
In order to achieve the same thing via pl/sql, the code needs to replicate what postman does behind the scene with the token data. A unique signature is generated using a combination of the current time, a random ‘Nonce’ string and the token key and secret. The call will only work if the signature is generated properly. For testing purposes, you can use some static values (e.g. for current date/time) in postman and oracle and validate that the signature created is the same (in postman you can view the code of the web service call in jQuery, which shows the signature generated for a request).
Correctly generating this signature was by far the most challenging aspect of this configuration, as the process that postman follows to generate it based on it is not transparent. After a lot of googling and trial and error, I was able to generate the same signature out of both systems.
function get_data(p_script     IN number,
                  p_deploy     IN number,
                  p_search_id  IN varchar2) return CLOB IS

c_oauth_signature_method CONSTANT VARCHAR2(10) := 'HMAC-SHA1';
c_oauth_version CONSTANT VARCHAR2(5) := '1.0';

v_result                 CLOB;
v_script                 NUMBER;
v_deploy                 NUMBER;
v_search_id              VARCHAR2(32000);
v_oauth_consumer_key     VARCHAR2(500);
v_oauth_token            VARCHAR2(500);
v_oauth_secret           VARCHAR2(500);
v_oauth_nonce            VARCHAR2(500);
v_oauth_timestamp        VARCHAR2(100);
v_oauth_consumer_secret  VARCHAR2(500);
v_oauth_header           VARCHAR2(2000);
v_random                 varchar2(11);
v_oauth_signature        VARCHAR2(1000);
v_base_string            VARCHAR2(2000);

v_access_user  varchar2(20);

begin
  -- all parameters are stored in config and retrieved via a lookup function
  v_oauth_consumer_key := get_config_char_value(p_subtype => 'CLIENT_ID',                    p_type => 'AUTH');
  v_oauth_consumer_secret := get_config_char_value(p_subtype  => 'CLIENT_SECRET', p_type => 'AUTH');
  v_oauth_token := get_config_char_value(p_subtype => 'TOKEN', p_type => 'AUTH');
v_oauth_secret := get_config_char_value(p_subtype => 'TOKEN_SECRET', p_type => 'AUTH');
v_access_user := get_config_char_value(p_subtype => 'ACCESS_USER', p_type => 'AUTH');
-- RANDOM oauth_nonce
SELECT dbms_random.string('A', 11) INTO v_random FROM DUAL;
SELECT UTL_ENCODE.base64_encode(UTL_I18N.string_to_raw(v_random, 'AL32UTF8'))
INTO v_oauth_nonce
FROM DUAL;
SELECT (SYSDATE - TO_DATE('01-01-1970', 'DD-MM-YYYY')) * (86400)
INTO v_oauth_timestamp
FROM DUAL;
v_oauth_timestamp := substr(v_oauth_timestamp, 1, 10); v_base_string := 'GET' || chr(38) || 'https%3A%2F%2F' || v_access_user || '.restlets.api.netsuite.com%2Fapp%2Fsite%2Fhosting
%2Frestlet.nl' || chr(38) || 'deploy%3D' || p_deploy || '%26id%3D' || p_search_id || '%26oauth_consumer_key%3D' || v_oauth_consumer_key || '%26oauth_nonce%3D' || v_oauth_nonce || '%26oauth_signature_method%3D' || c_oauth_signature_method || '%26oauth_timestamp%3D' || v_oauth_timestamp || '%26oauth_token%3D' || v_oauth_token || '%26oauth_version%3D' || c_oauth_version || '%26script%3D' || p_script;
--generate the signature
select UTL_RAW.cast_to_varchar2(UTL_ENCODE.base64_encode( dbms_crypto.mac( UTL_I18N.STRING_TO_RAW(v_base_string,'AL32UTF8') ,DBMS_CRYPTO.HMAC_SH1 ,UTL_I18N.STRING_TO_RAW(v_oauth_consumer_secret ||chr(38) || v_oauth_secret, 'AL32UTF8')))) into v_oauth_signature from dual;
v_oauth_signature := replace(v_oauth_signature, '=', '%3D');
v_oauth_signature := replace(v_oauth_signature, '/', '%2F');
v_oauth_signature := replace(v_oauth_signature, '+', '%2B');

v_oauth_header := 'OAuth ' || 'realm="' || v_access_user || '"' || ', ' || 'oauth_consumer_key="' || v_oauth_consumer_key || '", ' || 'oauth_token="' || v_oauth_token || '", ' || 'oauth_signature_method="' || c_oauth_signature_method || '", ' || 'oauth_timestamp="' || v_oauth_timestamp || '", ' || 'oauth_nonce="' || v_oauth_nonce || '", ' || 'oauth_version="' || c_oauth_version || '", ' || 'oauth_signature="' || v_oauth_signature || '"';

APEX_WEB_SERVICE.g_request_headers.delete(); APEX_WEB_SERVICE.g_request_headers(1).name := 'Content-Type';
APEX_WEB_SERVICE.g_request_headers(1).value := 'application/json'; APEX_WEB_SERVICE.g_request_headers(2).name := 'Authorization'; APEX_WEB_SERVICE.g_request_headers(2).value := v_oauth_header;

v_result := APEX_WEB_SERVICE.make_rest_request(p_url=> 'https://' || v_access_user ||'.restlets.api.netsuite.com/app/site/hosting/restlet.nl?script=' || p_script ||chr(38) ||'deploy=' ||p_deploy ||chr(38) ||'id=' ||p_search_id, p_http_method => 'GET' );

RETURN v_result;

end;
OAuth 2 Postman
To get the initial token.
- execute the following in browser
https://<netsuite_user_id>.app.netsuite.com/app/login/oauth2/authorize.nl?scope=restlets&redirect_uri=https://localhost&response_type=code&client_id=<consumer_key>
- You should then be taken to a website that lets you click ok to authorise the application
- The result may be a page not found error next, but the URL should now have a code in it like:
44957bb819f680f74522f7123500f6faa1625bbasd123123120e179f4d11420eb7ae
- In postman, do a post request, auth type = basic (enter consumer id and secret), content type = application/x-www-form-urlencoded.
Add the following params into body:
code <code from step 3>
redirect_uri <same as in link in step 1, I used localhost>
grant_type = authorization_code

- Executing this will give you a bearer token and a refresh token e.g.
access_token
{
"access_token": "xxxxx",
"refresh_token": "xxxx",
"expires_in": "3600",
"token_type": "Bearer"
}
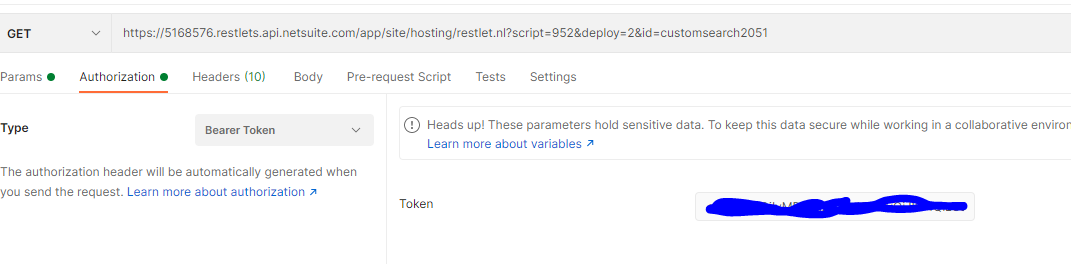
- You can then use the access token every time you call the service, to get you a valid refresh token to use via postman/apex_web_services:
The refresh token can then be used to access the data in the same way as with oAuth1, except the authorisation type is ‘Bearer Token’ (to which you enter the refresh token from above).
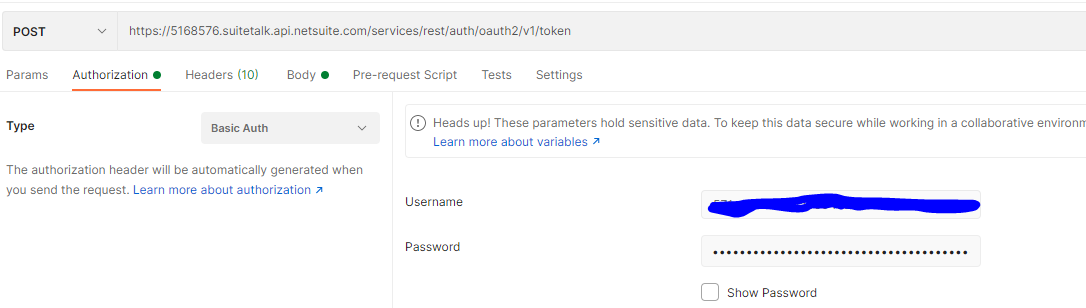
OAuth 2 Oracle
In oracle you must recreate this process to get the refresh token first – effectively this needs to happen every call as the refresh token expires after 60 mins. Note: The initial access token expires after 7 days and must be regenerated.
function get_refresh_token RETURN varchar2 IS
v_result         CLOB;
v_bearer         VARCHAR2(32000);
v_username       VARCHAR2(32000);
v_password       VARCHAR2(32000);
v_refresh_token  VARCHAR2(32000);
v_access_user    VARCHAR2(20);

BEGIN

v_username := get_config_char_value(p_subtype => 'CLIENT_ID', p_type => 'AUTH');
v_password := get_config_char_value(p_subtype => 'CLIENT_SECRET', p_type => 'AUTH');
v_refresh_token := get_config_char_value(p_subtype => 'REFRESH_TOKEN', p_type => 'AUTH');
v_access_user := get_config_char_value(p_subtype => 'ACCESS_USER', p_type => 'AUTH');

APEX_WEB_SERVICE.g_request_headers.delete(); APEX_WEB_SERVICE.g_request_headers(1).name := 'Content-Type';
APEX_WEB_SERVICE.g_request_headers(1).value := 'application/x-www-form-urlencoded';
v_result := APEX_WEB_SERVICE.make_rest_request(p_url => 'https://' || v_access_user || '.suitetalk.api.netsuite.com/services/rest/auth/
oauth2/v1/token', p_http_method => 'POST', p_username => v_username, p_password => v_password, p_parm_name => APEX_util.string_to_table('grant_type:refresh_token'), p_parm_value => APEX_util.string_to_table('refresh_token:' || v_refresh_token)); apex_json.parse(v_result); v_bearer := apex_json.get_varchar2(p_path => 'access_token');

RETURN v_bearer;

END;

function ws_get_data(p_key        IN CLOB,
                     p_script     IN number,
                     p_deploy     IN number,
                     p_search_id  IN varchar2) return CLOB IS

v_result CLOB;
v_access_user varchar2(20);

begin

v_access_user := get_config_char_value(p_subtype => 'ACCESS_USER', p_type => 'AUTH');

APEX_WEB_SERVICE.g_request_headers.delete(); APEX_WEB_SERVICE.g_request_headers(1).name := 'Content-Type';
APEX_WEB_SERVICE.g_request_headers(1).value := 'application/json'; APEX_WEB_SERVICE.g_request_headers(2).name := 'Authorization'; APEX_WEB_SERVICE.g_request_headers(2).value := 'Bearer ' || p_key;

-- Get the XML response from the web service.
v_result := APEX_WEB_SERVICE.make_rest_request(p_url => 'https://' || v_access_user || '.restlets.api.netsuite.com/app/site/hosting/restlet.nl?script=' || p_script || chr(38) || 'deploy=' || p_deploy || chr(38) || 'id=' || p_search_id, p_http_method => 'GET' );

RETURN v_result;

end;
Summary
The NetSuite API is really useful for accessing report data. Once you get through the intricacies of the web services calls, you can start embedding the data into your APEX application.
Author: Michael Pickering
Job Title: Oracle Development Consultant
Bio: Michael is a Development Consultant at DSP. Having attained an MSc in Computer-Based Information Systems, he began his career developing healthcare reporting solutions, before moving to specialise in Oracle Forms and Reports in the construction industry. Here at DSP, he is part of a highly skilled development team providing APEX development solutions and training to both UK and international businesses.