- About
Getting to know us
- Services
- Managed Services
- Application Services
- Cloud Services
- Data Science
- Consulting Services
- Technology Solutions
Managed Services
Application Services
Data Science
Consulting Services
Technology Solutions
- Industries
- Resources
Resources
- Contact
- Contact us
Exporting data Using APEX_DATA_EXPORT
Contents
What is APEX_DATA_EXPORT
APEX_DATA_EXPORT was introduced along with APEX_REGION.EXPORT_DATA in APEX 20.2, to allow developers to easily extract and download data. APEX_DATA_EXPORT allows various file formats to be exported, using SQL queries of varying complexity, to output data using only a few commands. In this blog, I will examine the process and cover the functionality that allows you to customise your output file, e.g. determining which columns to show/adding highlighting etc.
Constants and Data Types
There is an array of constants in APEX_DATA_EXPORT to aid in creating your code. There are export format constants such as c_format_xml or c_format_html. Alignment constants are used in the add_column, add_column_group and get_print_config methods. In the download procedure (mentioned further down), there are the constants c_attachment constant and c_inline. Lastly, there is an array of constants to set the printing configuration for your file, such as fonts or sizings.
All constants can be found here.
The datatypes associated with the procedure can be found here for reference.
Basic Example
Say, for example, it was requested that there would be a button on an APEX page that printed the name, title and contact type of all contacts in the EBA_CUST_CONTACTS table; you would use code like the below:
CREATE OR REPLACE PACKAGE BODY "APEX_DATA_EXPORT_DEMO" AS

   PROCEDURE download_contacts AS

       l_context apex_exec.t_context;

       l_export apex_data_export.t_export;

   BEGIN

       l_context := apex_exec.open_query_context(p_location => apex_exec.c_location_local_db, p_sql_query => 'SELECT name, title, company FROM eba_cust_contacts;'

       );

       l_export := apex_data_export.export(p_context => l_context, p_format => apex_data_export.c_format_pdf, p_file_name => 'Customer_Contacts'

       );

       apex_exec.close(l_context);

       apex_data_export.download(p_export => l_export);

   EXCEPTION

       WHEN OTHERS THEN

           apex_exec.close(l_context);

           RAISE;

   END;

END "APEX_DATA_EXPORT_DEMO";
In a basic APEX page, you could have a button that submits the page where a process calls the download_contacts procedure. This should then show the download dialog for your filesystem and allow you to download a PDF, which will look something like the below:
Additional APEX_DATA_EXPORT procedures
The APEX_DATA_EXPORT package has functionality that allows you to dynamically select the columns you will want in the export using ADD_COLUMN:
PROCEDURE ADD_COLUMN (
  p_columns             IN OUT NOCOPY t_columns,
  p_name                IN            apex_exec.t_column_name,
  p_heading             IN            VARCHAR2                  DEFAULT NULL,
  p_format_mask         IN            VARCHAR2                  DEFAULT NULL,
  p_heading_alignment   IN            t_alignment               DEFAULT NULL,
  p_value_alignment     IN            t_alignment               DEFAULT NULL,
  p_width               IN            NUMBER                    DEFAULT NULL,
  p_is_column_break     IN            BOOLEAN                   DEFAULT FALSE,
  p_is_frozen           IN            BOOLEAN                   DEFAULT FALSE,
  p_column_group_idx    IN            PLS_INTEGER               DEFAULT NULL );
If column groupings are required, you can do this via the ADD_COLUMN_GROUP procedure:
PROCEDURE ADD_COLUMN_GROUP (
    p_column_groups     IN OUT NOCOPY   t_column_groups,
    p_idx               OUT             PLS_INTEGER,
    p_name              IN              VARCHAR2,
    p_alignment         IN              t_alignment         DEFAULT c_align_center,
    p_parent_group_idx  IN              PLS_INTEGER         DEFAULT NULL );
Aggregations can be achieved quite easily using the ADD_AGGREGATE procedure:
PROCEDURE ADD_AGGREGATE(
  p_aggregates            IN OUT NOCOPY t_aggregates,
  p_label                 IN            t_label,
  p_format_mask           IN            VARCHAR2                  DEFAULT NULL,
  p_display_column        IN            apex_exec.t_column_name,
  p_value_column          IN            apex_exec.t_column_name,
  p_overall_label         IN            t_label                   DEFAULT NULL,
  p_overall_value_column  IN            apex_exec.t_column_name   DEFAULT NULL );
Highlighting can be done using the below procedure:
PROCEDURE ADD_HIGHLIGHT (
  p_highlights        IN OUT NOCOPY t_highlights,
  p_id                IN            pls_integer,
  p_value_column      IN            apex_exec.t_column_name,
  p_display_column    IN            apex_exec.t_column_name DEFAULT NULL,
  p_text_color        IN            t_color                 DEFAULT NULL,
  p_background_color  IN            t_color                 DEFAULT NULL );
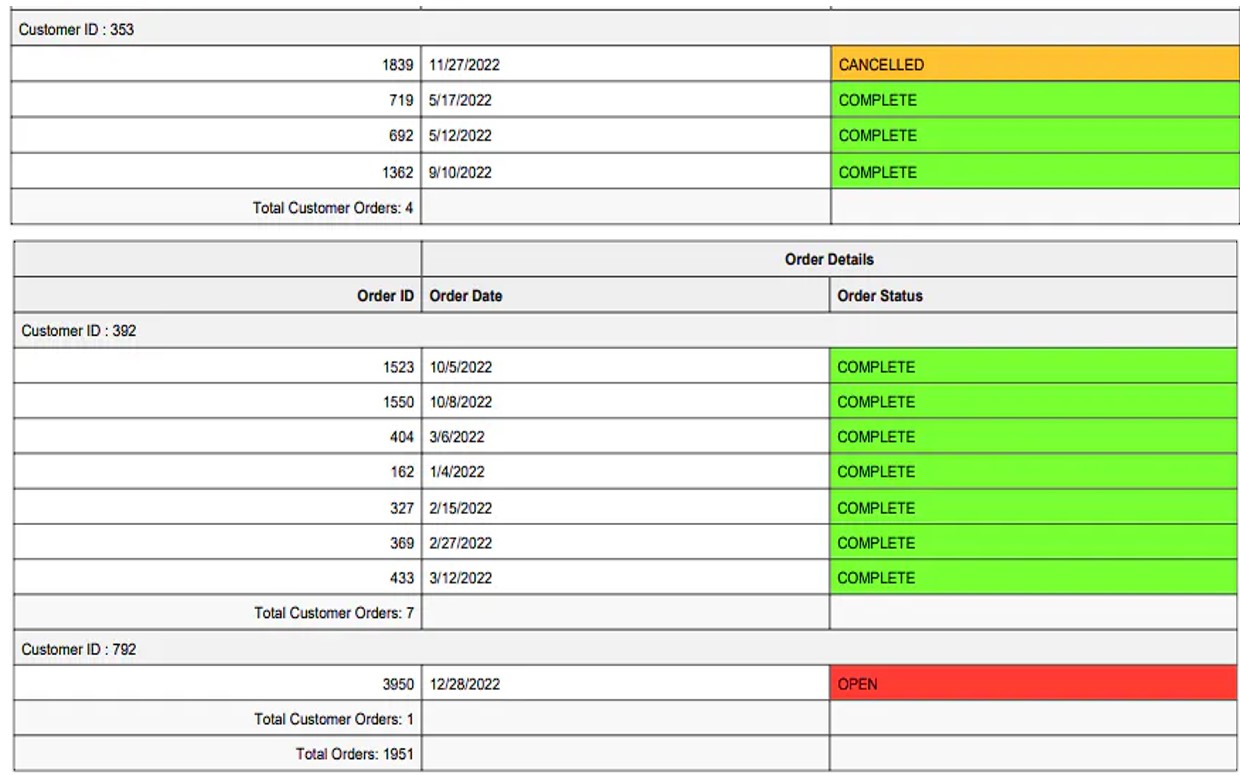
So, say, for example, it was requested to print a report with the following criteria:
- display all orders by customer, showing the order ID, order date, customer ID and order status with column headings included
- aggregate the number of orders per customer
- highlight any orders that are not complete with a different highlight for specific statuses
The following procedure should produce a report that meets the requested criteria. The column names in the select statement and how they are used in the different procedures should give an idea of their functionality.
PROCEDURE download_orders AS
      l_aggregates      apex_data_export.t_aggregates;
      l_columns         apex_data_export.t_columns;
      l_context         apex_exec.t_context;
      l_export          apex_data_export.t_export;
      l_column_groups   apex_data_export.t_column_groups;
      l_order_det_idx   pls_integer;
      l_highlights      apex_data_export.t_highlights;
    BEGIN
        l_context := apex_exec.open_query_context(
          p_location    => apex_exec.c_location_local_db,
          p_sql_query   => 'SELECT
                              customer_id,
                              order_id,
                              order_datetime,
                              order_status,
                              COUNT(order_id) OVER(PARTITION BY customer_id) AS ORDERS_PER_CUSTOMER,
                              COUNT(order_id) OVER() AS TOTAL_ORDERS,
                              CASE WHEN ORDER_STATUS = ''COMPLETE'' THEN 1
                                   WHEN ORDER_STATUS = ''OPEN'' THEN 2
                                   WHEN ORDER_STATUS = ''REFUNDED'' THEN 3
                                   WHEN ORDER_STATUS = ''CANCELLED'' THEN 4
                              END as ORDER_STATUS_HIGHLIGHT
                            FROM
                              orders
                            ORDER BY
                              customer_id;' );
        --COMPLETE
        apex_data_export.add_highlight(
          p_highlights          => l_highlights,
          p_id                  => 1,
          p_value_column        => 'ORDER_STATUS_HIGHLIGHT',
          p_display_column      => 'ORDER_STATUS',
          p_background_color    => '#7AFF33',
          p_text_color          => '#03021D');
        --OPEN
        apex_data_export.add_highlight(
          p_highlights          => l_highlights,
          p_id                  => 2,
          p_value_column        => 'ORDER_STATUS_HIGHLIGHT',
          p_display_column      => 'ORDER_STATUS',
          p_background_color    => '#FF3C33',
          p_text_color          => '#03021D' );
        --REFUNDED
        apex_data_export.add_highlight(
          p_highlights          => l_highlights,
          p_id                  => 3,
          p_value_column        => 'ORDER_STATUS_HIGHLIGHT',
          p_display_column      => 'ORDER_STATUS',
          p_background_color    => '#3F33FF',
          p_text_color          => '#03021D' );
        --CANCELLED
        apex_data_export.add_highlight(
          p_highlights          => l_highlights,
          p_id                  => 4,
          p_value_column        => 'ORDER_STATUS_HIGHLIGHT',
          p_display_column      => 'ORDER_STATUS',
          p_background_color    => '#FFC133',
          p_text_color          => '#03021D' );

        apex_data_export.add_aggregate(
            p_aggregates              => l_aggregates,
            p_label                   => 'Total Customer Orders:',
            p_display_column          => 'ORDER_ID',
            p_value_column            => 'ORDERS_PER_CUSTOMER',
            p_overall_label           => 'Total Orders:',
            p_overall_value_column    => 'TOTAL_ORDERS' );

        --Adding Order Details Group
        apex_data_export.add_column_group(
        p_column_groups   => l_column_groups,
        p_idx             => l_order_det_idx,
        p_name            => 'Order Details' );

        --Including a column break on customer ID
        apex_data_export.add_column(
          p_columns => l_columns,
          p_name => 'CUSTOMER_ID',
          p_heading => 'Customer ID',
          p_is_column_break => true );

        apex_data_export.add_column(
          p_columns => l_columns,
          p_name => 'ORDER_ID',
          p_heading => 'Order ID');

        apex_data_export.add_column(
          p_columns => l_columns,
          p_name => 'ORDER_DATETIME',
          p_heading => 'Order Date',
          p_column_group_idx    => l_order_det_idx);

        apex_data_export.add_column(
          p_columns => l_columns,
          p_name => 'ORDER_STATUS',
          p_heading => 'Order Status',
          p_column_group_idx    => l_order_det_idx);

        l_export := apex_data_export.export (
          p_context       => l_context,
          p_format        => apex_data_export.c_format_pdf,
          p_columns       => l_columns,
          p_aggregates    => l_aggregates,
          p_column_groups => l_column_groups,
          p_highlights    => l_highlights,
          p_file_name     => 'Customer_Orders_Run_On_' || TO_CHAR(SYSDATE, 'YYYY_MM_DD'));

        apex_exec.close( l_context );

        apex_data_export.download( p_export => l_export );

    EXCEPTION
      WHEN others THEN
          apex_exec.close( l_context );
          raise;
    END;
Producing the below PDF:
If you want row highlighting, leave out the p_display_column parameter from the apex_data_export.add_highlight code:

Passing in parameters
As part of setting the query context to be used in the apex export, parameters can be set using the ADD_PARAMETER procedure, which is part of the APEX_EXEC package:
PROCEDURE download_orders_parameter_example (
      in_cust_id in  orders.customer_id%type) AS

      l_aggregates      apex_data_export.t_aggregates;
      l_columns         apex_data_export.t_columns;
      l_context         apex_exec.t_context;
      l_export          apex_data_export.t_export;
      l_column_groups   apex_data_export.t_column_groups;
      l_order_det_idx   pls_integer;
      l_highlights      apex_data_export.t_highlights;
      l_parameters      apex_exec.t_parameters;
    BEGIN

        --Adding customer ID parameter
        apex_exec.add_parameter( l_parameters, 'CUST_ID', in_cust_id);

        l_context := apex_exec.open_query_context(
          p_location    => apex_exec.c_location_local_db,
          p_sql_query   => 'SELECT
                              customer_id,
                              order_id,
                              order_datetime,
                              order_status,
                              COUNT(order_id) OVER(PARTITION BY customer_id) AS ORDERS_PER_CUSTOMER,
                              COUNT(order_id) OVER() AS TOTAL_ORDERS,
                              CASE WHEN ORDER_STATUS = ''COMPLETE'' THEN 1
                                   WHEN ORDER_STATUS = ''OPEN'' THEN 2
                                   WHEN ORDER_STATUS = ''REFUNDED'' THEN 3
                                   WHEN ORDER_STATUS = ''CANCELLED'' THEN 4
                              END as ORDER_STATUS_HIGHLIGHT
                            FROM
                              orders
                            WHERE customer_id = :CUST_ID
                            ORDER BY
                              customer_id;',
          p_sql_parameters  => l_parameters);

        --COMPLETE
        apex_data_export.add_highlight(
          p_highlights          => l_highlights,
          p_id                  => 1,
          p_value_column        => 'ORDER_STATUS_HIGHLIGHT',
          p_display_column      => 'ORDER_STATUS',
          p_background_color    => '#7AFF33',
          p_text_color          => '#03021D');
        --OPEN
        apex_data_export.add_highlight(
          p_highlights          => l_highlights,
          p_id                  => 2,
          p_value_column        => 'ORDER_STATUS_HIGHLIGHT',
          p_display_column      => 'ORDER_STATUS',
          p_background_color    => '#FF3C33',
          p_text_color          => '#03021D' );
        --REFUNDED
        apex_data_export.add_highlight(
          p_highlights          => l_highlights,
          p_id                  => 3,
          p_value_column        => 'ORDER_STATUS_HIGHLIGHT',
          p_display_column      => 'ORDER_STATUS',
          p_background_color    => '#3F33FF',
          p_text_color          => '#03021D' );
        --CANCELLED
        apex_data_export.add_highlight(
          p_highlights          => l_highlights,
          p_id                  => 4,
          p_value_column        => 'ORDER_STATUS_HIGHLIGHT',
          p_display_column      => 'ORDER_STATUS',
          p_background_color    => '#FFC133',
          p_text_color          => '#03021D' );

        apex_data_export.add_aggregate(
            p_aggregates              => l_aggregates,
            p_label                   => 'Total Customer Orders:',
            p_display_column          => 'ORDER_ID',
            p_value_column            => 'ORDERS_PER_CUSTOMER',
            p_overall_label           => 'Total Orders:',
            p_overall_value_column    => 'TOTAL_ORDERS' );

        --Adding Order Details Group
        apex_data_export.add_column_group(
        p_column_groups   => l_column_groups,
        p_idx             => l_order_det_idx,
        p_name            => 'Order Details' );

        --Including a column break on customer ID
        apex_data_export.add_column(
          p_columns => l_columns,
          p_name => 'CUSTOMER_ID',
          p_heading => 'Customer ID',
          p_is_column_break => true );

        apex_data_export.add_column(
          p_columns => l_columns,
          p_name => 'ORDER_ID',
          p_heading => 'Order ID');

        apex_data_export.add_column(
          p_columns => l_columns,
          p_name => 'ORDER_DATETIME',
          p_heading => 'Order Date',
          p_column_group_idx    => l_order_det_idx);

        apex_data_export.add_column(
          p_columns => l_columns,
          p_name => 'ORDER_STATUS',
          p_heading => 'Order Status',
          p_column_group_idx    => l_order_det_idx);

        l_export := apex_data_export.export (
          p_context         => l_context,
          p_format          => apex_data_export.c_format_pdf,
          p_columns         => l_columns,
          p_aggregates      => l_aggregates,
          p_column_groups   => l_column_groups,
          p_highlights      => l_highlights,
          p_file_name       => 'Customer_Orders_Run_On_' || TO_CHAR(SYSDATE, 'YYYY_MM_DD'));

        apex_exec.close( l_context );

        apex_data_export.download( p_export => l_export );

    EXCEPTION
      WHEN others THEN
          apex_exec.close( l_context );
          raise;
    END;
Parameters can easily be set using Oracle page items for user input and pass them in during the Oracle APEX page process code, i.e.,
begin
  APEX_DATA_EXPORT_DEMO.download_orders_parameter_example(:P2_CUSTOMER_ID);
end;
Output:

It would certainly be beneficial to have a look at the APEX_EXEC documentation here for building export context.
Storing files in the database
This is also quite easy to do with the power of APEX_DATA_EXPORT. All you need to do is replace your apex_data_export.download code with something like:
insert into reports (report,filename,run_on) values (l_export.content_blob , l_export.file_name,sysdate);
The export return type apex_data_export.export is:
type t_export is record (
    file_name    varchar2(32767),
    format       t_format,
    mime_type    varchar2(32767),
    row_count    number,
    as_clob      boolean,
    content_blob blob,
    content_clob clob );
Additional Notes / Personal Picks
Changing report type
This can easily be implemented using PL/SQL logic, and with APEX, the user can select their preferred report type using page items, i.e., a radio group:
--variable declared of t_format type
l_report_format   apex_data_export.t_format;

--Setting format
IF upper(in_report_type) = 'P' THEN
            l_report_format := apex_data_export.c_format_pdf;
        ELSIF upper(in_report_type) = 'E' THEN
            l_report_format := apex_data_export.c_format_xlsx;
        ELSIF upper(in_report_type) = 'C' THEN
            l_report_format := apex_data_export.c_format_csv;
        ELSIF upper(in_report_type) = 'J' THEN
            l_report_format := apex_data_export.c_format_json;
        ELSIF upper(in_report_type) = 'X' THEN
            l_report_format := apex_data_export.c_format_xml;
        ELSIF upper(in_report_type) = 'H' THEN
            l_report_format := apex_data_export.c_format_html;
        END IF;

--l_report_format used in export procedure
l_export := apex_data_export.export(
          p_context => l_context,
          p_format => l_report_format,
          p_file_name => 'Customer_Contacts');
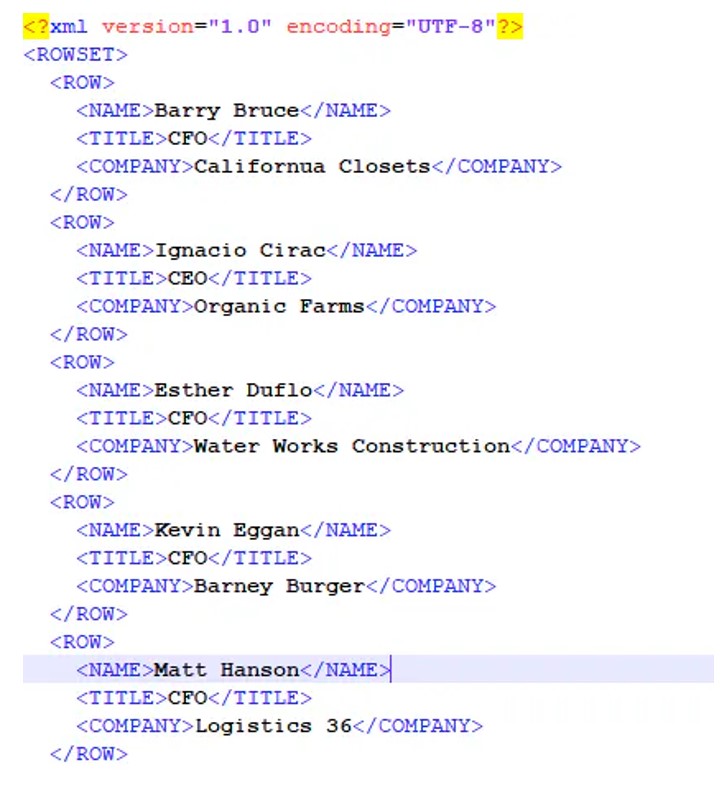
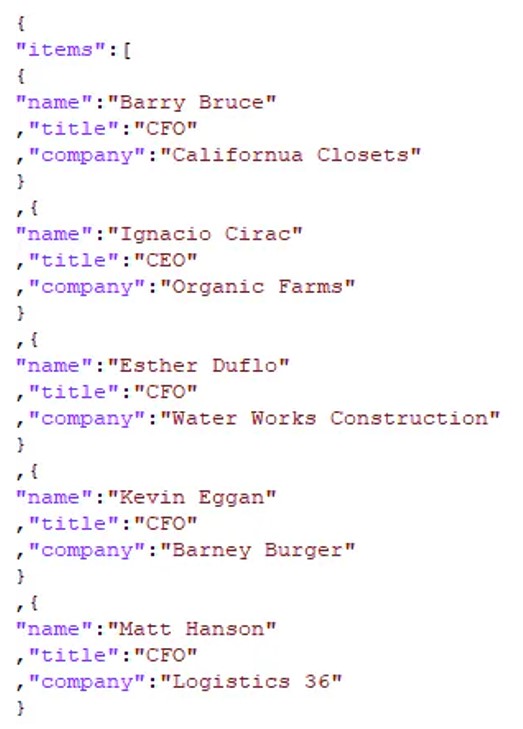
XML and JSON files are supported:
Supplemental Text
This can be used to add text to the top of the first page of the generated report and is done simply with another parameter on the export procedure:
p_supplemental_text => 'Customer Orders');
 GET_PRINT_CONFIG
This procedure is used to style your data export.
There are a lot of parameters for this procedure, which can be found here.
To give an example of some parameters, I have added the below code to my customer order's download:
--print config variable
l_print_config    apex_data_export.t_print_config;

--setting print configurations
l_print_config := apex_data_export.get_print_config(
          p_orientation       => apex_data_export.c_orientation_landscape,
          p_border_width      => 2,
          p_page_footer       => 'Footer Text',
          p_body_font_family  => apex_data_export.c_font_family_times
          );

--add the variable to the export call:
p_print_config    => l_print_config,
Content-Disposition
Content-Disposition is part of the download procedure:
PROCEDURE DOWNLOAD (
    p_export                IN OUT NOCOPY t_export,
    p_content_disposition   IN t_content_disposition    DEFAULT c_attachment,
    p_stop_apex_engine      IN BOOLEAN                  DEFAULT TRUE );
Using the below constants:
- c_attachment constant t_content_disposition := 'attachment'; - This will open a download dialog
- c_inline constant t_content_disposition := 'inline'; - This will open your document in your current browser window
Additional Benefits
- The functionality available within the Oracle database means things like report scheduling or sending reports in emails can be easily carried out
- Running multiple reports quickly
- When downloading reports, code can be called outside of an APEX app, i.e., using ORDS, which can be done using APEX_SESSION.CREATE_SESSION and using 'p_stop_apex_engine;' in your download procedure call:
  PROCEDURE DOWNLOAD (
      p_export                IN OUT NOCOPY t_export,
      p_content_disposition   IN t_content_disposition    DEFAULT c_attachment,
      p_stop_apex_engine      IN BOOLEAN                  DEFAULT TRUE );
Troubleshooting
- If no download occurs, but the code executes without any errors, it may be that you are running the procedure through a dynamic action rather than a process
- Ensure you have set the below page setting to 'Always' or that you are executing the download code through a 'before header' process.
If neither option suits your current page, you could always download through a modal popup window.
Feel free to reference the official Oracle Docs for more info.
Other options for exporting data
Check out the below blogs written by the DSP team covering this area, including the export of reports via REST or printing from Oracle APEX report regions displayed on the page:
Summary
APEX_DATA_EXPORT is an asset for any APEX user seeking to export data from their applications. Its powerful capabilities, user-friendly interface, extensive customisation options, and support for large datasets make it an indispensable tool for analysis, reporting, and backup tasks. Whether you are a business analyst, a data scientist, or an IT professional, APEX_DATA_EXPORT simplifies the data export process, empowering you to unlock the full potential of your application data.
Also, on the topic of report generation, there were teasers of a JSON to PDF document generator called DocGen. This was recently shown at Oracle Cloudworld 2023. Depending on the complexity of the templates allowed, this could be a game changer for generating reports through Oracle.
For more information, check out our APEX services, or get in touch with our experts today. If you liked this blog, check out our other APEX blogs here.
Remember to follow us on LinkedIn. We publish insight blogs on the latest technology developments every week.

.png?width=250&name=stonewater-logo%20(1).png)


