- About

Getting to know us
- Industries
Recent case study:
Oracle EBS Cloud Deployment
Consolidating and Migrating assets into Oracle Cloud Infrastructure.
.png?width=250&name=stonewater-logo%20(1).png)
Most Visited Pages
-
- Resources
DSP-Explorer acquires leading Oracle Applications Managed Services Provider, Claremont, to further extend its data management capabilities.

Resources
- Contact us
ORDS, OAuth2 & Web Services in APEX – Part 3
Contents
Calling Web Services from APEX
The following blog will show you how to call GET method Web Service from an APEX 5.1 application and extract the response data. It will also show you how to authenticate calls to protected Web Services and how to process paginated JSON response data. Typically the Web Services would be external, however to keep things simple and consistent we will build upon the ones we created in the first two parts of this blog. Before you read on you can find out more about our APEX Services here.
Enhancements to the previously created Web Services
We previously created five Web Services over the EMP and DEPT tables and added OAuth2 Authentication. Before we begin we are going to add a further two GET method handlers that use no pagination. We will also update the items returned per page of the original Employees GET method to five and set the department number parameter to be passed in using the HTTP header rather than in the URI.
Login to your ORDSDEMO schema (created in part 1) and run the following PL/SQL.
DECLARE
 la_priv_patterns owa.vc_arr;
BEGIN
 ords.define_template(p_module_name => 'hr.v1',
                      p_pattern     => 'all_departments',
                      p_comments    => 'All Departments');
 ords.define_template(p_module_name => 'hr.v1',
                      p_pattern     => 'all_employees',
                      p_comments    => 'All Employees');
 ords.define_handler(p_module_name     => 'hr.v1',
                     p_pattern         => 'all_departments',
                     p_method          => 'GET',
                     p_source_type     => ords.source_type_query,
                     p_source          => 'SELECT deptno, dname, loc FROM dept ORDER BY deptno',
                     p_items_per_page  => 0,
                     p_comments        => 'List all departments');
 ords.define_handler(p_module_name  => 'hr.v1',
                       p_pattern      => 'all_employees',
                     p_method       => 'GET',
                     p_source_type  => ords.source_type_query,
                     p_source       => 'SELECT d.dname, e.ename, e.job, e.empno, e.hiredate, d.loc
                                       FROM emp e, dept d
                                       WHERE e.deptno = d.deptno
                                       AND (:pn_deptno IS NULL OR d.deptno = :pn_deptno)
                                       ORDER BY d.dname, e.ename',
                     p_items_per_page => 0,
                     p_comments       => 'List all employees');
 ords.define_handler(p_module_name    => 'hr.v1',
                     p_pattern        => 'employees',
                     p_method         => 'GET',
                     p_source_type    => ords.source_type_query,
                     p_source         => 'SELECT d.dname, e.ename, e.job, e.empno, e.hiredate, d.loc
                                         FROM emp e, dept d
                                         WHERE e.deptno = d.deptno
                                         AND (:pn_deptno IS NULL OR d.deptno = :pn_deptno)
                                         ORDER BY d.dname, e.ename',
                     p_items_per_page => 5,
                     p_comments       => 'List employees');
 ords.define_parameter(p_module_name        => 'hr.v1',
                       p_pattern            => 'all_employees',
                       p_method             => 'GET',
                       p_name               => 'department_number',
                       p_bind_variable_name => 'pn_deptno',
                       p_source_type        => 'HEADER',
                       p_param_type         => 'INT',
                       p_access_method      => 'IN',
                       p_comments => 'Restrict employees to a single department');
 ords.define_parameter(p_module_name        => 'hr.v1',
                       p_pattern            => 'employees',
                       p_method             => 'GET',
                       p_name               => 'department_number',
                       p_bind_variable_name => 'pn_deptno',
                       p_source_type        => 'HEADER',
                       p_param_type         => 'INT',
                       p_access_method      => 'IN',
                       p_comments           => 'Restrict employees to a single department');

 la_priv_patterns(1) := '/hr/v1/all_employees';
 ords.create_privilege_mapping(p_privilege_name => 'employee.privilege',
                               p_patterns       => la_priv_patterns);

COMMIT;
END
You will now have two additional GET method Web Services.
- all_departments, non-paginated GET method Web Services returning all departments in JSON format.
- all_employees, non-paginated GET method Web Services returning all employees (optionally for a named department) in JSON format. Protected using OAuth2.
Access Web Services from APEX
There are currently two methods of accessing a Web Service within APEX.
- Define using Web Services References within the Data References section of Shared Components and access via a Web Service page process.
- Access directly using the apex_web_service PL/SQL API.
The following examples are calling Web Services running on a local XE installation via port 8081; therefore, all of the URLs will start with http://localhost:8081/ords/. Update this part of the URL to reflect your configuration.
Accessing a GET method Web Service using Web Services References
To get started we need to create a new APEX application. Log into the application builder and create a new desktop application called ‘Web Service Demo’. Accept all the defaults and add a blank home page.
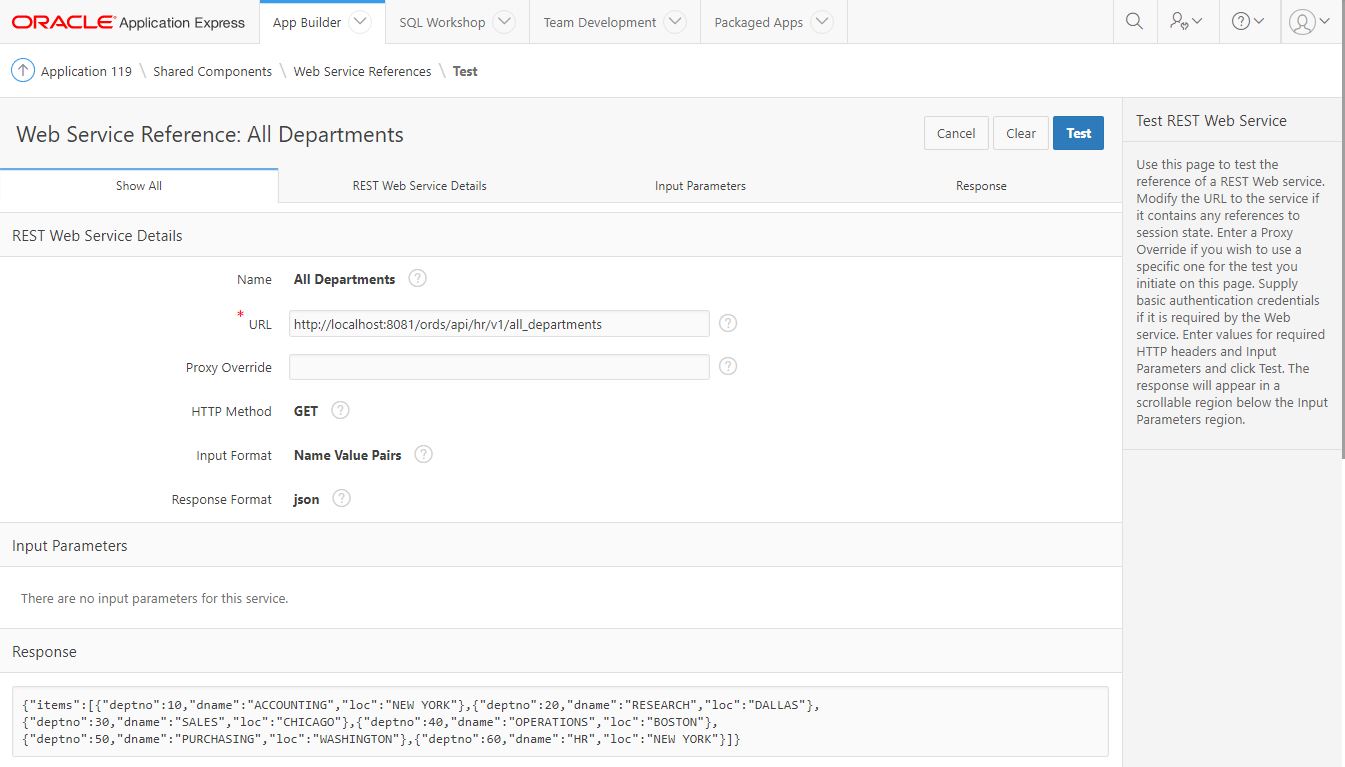
Navigate to shared components and click on Web Service Reference within the Data References section, then follow these steps to define the request for the all_departments Web Service.
1. Click Create.
2. Keep the default type of REST selected and press Next.
3. Enter the following values for the REST details and press Next.
| Name | All Departments |
| URL | http://localhost:8081/ords/api/hr/v1/all_departments |
| HTTP Method | GET |
| Basic Authentication | No |
4. We do not need any REST Inputs so press Next.
5. Set the REST output type to JSON and press Create.
Now the Web Service Reference has been defined we can use it as the source for an interactive report. Create a new blank page (2) called ‘Departments – WSR’, selecting the options within the wizard to include breadcrumb and navigation links.
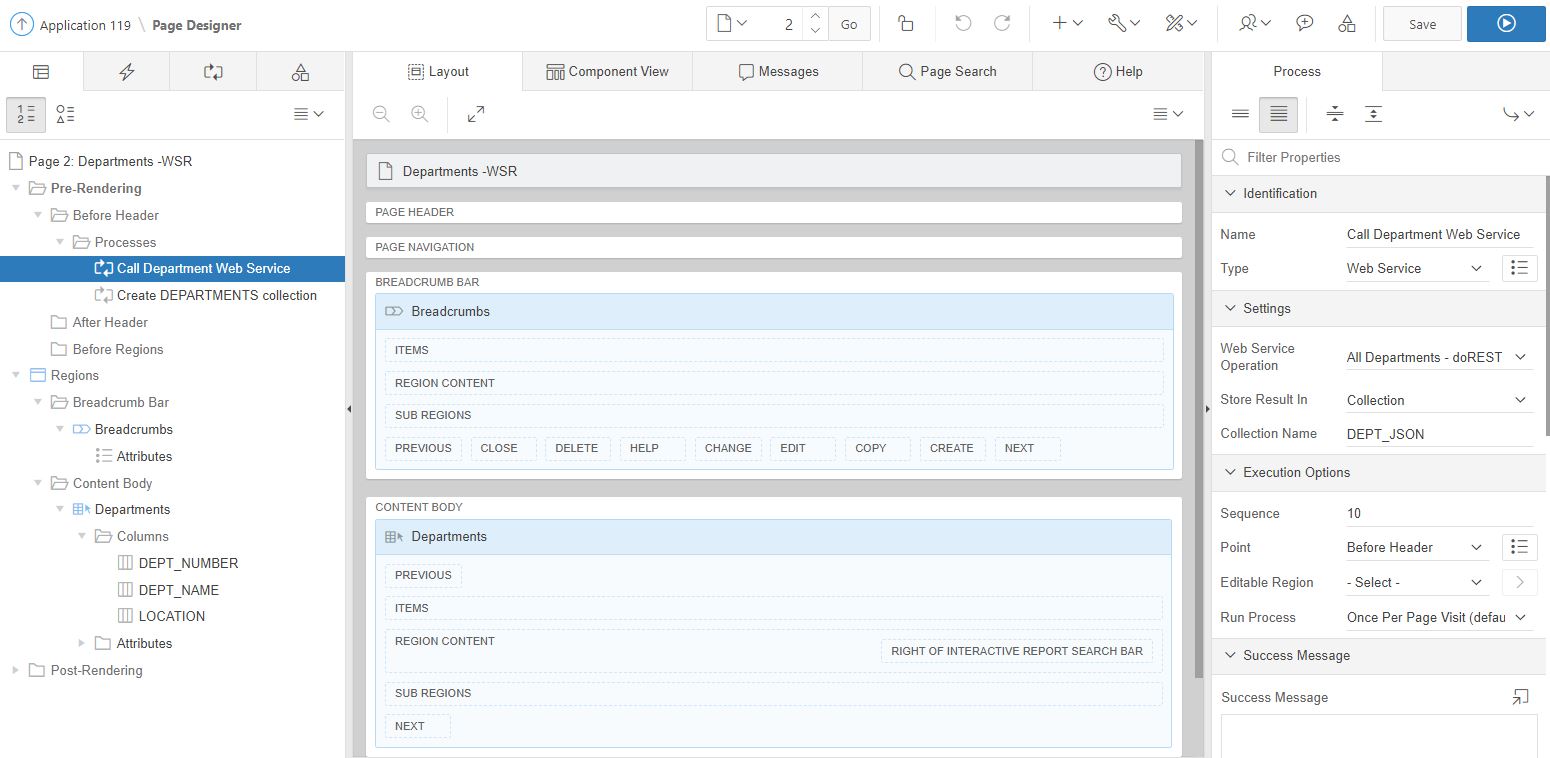
Navigate to page 2 and follow these steps to add two process, one to call the Web Service and another to add the returned data into a collection for the interactive report.
1. Right-click on Before Header within Rendering > Pre-Rendering.
2. Select ‘Create Process’ and enter the following properties.
| Name | Call Department Web Service |
| Type | Web Service |
| Web Service Operation | All Departments – doREST |
| Store Result in | Collection |
| Collection Name | DEPT_JSON |
| Store Result in | Collection |
| Sequence | Collection |
3. Create a second process using the following properties.
| Name | Create DEPARTMENTS collection |
| Type | PL/SQL Code |
| PL/SQL Code | See step 4 |
| Sequence | 20 |
4. Use the following PL/SQL code for the second process to get the Web Service response data and use it to create a new DEPARTMENTS collection for the interactive report to query.
DECLARE
 lc_data CLOB;
 lj_depts apex_json.t_values;
BEGIN
 -- Extract JSON data from DEPT_JSON collection populated by Web Service call
 SELECT clob001
 INTO lc_data
 FROM apex_collections
 WHERE collection_name = 'DEPT_JSON';

-- Parse the JSON data
 apex_json.parse(lj_depts, lc_data);

 -- Loop through each department in the JSON data and add to a new collection
 apex_collection.create_or_truncate_collection('DEPARTMENTS');
 FOR dept_loop IN 1 .. apex_json.get_count(p_path => 'items', p_values => lj_depts) LOOP
   apex_collection.add_member(p_collection_name => 'DEPARTMENTS',
                              p_c001            => apex_json.get_varchar2(p_path   => 'items[%d].deptno',
                                                                          p0       => dept_loop,
                                                                          p_values => lj_depts),
                              p_c002            => apex_json.get_varchar2(p_path   => 'items[%d].dname',
                                                                          p0       => dept_loop,
                                                                          p_values => lj_depts),
                              p_c003            => apex_json.get_varchar2(p_path   => 'items[%d].loc',
                                                                          p0       => dept_loop,
                                                                          p_values => lj_depts));
 END LOOP;
END;
The final step is to add an interactive report region to the page using the DEPARTMENTS collection as the source.
1. Add an Interactive Report region to the CONTENT BODY of the page.
2. Set the title to ‘Departments’.
3. Enter the following for the SQL Query.
SELECT c001 dept_number,
       c002 dept_name,
       c003 location
FROM apex_collections
WHERE collection_name = 'DEPARTMENTS'
4. Press Save.
You now have a page with two before header processes, a breadcrumb region and an interactive report region.
Now run the page, the first process calls the Web Service and stores the JSON formatted response containing the department data into the CLOB column of the DEPT_JSON collection. The second process extracts the data held in the CLOB, parses it using apex_json.parse and the loops through each row in turn to build the DEPARTMENTS collection.
The interactive report region then executes a simple query on the apex_collections table.
Accessing a GET method Web Service using apex_web_service
An alternative to defining the Web Services within shared components is to use the apex_web_service PL/SQL API.
Create a new blank page (3) called ‘Departments – API’ selecting the options to include the breadcrumb and navigation links. Add a Before Header process using the following properties.
1. Right-click on Before Header within Rendering > Pre-Rendering.
2. Select ‘Create Process’ and enter the following properties.
| Name | Create DEPARTMENTS collection from Web Service |
| Type | PL/SQL Code |
| PL/SQL Code | See step 3 |
| Sequence | 10 |
3. Use the following PL/SQL Code for the process to call the Web Service and add the data to a new collection called DEPARTMENTS2.
DECLARE
 lc_data CLOB;
 lj_depts apex_json.t_values;
BEGIN
 -- Call the Web Service and store the JSON formatted response into a CLOB
 lc_data := apex_web_service.make_rest_request(
                           ' http://localhost:8081/ords/api/hr/v1/all_departments','GET');

-- Parse the JSON data
 apex_json.parse(lj_depts, lc_data);

 -- Loop through each department in the JSON data and add to a new collection
 apex_collection.create_or_truncate_collection('DEPARTMENTS2');
 FOR dept_loop IN 1 .. apex_json.get_count(p_path => 'items', p_values => lj_depts) LOOP
   apex_collection.add_member(p_collection_name => 'DEPARTMENTS2',
                              p_c001            => apex_json.get_varchar2(p_path   => 'items[%d].deptno',
                                                                          p0       => dept_loop,
                                                                          p_values => lj_depts),
                              p_c002            => apex_json.get_varchar2(p_path   => 'items[%d].dname',
                                                                          p0       => dept_loop,
                                                                          p_values => lj_depts),
                              p_c003            => apex_json.get_varchar2(p_path   => 'items[%d].loc',
                                                                          p0       => dept_loop,
                                                                          p_values => lj_depts));
 END LOOP;
END;
4. Add an Interactive Report region named ‘Departments’ to the CONTENT BODY area using the following query.
SELECT c001 dept_number,
 c002 dept_name,
 c003 location
FROM apex_collections
WHERE collection_name = 'DEPARTMENTS2'
5. Save and run the page.
When the page runs, the process calls the Web Service using the apex_web_service API and stores the response into a CLOB. The process then parses the CLOB and loops through each row to populate the DEPARTMENTS2 collection. The interactive report then executes a query on the apex_collections table.
Accessing a GET method Web Service protected with OAuth2 via Web Services References
To access an OAuth 2.0 protected Web Service we need a valid access token to pass in the HTTP header, which is generated using a client id and secret. Use the following PL/SQL to create a function within the ORDSDEMO schema to return the client credentials. If your APEX application is in a different schema you will need to grant EXECUTE privileges on the procedure.
CREATE OR REPLACE PROCEDURE get_client_credentials(pv_name IN user_ords_clients.name%TYPE,
                                                   pv_id_o OUT user_ords_clients.client_id%TYPE,
                                                   pv_secret_o OUT user_ords_clients.client_secret%TYPE)
IS
 CURSOR c_client IS
   SELECT client_id, client_secret
   FROM user_ords_clients
   WHERE NAME = pv_name;

vr_client c_client%ROWTYPE;
BEGIN
 OPEN c_client;
 FETCH c_client
 INTO vr_client;
 CLOSE c_client;
 pv_id_o     := vr_client.client_id;
 pv_secret_o := vr_client.client_secret;
END get_client_credentials;
Navigate to shared components, click on Web Service Reference and create a second entry using the following steps.
1. Click on Create.
2. Keep the default type of REST selected and press Next.
3. Enter the following values for the REST details and press Next.
| Name | All Employees |
| URL | http://localhost:8081/ords/api/hr/v1/all_employees |
| HTTP Method | GET |
| Basic Authentication | No |
| HTTP Request Header > Name (1) | Authorization |
| HTTP Request Header > Name (2) | department_number |
4. We do not need any REST Inputs, so press Next.
5. Set the REST output type to JSON and press Create.
At this stage, we cannot test the Web Service without a valid access token as it is protected.
Now we have created a procedure to return the client credentials and added a Web Service Reference to return all employees we need to add a page to use them. Create a new blank page (4) called ‘Employees – WSR’ and follow these steps to add the various regions, items and processes.
1. Add a Standard region called ‘Department’ and add the following two hidden items.
a. P4_CLIENT_ID
b. P4_CLIENT_SECRET
2. Add a select list item called P4_DEPT_NO to the region using the following properties.
| Name | P4_DEPT_NO |
| Type | Select List |
| Label | Department |
| List of Values | – |
| Type | SQL Query |
| SQL Query | SELECT dname, deptno FROM ordsdemo.dept ORDER BY dname |
| Display NULL value | Yes |
| Null Display Value | All |
| Null Return Value | Leave blank (NULL) |
3. Add a dynamic action to P4_DEPT_NO using the following properties.
| Name | Call Web Service and refresh Employees |
| Type | Select List |
| Label | Department |
| When | – |
| Event | Change |
| Selection Type | Items(s) |
| Item(s) | P4_DEPT_NO |
| TRUE action | Submit Page |
4. Add and interactive report region called ‘Employees’ below the department region using the following SQL.
SELECT c001 dept_name,
       c002 emp_name,
       c003 job_title,
       c004 location,
       n001 empno,
       d001 hiredate
FROM apex_collections
WHERE collection_name = 'EMPLOYEES'
5. Right-click on Before Header within Rendering > Pre-Rendering and select ‘Create Process’ entering the following properties.
| Name | Get Client Credentials |
| Type | PL/SQL Code |
| PL/SQL Code | See step 3 |
| Sequence | 10 |
6. Use the following PL/SQL Code for the process (Client 1 has access to the3 Employee Web Services)
ordsdemo.get_client_credentials(pv_name => 'Client 1',
                                pv_id_o => :P4_CLIENT_ID,
                                pv_secret_o => :P4_CLIENT_SECRET);
7. Click on the processing tab and create a new process to call the Web Service each time the page is submitted using the following properties.
| Name | Execution Options > Point |
| Type | Web Service |
| Web Service Operation | All Employees – doREST |
| Store Result in | Collection |
| Collection Name | EMPS_JSON |
| Execution Options > Sequence | 10 |
| Execution Options > Point | Processing |
8. In the processing tree, expand the options beneath the process to display the two IN parameters.
9. Click on the ‘Authorization’ parameter, set the source to ‘PL/SQL Function Body’ and then enter the following PL/SQL to return the access token.
BEGIN
 apex_web_service.oauth_authenticate(p_token_url => 'http://localhost:8081/ords/api/oauth/token',
                                     p_client_id => :P4_CLIENT_ID,
                                     p_client_secret => :P4_CLIENT_SECRET);
 RETURN 'Bearer '||apex_web_service.oauth_get_last_token;
END;
10. Click on the ‘department_number’ parameter and set the source to ‘Item’ and the item to ‘P4_DEPT_NO’.
11. Add a second process using the following parameters.
| Name | Populate Collection |
| Type | PL/SQL Code |
| PL/SQL Code | See next step |
| Execution Options > Sequence | 20 |
| Execution Options > Point | Processing |
12. Use the following PL/SQL for the process to get the response data and build a new collection of employees.
DECLARE
 lc_data CLOB;
 lj_emps apex_json.t_values;
BEGIN
 select clob001
 INTO lc_data
 from apex_collections
 where collection_name = 'EMPS_JSON';

 :P4_CLOB := lc_data;

apex_json.parse(lj_emps, lc_data);
 apex_collection.create_or_truncate_collection('EMPLOYEES');

 FOR x IN 1 .. apex_json.get_count(p_path => 'items', p_values => lj_emps) LOOP
  apex_collection.add_member(p_collection_name => 'EMPLOYEES',
                             p_c001 => apex_json.get_varchar2(p_path   => 'items[%d].dname',
                                                              p0       => x,
                                                              p_values => lj_emps),
                             p_c002 => apex_json.get_varchar2(p_path   => 'items[%d].ename',
                                                              p0       => x,
                                                              p_values => lj_emps),
                             p_c003 => apex_json.get_varchar2(p_path   => 'items[%d].job',
                                                              p0       => x,
                                                              p_values => lj_emps),
                             p_c004 => apex_json.get_varchar2(p_path   => 'items[%d].loc',
                                                              p0       => x,
                                                              p_values => lj_emps),
                             p_n001 => apex_json.get_number(p_path   => 'items[%d].empno',
                                                            p0       => x,
                                                            p_values => lj_emps),
                             p_d001 => apex_json.get_date(p_path   => 'items[%d].hiredate',
                                                          p0       => x,
                                                          p_values => lj_emps));
 END LOOP;
END;
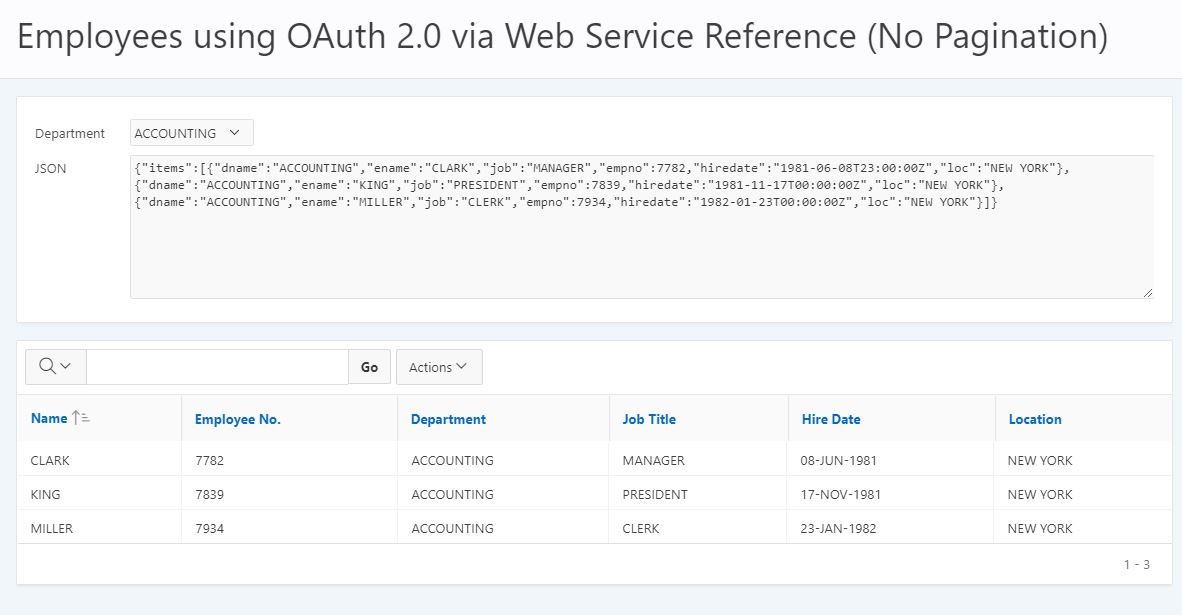
13. Save and run the page, selecting Accounting for the department.
When the page runs, the pre-rendering process obtains the client id and secret for Client 1 and stores them in the two hidden items.
Each time the department select list is changed the dynamic action submits the page and runs the processes to call the Web Service and process the results.
The parameters for the Web Services are populated automatically before it runs. The Authorization parameter is populated with a new access token using the oauth_authenticate procedure in conjunction with the client id and secret.
The department_number is set to the value of P4_DEPT_NO item.
The populate collection process then obtains the JSON results from the collection, parses it and then loops through each employee adding the details to a new collection for the Interactive report region to query.
Accessing an OAuth2 protected GET method Web Service via apex_web_service
As we did for page 3, we can use the apex_web_service PL/SQL API to call the Web Service directly. To do this we can copy page 4 and amend it.
1. Open page 4.
2. Click on the ‘Create’ icon and then select ‘Page as Copy’.
3. Leave ‘Page in this application’ selected and press Next.
4. Enter 5 for the new page number and ‘Employees – API’ for the name. Press Next.
5. Select ‘Create a new navigation menu entry’. Press Next.
6. Press Copy.
We no longer need the process to call the web service so this can be deleted. To do this simply highlight the process in the tree and press delete. Now we need to update the process that populates to the collection so that it also calls the Web Service. We also need to generate an access token to pass as a parameter along with the department number. To do this update the PL/SQL code with the following.
DECLARE
 lc_data CLOB;
 lj_emps apex_json.t_values;
BEGIN
 -- Generate access tokem
 apex_web_service.oauth_authenticate(p_token_url     => 'http://localhost:8081/ords/api/oauth/token',
                                     p_client_id     => :P5_CLIENT_ID,
                                     p_client_secret => :P5_CLIENT_SECRET);

 -- Set parameter values
 apex_web_service.g_request_headers(1).name := 'Authorization';
 apex_web_service.g_request_headers(1).value := 'Bearer ' || apex_web_service.g_oauth_token.token;
 apex_web_service.g_request_headers(2).name := 'department_number';
 apex_web_service.g_request_headers(2).value := :P5_DEPT_NO;

 -- Call Web Servive
 lc_data := apex_web_service.make_rest_request(p_url         => 'http://localhost:8081/ords/api/hr/v1/all_employees',
                                               p_http_method => 'GET');
 :P5_CLOB := lc_data;
 apex_json.parse(lj_emps, lc_data);

 -- Loop through all returned employees and build new collection
 apex_collection.create_or_truncate_collection('EMPLOYEES2');
 FOR x IN 1 .. apex_json.get_count(p_path => 'items', p_values => lj_emps) LOOP
 apex_collection.add_member(p_collection_name => 'EMPLOYEES2',
                            p_c001            => apex_json.get_varchar2(p_path   => 'items[%d].dname',
                                                                        p0       => x,
                                                                        p_values => lj_emps),
                            p_c002            => apex_json.get_varchar2(p_path   => 'items[%d].ename',
                                                                        p0       => x,
                                                                        p_values => lj_emps),
                            p_c003            => apex_json.get_varchar2(p_path   => 'items[%d].job',
                                                                        p0       => x,
                                                                        p_values => lj_emps),
                            p_c004            => apex_json.get_varchar2(p_path   => 'items[%d].loc',
                                                                        p0       => x,
                                                                        p_values => lj_emps),
                            p_n001            => apex_json.get_number(p_path   => 'items[%d].empno',
                                                                      p0       => x,
                                                                      p_values => lj_emps),
                            p_d001            => apex_json.get_date(p_path   => 'items[%d].hiredate',
                                                                    p0       => x,
                                                                    p_values => lj_emps));
 END LOOP;
END;
Finally, update the SQL query for the Employees interactive report to use the collection name ‘EMPLOYEES2’. Now save and run the page, selecting Accounting for the department.
As before, when the page runs the pre-render process obtains the client id and secret. When department is changed the page is submitted and the process to call the Web Service runs. This time the process generates the access token and then uses the apex_web_service API to set the values of the two HTTP header parameters before calling the Web Service and processing the JSON response to build the employee collection.
Dealing with paginated JSON data
The previous examples have all called Web Services that return non-paginated JSON data; however, when they return large volumes of data the responses are typically paginated. This example uses the original Employees GET method Web Services that paginates the employees into sets of five. As we did for page 5 we will start by copying page 4.
1. Open page 4.
2. Click on the ‘Create’ icon and then select ‘Page as Copy’.
3. Leave ‘Page in this application’ selected and press Next.
4. Enter 6 for the new page number and ‘Pagination’ for the name. Press Next.
5. Select ‘Create a new navigation menu entry’. Press Next.
6. Press Copy.
We no longer need either of the two processes to call the web service or populate the collection so delete them both. Keep the pre-rendering process to get the client credentials, as this is still required.
When a Web Service returns paginated data it will also contain navigation links (e.g. next, previous and first) which we can extract. The links will consist of the URL to call the web service with the addition of a URI parameter to instruct the Web Service which page of data to return. In this example, we will extract the links and store them in three text items. We will then add navigation buttons to the report region to use the links.
1. Add the following four items to the Department region below P6_CLOB.
a. P6_URL (hidden)
b. P6_PREV (display only)
c. P6_NEXT (display only)
d. P6_FIRST (display only)
2. Change the report type of the Employees region from Interactive Report to Classic Report and change the collection name used in the SQL query to ‘EMPLOYEES3’. Change the pagination type within the reports attributes to ‘No Pagination (Show All Rows)’.
3. Create a new custom dynamic action with the following properties to call the Web Service and populate the EMPLOYEES3 collection.
| Name | Call API and populate collection |
| Event | Custom |
| Custom Event | CallEmployeeAPI |
| Selection Type | JavaScript Expression |
| JavaScript Expression | document |
4. Update the Show TRUE action using the following properties.
| Action | Execute PL/SQL Code |
| PL/SQL Code | See step 5 |
| Items to Return | P6_CLOB,P6_NEXT,P6_PREV,P6_FIRST |
| Event | Call API and populate collection |
| Sequence | 10 |
5. Use the following for the PL/SQL code for the TRU action.
DECLARE
 lc_data CLOB;
 lj_emps apex_json.t_values;
 lv_token VARCHAR2(100);
BEGIN

 -- Generate a new access token using the client credentials
 apex_web_service.oauth_authenticate(p_token_url => 'http://localhost:8081/ords/api/oauth/token',
                                     p_client_id => :P6_CLIENT_ID,
                                     p_client_secret => :P6_CLIENT_SECRET);
 lv_token := apex_web_service.oauth_get_last_token;

 IF lv_token IS NOT NULL THEN

  -- Set Paramaters
  apex_web_service.g_request_headers(1).name := 'Authorization';
  apex_web_service.g_request_headers(1).value := 'Bearer ' || lv_token;
  apex_web_service.g_request_headers(2).name := 'department_number';
  apex_web_service.g_request_headers(2).value := :P6_DEPT_NO;

  -- Call the Web Service and store the JSON formatted response into a CLOB
  lc_data := apex_web_service.make_rest_request(p_url => NVL(:P6_URL,'http://localhost:8081/ords/api/hr/v1/employees'),
                                                p_http_method => 'GET');

  -- Parse JSON data and extract data into collection
  apex_json.parse(lj_emps, lc_data);
  apex_collection.create_or_truncate_collection('EMPLOYEES3');

  FOR x IN 1 .. apex_json.get_count(p_path => 'items', p_values => lj_emps) LOOP

    apex_collection.add_member(p_collection_name => 'EMPLOYEES3',
                               p_c001            => apex_json.get_varchar2(p_path   => 'items[%d].dname',
                                                                           p0       => x,
                                                                           p_values => lj_emps),
                               p_c002            => apex_json.get_varchar2(p_path   => 'items[%d].ename',
                                                                           p0       => x,
                                                                           p_values => lj_emps),
                               p_c003            => apex_json.get_varchar2(p_path   => 'items[%d].job',
                                                                           p0       => x,
                                                                           p_values => lj_emps),
                               p_c004            => apex_json.get_varchar2(p_path   => 'items[%d].loc',
                                                                           p0       => x,
                                                                           p_values => lj_emps),
                               p_n001            => apex_json.get_number(p_path   => 'items[%d].empno',
                                                                         p0       => x,
                                                                         p_values => lj_emps),
                               p_d001            => apex_json.get_date(p_path   => 'items[%d].hiredate',
                                                                       p0       => x,
                                                                       p_values => lj_emps));
 END LOOP;
 END IF;

 :P6_CLOB := lc_data;
 :P6_NEXT := apex_json.get_varchar2(p_path => 'next."$ref"',
                                    p_values => lj_emps);
 :P6_FIRST := apex_json.get_varchar2(p_path => 'first."$ref"',
                                     p_values => lj_emps);
 :P6_PREV := apex_json.get_varchar2(p_path => 'prev."$ref"',
                                    p_values => lj_emps);

END;
6. Add a second TRUE action to refresh the Employees classic report region.
| Action | Refresh |
| Selection Type | Region |
| Region | Employees |
| Event | Call API and populate collection |
| Sequence | 20 |
We now have a custom dynamic action to call the web service, process the response into a collection and extract the next, previous and first URL links. We can now add some navigation buttons to the page to call it and return the relevant pages of employee data. We can also call it when the page loads so the page is not blank when first opened.
1. Create a page load Dynamic Action using the following properties.
| Name | Call Web Service on page load |
| Event | Page Load |
2. Update the show TRUE action using the following properties to call the custom dynamic action when the page loads..
| Action | Execute JavaScript Code |
| Code | apex.event.trigger(document,”CallEmployeeAPI”); |
| Event | Call Web Service on page load |
| Sequence | 10 |
3. Next, we need to change the existing dynamic action ‘Refresh Employees’ that runs when the department select list is changed (P6_DEPT_NO). Change the Submit Page action to Execute PL/SQL Code using the following properties.
| Action | Execute PL/SQL Code |
| PL/SQL Code | :P6_URL := ‘http://localhost:8081/ords/api/hr/v1/employees’; |
| Items to Submit | P6_DEPT_NO |
| Items to Return | P6_URL |
| Sequence | 10 |
4. Now add the following second action.
| Action | Execute JavaScript Code |
| Code | apex.event.trigger(document,”CallEmployeeAPI”); |
| Sequence | 20 |
5. Save and run the page.
When the page first loads the pre-rendering process obtains the client credentials. Next, the Page Load dynamic action calls the custom dynamic action, which in turn calls the Web Service, populates the employee collection, extracts the navigation links and refreshes the employee classic report region. Each time the department is changed the custom dynamic action is called to refresh the links and employee region.
Now we need to add some buttons that use the navigation links to page through the employees.
1. Add three buttons to the employee region as follows.
| FIRST | Button Position: Previous |
| PREVIOUS | Button Position: Previous |
| NEXT | Button Position: Next |
2. Add a click event dynamic action to the FIRST button with the name ‘Go to first page’ and then add the following two TRUE actions.
| Action 1 | |
| Action | Execute PL/SQL Code |
| PL/SQL Code | :P6_URL := :P6_FIRST; |
| Items to Return | P6_URL |
| Sequence | 10 |
| Action 2 | |
| Action | Execute JavaScript Code |
| Code | apex.event.trigger(document,”CallEmployeeAPI”); |
| Sequence | 20 |
3. Add a click event dynamic action to the PREVIOUS button with the name ‘Go to previous page’ and then add the following two TRUE actions.
| Action 1 | |
| Action | Execute PL/SQL Code |
| PL/SQL Code | :P6_URL := :P6_PREV; |
| Items to Return | P6_URL |
| Sequence | 10 |
| Action 2 | |
| Action | Execute JavaScript Code |
| Code | apex.event.trigger(document,”CallEmployeeAPI”); |
| Sequence | 20 |
4. Add a click event dynamic action to the NEXT button with the name ‘Go to next page’ and then add the following two TRUE actions.
| Action 1 | |
| Action | Execute PL/SQL Code |
| PL/SQL Code | :P6_URL := :P6_NEXT; |
| Items to Return | P6_URL |
| Sequence | 10 |
| Action 2 | |
| Action | Execute JavaScript Code |
| Code | apex.event.trigger(document,”CallEmployeeAPI”); |
| Sequence | 20 |
5. Save and run the page selecting ALL departments.
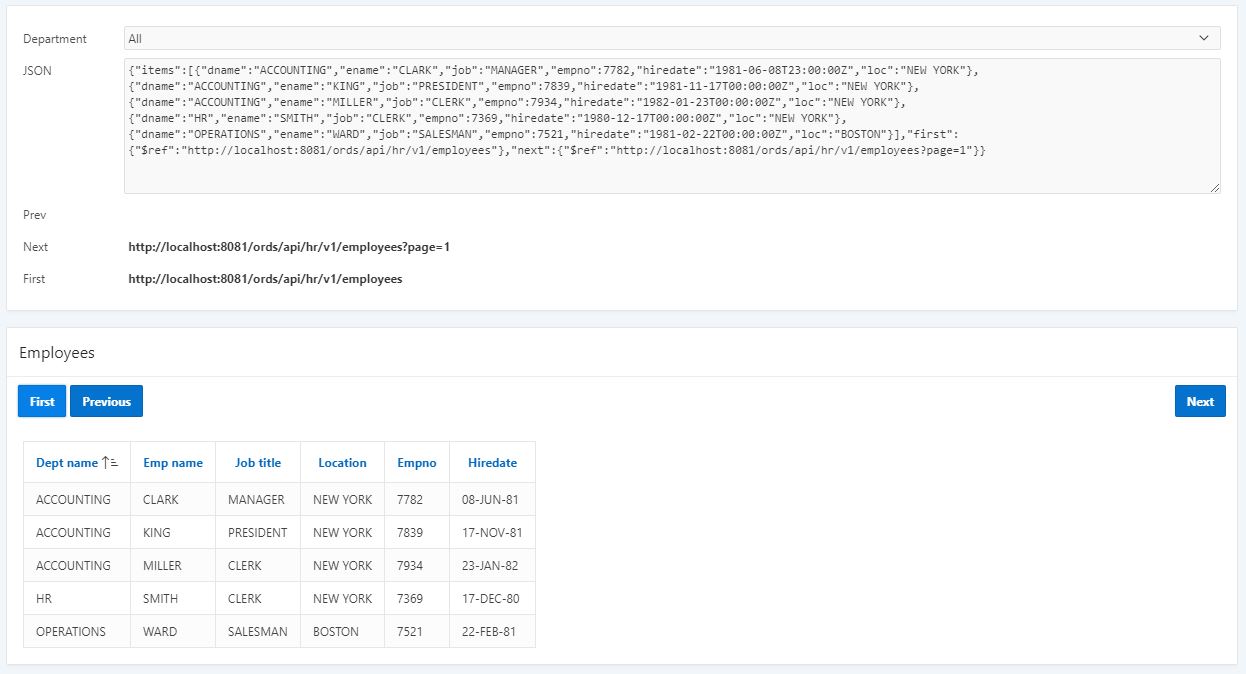 You will see that the returned JSON data contains five employee records and the navigation links. The links have been extracted and displayed in the relevant display only items. The employee classic report shows the first five employees.
If you press the ‘Next’ button, the Web Service will be called again, but this time using the link from P6_NEXT, which is suffixed with the page number to display. The returned JSON response now contains the next five employees and the new navigation links. You will notice that this time there is also a previous link as we are displaying the second page of employees. You can now use the three buttons to page back and forward through all of the employees.
To complete the page we need to make sure the next button is hidden when we are on the last page of employees and the previous button hidden when on the first. One way to do this is to add dynamic actions to P6_PREV and P6_NEXT as follows.
1. Create a change event dynamic action for P6_PREV with the following properties.
| Name | Show/Hide Previous Button |
| Event | Change |
| Selection Type | Item(s) |
| Item(s) | P6_PREV |
| Client-side Condition: Type | Item is not null |
| Client-side Condition: Item | P6_PREV |
2. Add the following TRUE and FALSE actions to the dynamic action.
| TRUE Action | |
| Action | Show |
| Affected Elements: Selection Type | Button |
| Button | PREVIOUS |
| FALSE Action | |
| Action | Hide |
| Code | Button |
| Sequence | PREVIOUS |
3. Create a change event dynamic action for P6_NEXT with the following properties.
| Name | Show/Hide Previous Button |
| Event | Change |
| Selection Type | Item(s) |
| Item(s) | P6_NEXT |
| Client-side Condition: Type | Item is not null |
| Client-side Condition: Item | P6_NEXT |
4. Add the following TRUE and FALSE actions to the dynamic action.
| TRUE Action | |
| Action | Show |
| Affected Elements: Selection Type | Button |
| Button | NEXT |
| FALSE Action | |
| Action | Hide |
| Code | Button |
| Sequence | NEXT |
5. Save and run the page.
Now when the page runs the next and previous buttons are only displayed if there is an applicable link.
POST, PUT and DELETE requests
You can also use the apex_web_service API to call POST, PUT and DELETE method Web Services. For Example, you could add a departments maintenance page to call the Web Services we created in part one to add, update and delete departments.
To do this simply set the HTTP method parameter to POST, PUT or DELETE as applicable when calling the make_rest_request function and then use apex_json.get_varchar2 to extract the results from the response.
You can also use apex_web_service.g_status_code to get the response status code to check of the Web Service call returned a successful 200 OK status.
For more information, get in touch with our experts to find out more about our APEX Services or book a meeting...

Author: Colin Archer
Job Title: Senior Oracle APEX Development Consultant
Bio: Colin is a Senior Development Consultant at DSP with 20 years’ experience of analysis, design, and development of bespoke Oracle applications for a wide variety of business functions. Building on his previous experience of Forms and PL/SQL he is now focusing on developing high quality fit for purpose solutions using APEX.