- Services

Getting to know us
- Industries
Recent case study:
Oracle EBS Cloud Deployment
Consolidating and Migrating assets into Oracle Cloud Infrastructure.
.png?width=250&name=stonewater-logo%20(1).png)
Most Visited Pages
-
- Resources
DSP-Explorer acquires leading Oracle Applications Managed Services Provider, Claremont, to further extend its data management capabilities.

Resources
- Contact us
ORDS, OAuth2 & Web Services in APEX – Part 2
Contents
In my previous blog, I took you through how to create RESTful Web Services with ORDS and how to test them with a REST client. This blog will build on those Web Services (Fig.1) and show you how you can protect them to ensure they can only be accessed by the users you specify. Before you read on, you can find out more about our Oracle APEX Services here.
| Handler | Method | URL |
| List departments | GET | http://<hostname>:<port>/ords/api/hr/v1/departments |
| Create a Department | POST | http://<hostname>:<port>/ords/api/hr/v1/departments |
| Create a Department | PUT | http://<hostname>:<port>/ords/api/hr/v1/departments |
| Delete a Department | DELETE | http://<hostname>:<port>/ords/api/hr/v1/departments |
| List employees | GET | http://<hostname>:<port>/ords/api/hr/v1/employees |
Fig. 1
To ensure your Web Services are only accessible by the appropriate users (clients) you can protect them using OAuth2. This involves creating roles and privileges to protect the Web Services and the creation of clients, which can be for individuals or applications. Each client can then be granted access to one or more roles in order to access the associated Web Services.
ORDS Metadata
There are several public views owned by the ORDS_METADATA schema that you can use to query roles, privileges, and clients that have been created. The following six views are the primary ones to use.
| View | Contents |
| USER_ORDS_ROLES | All Roles |
| USER_ORDS_PRIVILEGES | All Privileges |
| USER_ORDS_PRIVILEGE_MAPPINGS | Web Service URLs protected by each privilege |
| USER_ORDS_PRIVILEGE_ROLES | Privileges granted to each role |
| USER_ORDS_CLIENTS | All Clients |
| USER_ORDS_CLIENT_ROLES | Roles granted to each client |
OAuth Methods
There are three OAuth2 methods available to ORDS.
- Client Credentials – Two stage process for server-to-server communication where there is no human interaction. Credentials are used to generate an access token that are then used to authenticate the Web Service calls.
- Authorisation Code – Three-stage process when there is human interaction. Using a browser and a URL the user enters their credentials to authenticate. This generates an Authorization Code that in turn is used to generate the access token for authenticating the Web Service calls.
- Implicit – Two-stage process when there is human interaction. Using a browser and a URL the user enters their credentials to authenticate. This generates an Access Token for authenticating the Web Service calls.
On this occasion we are going to use the Client Credentials method to protect the Employees / Department Web Services we previously created. This is so in part three of the blog we can automate the authentication and calling of the Web Services from an APEX application.
Test our existing Web Services
As we did in part one we will be using Postman to test the Web Services. Before we start protecting them we should test they are all working correctly and do not require any authentication.
Using Postman, open your ORDS Demo collection and test each of the five previously saved requests are working correctly. For example, click on the ‘List Departments’ GET method request and press send to return all of the departments in JSON format.
Roles and Privileges
Projecting a Web Service is a three-part process.
-
- Create the ORDS roles that will be granted to the clients
- Create the privileges that will protect the Web Services and link to one or more roles
- Map the privileges on to the required URL patterns
Create Role
To protect the Web Services we first need to create roles, which can be subsequently granted to a client and allocated to a privilege. To give greater flexibility when granting roles to clients we will protect each module independent, starting with Departments.
BEGIN
  ords.create_role(p_role_name => 'department_role');
  COMMIT;
END;
Create Privilege
Next, we need to define the privileges and link them to the relevant roles so that when we grant a role to a client they will obtain the required privilege.
DECLARE
  la_roles owa.vc_arr;
BEGIN
  la_roles(1) := 'department_role';
  ords.define_privilege(p_privilege_name => 'department.privilege',
                        p_roles          => la_roles,
                        p_label          => 'Departments Access',
                        p_description    => 'Access to HR Department Web Services');
  COMMIT;
END;
When defining a privilege you can allocate multiple roles depending on how you need to structure your security. In our example we have created one privilege for the department Web Service and linked it to a single role.
Create Privilege Mapping
The last step of the process is to map the URL patterns of the Web Services we wish to protect to the privilege.
DECLARE
  la_priv_patterns owa.vc_arr;
BEGIN
  la_priv_patterns(1) := '/hr/v1/departments';
  ords.create_privilege_mapping(p_privilege_name => 'department.privilege',
                                p_patterns       => la_priv_patterns);
  COMMIT;
END;
As all four of the Web Services for the Departments template use the same URL, we only need to add one URL pattern to protect them all. If we had more than one template within the HR module that we need protecting by the department privilege we could add additional URLs here.
If we wanted to protect one or more of the Department Web Services independently so a client could have access to the GET method without having access to the POST, PUT or DELETE methods, we would have to define the GET template with a different pattern (e.g. list_departments).
As soon as a privilege has been mapped to a pattern, and Web Services matching it will be protected immediately.
To check all four of the department Web Services are now protected use your collection of Postman requests to test each one. Each request will now return a 401 unauthorised status when called as shown in Fig.2.
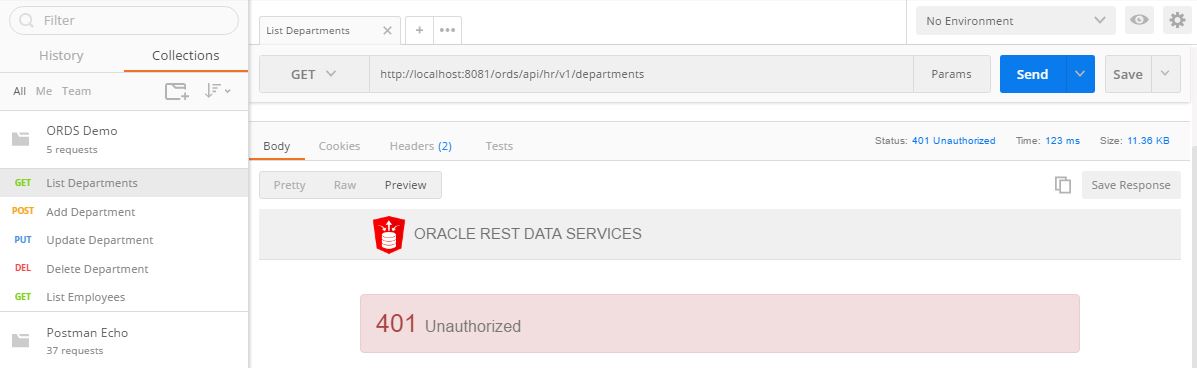
Fig. 2
Next, check the Employees module has not been protected and can still be accessed. Open the List Employees request and set the department_number parameter value to 10. The request will be successful, returning the employees and a status of 200 OK (Fig.3).
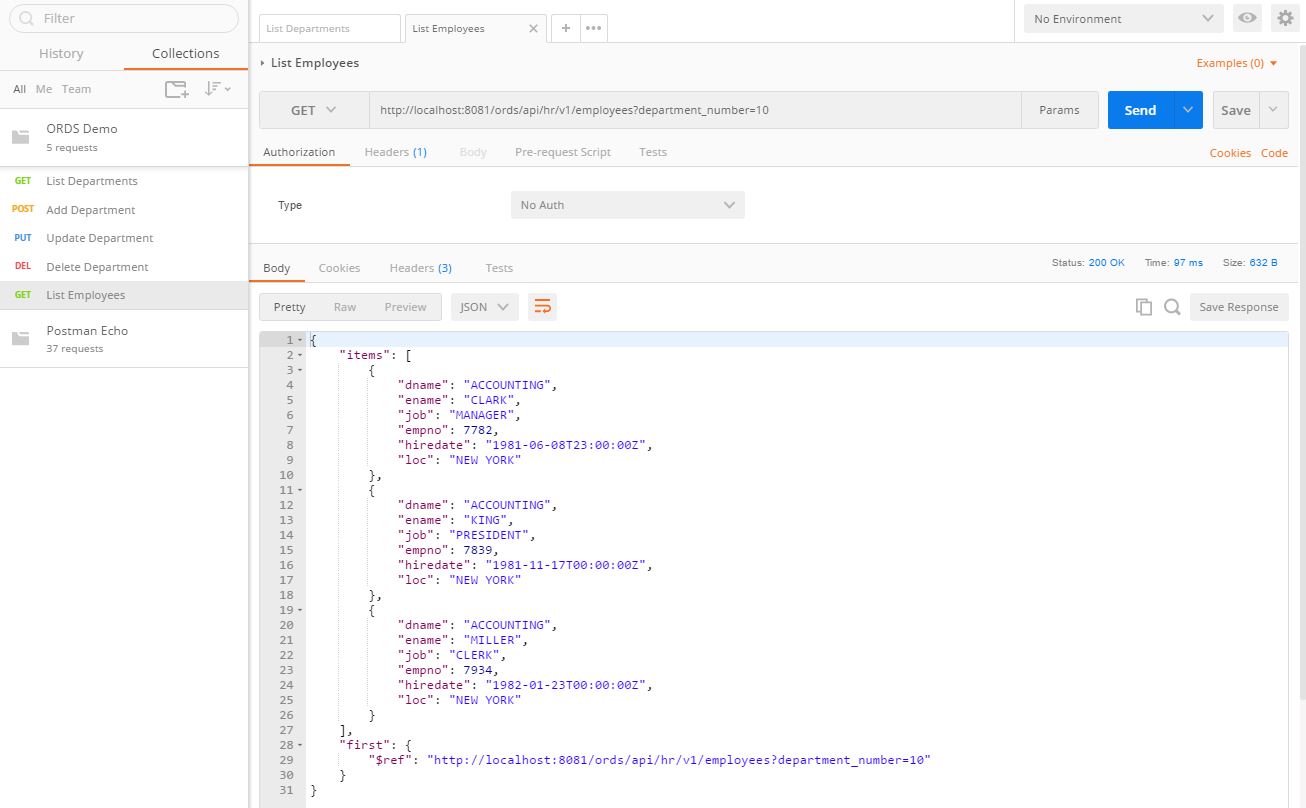
Fig. 3
To complete the protection of our Web Services run the following PL/SQL to create a second role and privilege to protect the Employees module.
DECLARE
  la_roles         owa.vc_arr;
  la_priv_patterns owa.vc_arr;
BEGIN
  ords.create_role(p_role_name => 'employee_role');

  la_roles(1)         := 'employee_role';
  la_priv_patterns(1) := '/hr/v1/employees';

  ords.define_privilege(p_privilege_name => 'employee.privilege',
                        p_roles          => la_roles,
                        p_patterns       => la_priv_patterns,
                        p_label          => 'Employees Access',
                        p_description    => 'Access to Employee Resources');
  COMMIT;
END;
The Employees Web Service is not protect and cannot be accessed without authenticating the request call.
Creating a Client
To access the protected Web Services we now need to pass a valid access token as a parameter in the HTTP Header. In order to generate an access token we need to create a client using the OAUTH API.
BEGIN
  oauth.create_client(p_name => 'Client 1',
                      p_grant_type       => 'client_credentials',
                      p_description      => 'Client with access to Employee Resources',
                      p_support_email    => 'client.one@ordsdemo.com',
                      p_privilege_names  => NULL);
  COMMIT;
END;
The above example uses the create_client procedure to create a client called ‘Client 1’. The ‘p_privelage_names’ parameter is mandatory but can be set to NULL. Alternately, you can pass a comma-separated list of privilege names the client requires access to.
When you create a new client it is allocated a unique client id and secret that is subsequently used to generate an access token. Use the following SQL query to verify the client has been created and the values for the client id and secret.
SELECT id, name, description, client_id, client_secret
FROM user_ords_clients
WHERE name = 'Client 1';
| ID | NAME | DESCRIPTION | CLIENT_ID | CLIENT_SECRET |
| 10393 | Client 1 | Client with access to Employee Resources | kyP5X83FXv2uPvDPDSjspw.. | dXhW3IPuabH0Bsp-5d_8fA.. |
Once the client has been created, we need to grant one or more roles that are mapped to the privileges the client requires to. In this instance, the client only needs the ‘employee_role’.
BEGIN
  oauth.grant_client_role(p_client_name => 'Client 1',
                          p_role_name   => 'employee_role');
  COMMIT;
END;
We have now created a client and granted it the necessary role to call the Employees GET method Web, and can now use the generated client id / secret to obtain an access token.
Testing the Employees Web Service with a OAuth2.0
Open Postman and open the List Employees GET request and press send to confirm the Web Service is protected. We receive a 401 unauthorised status as expected, as we have not authenticated the request call by including a valid access token in the HTTP header.
To generate an access token we must use the client id and secret details we generated for ‘Client 1’. Within Postman click on the Authorization tab, change the type to ‘OAuth 2.0’, click the ‘Get New Access Token’ button and enter the following details.
| Token Name | Anything, e.g. Client 1 |
| Access Token URL | http://<host_ref>/ords/ordsdemo/oauth/token |
| Client ID | Client ID generated for Client 1 |
| Client Secret | Client secret generated for Client 1 |
| Grant Type | Client Credentials |
| Request access token locally | Un-ticked |
Note: The <host_ref> must be set to the relevant name and port of your ORDS configuration. I have created the Web Services in a local copy of Oracle XE running on port 8081 with ORDS 3.11. Therefore, the access token URL will be http://localhost:8081/ords/api/oauth/token
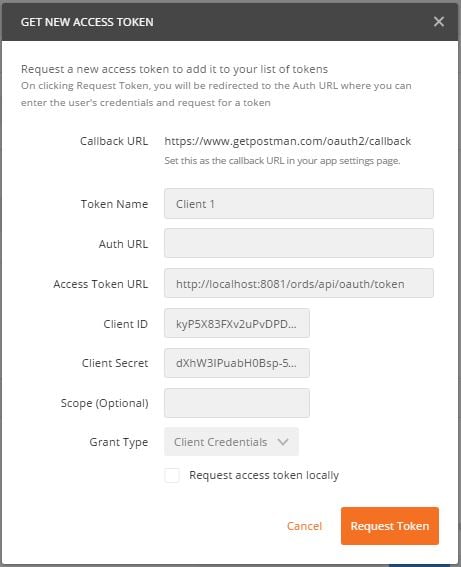
Once you have entered all of the details press the ‘Request Token’ button. This will close the popup and generate an access token with a one-hour expiration time.
We now need to add the access token to the Employees request. This can be achieved using the following steps.
- Click on the newly generated token, which can be found in the ‘Existing Tokens’ list.
- Ensure the ‘Access token to’ selection is set to ‘Header’.
- Click on the use token button.
If you now select the Headers tab you will see a new Authorization key value has been created and the value set to the access token. Now when we press the Send button the request is authenticated and the employees are returned along with the response status 200 – OK.
The Web Service currently uses an optional URI parameter to restrict the employees to a single department. Use the following PL/SQL to update the parameter so that it is passed using the HTTP Header instead.
BEGIN
  ords.define_parameter(p_module_name        => 'reports.v1',
                        p_pattern            => 'employees.json',
                        p_method             => 'GET',
                        p_name               => 'department_number',
                        p_bind_variable_name => 'pn_deptno',
                        p_source_type        => 'HEADER',
                        p_param_type         => 'INT',
                        p_access_method      => 'IN',
                        p_comments           => 'Used to restrict the employees to a single department');
  COMMIT;
END;
Now add a new key to the header with the name ‘department_number’ and a value of 10. Press the Send button to resubmit the request. Only the employees for the Accounting department are returned.
Testing the Add Department POST Web Service with a OAuth2.0
Open the Add Department request and click on the Headers tab. Now set the values for the department number, name and location to values that are valid and unique.
Next click on the Authorization tab and change the type to OAuth 2.0 to display the list of existing tokens. Select the previously generated Client 1 token and use the Use Token button to add it to the HTTP Header and press Send.
We get a 401 – Unauthorised response as the access token is for a client that has not been granted the required role to use Departments POST method Web Service. Use the following PL/SQL to create a new client with the required role.
BEGIN
  oauth.create_client(p_name            => 'Client 2',
                      p_grant_type      => 'client_credentials',
                      p_description     => 'Client with access Department Resources',
                      p_support_email   => 'client.two@ordsdemo.com',
                      p_privilege_names => NULL);
  oauth.grant_client_role(p_client_name => 'Client 2',
                          p_role_name   => 'department_role');
  COMMIT;
END;
Query the user_ords_clients view obtain the client id and secret for Client 2 and then use them to generate a new access token via the ‘Get New Access Token’ popup. Select the new token and press the Use Token button to add it to the header.
Now when we press the Send button the request is successful and returns a response code of 200 OK status.
To check the department has been added use the List Departments request to call the Departments GET method Web Service. Remember to use the access token generated for Client 2 by adding it to the HTTP Header before pressing send.
The request will be successful and return all of the departments including the new one you just added.
Use the access token to test Client 2 can also call the Departments PUT method to update a department and the DELETE to delete one.
If you would like to find out more information speak to one of our Oracle APEX experts, get in touch through enquiries@dsp.co.uk or book a meeting...

If you liked this blog, check out our other APEX blogs here.
Author: Colin Archer
Job Title: Senior Oracle APEX Development Consultant
Bio: Colin is a Senior Development Consultant at DSP with 20 years’ experience of analysis, design, and development of bespoke Oracle applications for a wide variety of business functions. Building on his previous experience of Forms and PL/SQL he is now focusing on developing high quality fit for purpose solutions using APEX.