- About

Getting to know us
- Industries
Recent case study:
Oracle EBS Cloud Deployment
Consolidating and Migrating assets into Oracle Cloud Infrastructure.
.png?width=250&name=stonewater-logo%20(1).png)
Most Visited Pages
-
- Resources
DSP-Explorer acquires leading Oracle Applications Managed Services Provider, Claremont, to further extend its data management capabilities.

Resources
- Contact us
APEX Authentication Using Microsoft Azure Face API
Contents

One of my favourite features of my phone is that I do not need to remember my credentials for each app and don’t even need to type passwords using those little keyboards. Using face identification, I am able to authenticate, approve payments and even transfer money. Why not have this on APEX apps? The Azure Cognitive Services Face API provides a variety of powerful face recognition features for a large number of different cases. It can also detect face attributes including age, gender, head pose, smile, facial hair, glasses, emotion, hair, makeup, occlusion, accessories, blur, exposure and noise.
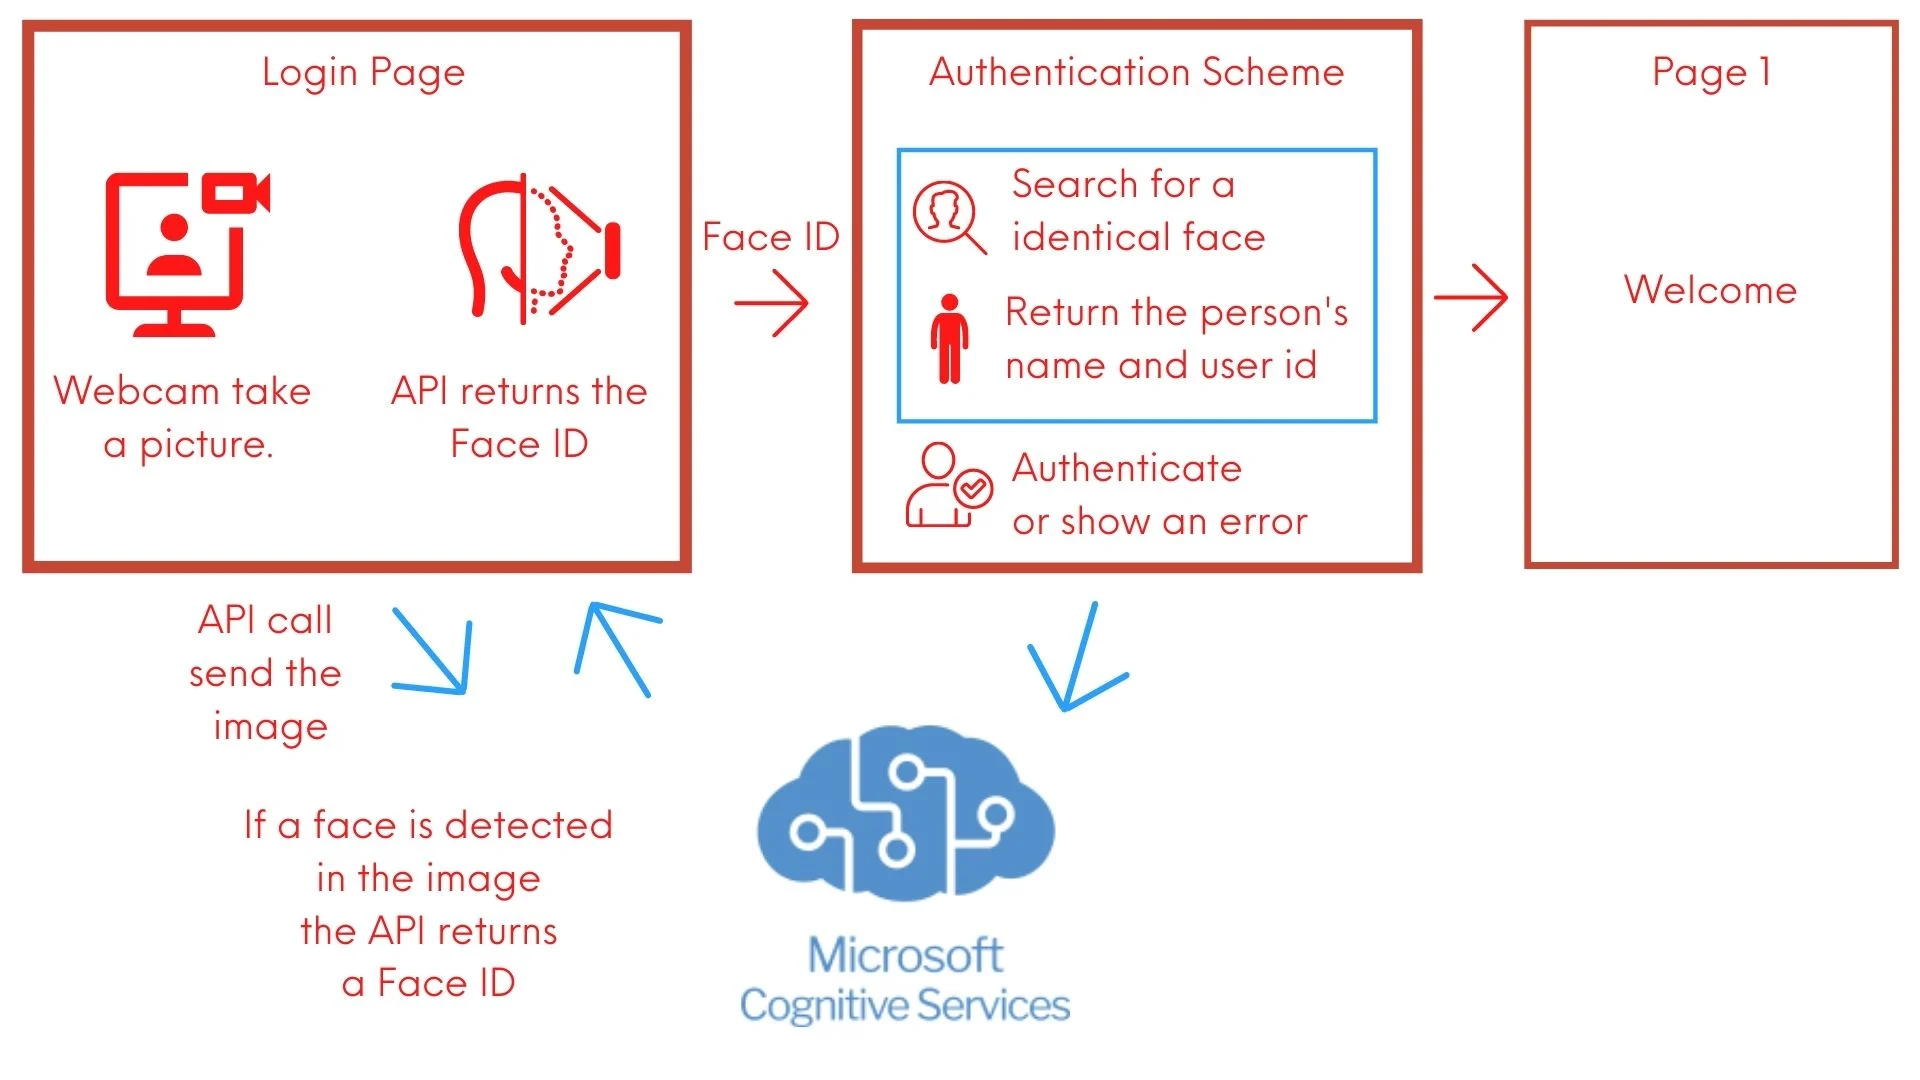
For this blog, I am going to create an APEX custom authentication scheme that detects the person in front of the camera and make calls to the Azure Face API. If the identification is successful, the API will return the name and user ID to the authentication scheme, if not it returns null and the authentication fails.
.webp)
Getting started
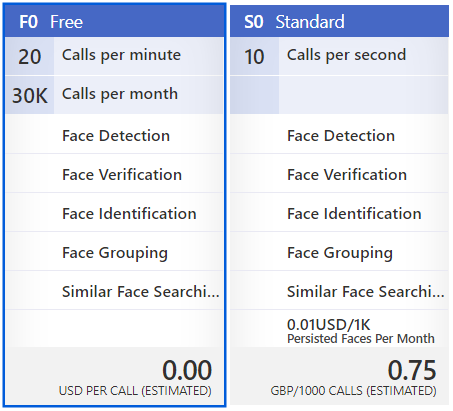
For the API calls, we need a KEY that we can get on the Azure Portal. When Logged to the portal, open the left menu and click on “Create a resource”, search for “Face” from the AI + Machine Leaning Category. The free tier allows us to perform 20 calls per minute and 30K Calls per month, which is more than enough to develop and even to use on some apps.
Create a Faces Database
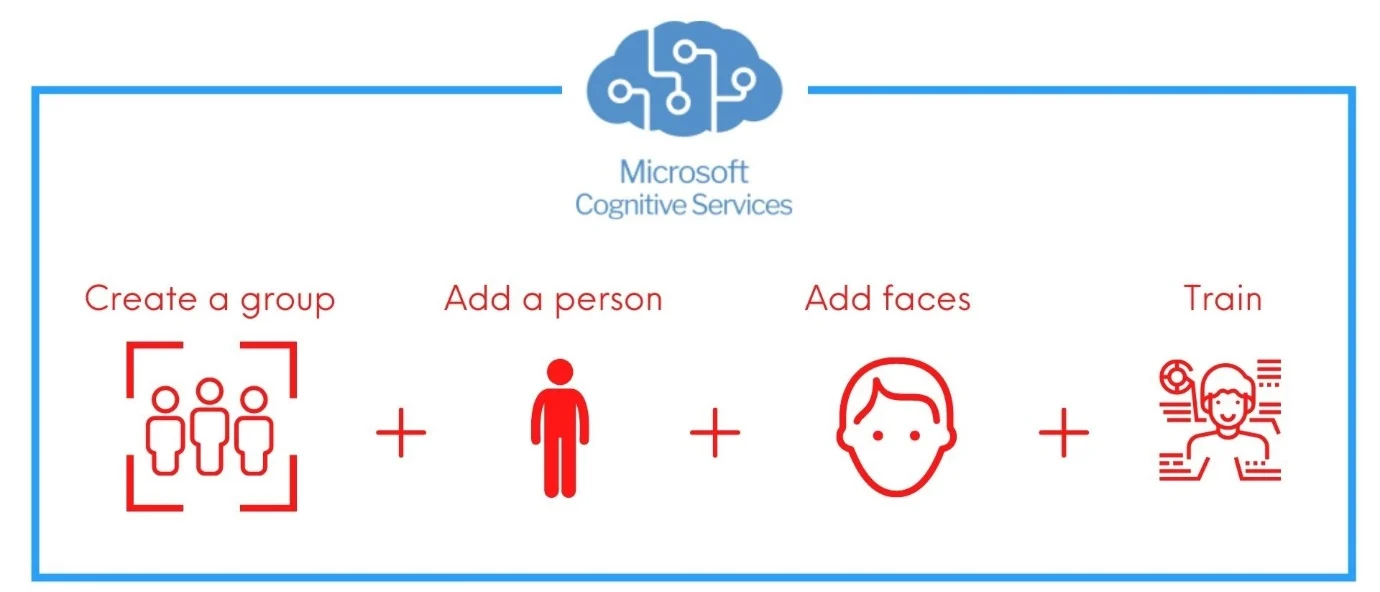
There are different ways to work with the Face API. For this demo app I am doing the following.
- Create a person group called users
- Create a person on this group called Rodrigo Mesquita and we also save the app user id (‘RODRIGOM’)
- Add the person’s face using an image blob stored in a database table.
DECLARE
    l_clob        CLOB;
    l_body        CLOB;
    lv_group_id   VARCHAR2(100) := 'users';
    lv_person_id  VARCHAR2(100);
    l_image       BLOB;
BEGIN
    apex_web_service.g_request_headers(1).name := 'Ocp-Apim-Subscription-Key';
    apex_web_service.g_request_headers(1).value := '<add the API KEY here>';
    apex_web_service.g_request_headers(2).name := 'Content-Type';
    apex_web_service.g_request_headers(2).value := 'application/json';
- Create a Person Group: Create a new person group passing JSON with specified personGroupId, name, user-provided userData and recognitionModel.
APEX_JSON.initialize_clob_output;
   APEX_JSON.open_object;
   APEX_JSON.write('name', lv_group_id);
   APEX_JSON.write('userData', 'user-provided data attached to the person group.');
   APEX_JSON.write('recognitionModel', 'recognition_03');
   APEX_JSON.close_object;
   l_body := APEX_JSON.get_clob_output;
   APEX_JSON.free_output;

   l_clob := apex_web_service.make_rest_request(
       p_url => 'https://northeurope.api.cognitive.microsoft.com/face/v1.0/persongroups/'||lv_group_id,
       p_http_method => 'PUT',
       p_body => l_body);
Create a Person in the group
APEX_JSON.initialize_clob_output;
    APEX_JSON.open_object;
    APEX_JSON.write('name', 'Rodrigo');
    APEX_JSON.write('userData', 'RODRIGOM');
    APEX_JSON.close_object;
    l_body := APEX_JSON.get_clob_output;
    APEX_JSON.free_output;

    l_clob := apex_web_service.make_rest_request(
        p_url => 'https://northeurope.api.cognitive.microsoft.com/face/v1.0/persongroups/'||lv_group_id||'/persons',
        p_http_method => 'POST',
        p_body => l_body);

     APEX_JSON.parse(l_clob);
     lv_person_id := APEX_JSON.get_varchar2(p_path => 'personId');
Add a face to the person: Each person entry can hold up to 248 faces.
   -- get user image
   SELECT IMAGE
     INTO l_image
     FROM USER_IMAGES
    WHERE USER_ID = 'RODRIGOM';
apex_web_service.g_request_headers.delete(2);
apex_web_service.g_request_headers(2).name := 'Content-Type';
apex_web_service.g_request_headers(2).value := 'application/octet-stream';

l_clob := apex_web_service.make_rest_request(
   p_url => 'https://northeurope.api.cognitive.microsoft.com/face/v1.0/persongroups/'||lv_group_id||'/persons/'||lv_person_id||'/persistedFaces?detectionModel=detection_01',
   p_http_method => 'POST',
   p_body_blob => l_image);
Train the Group: This call submits a person group training task. Training is a crucial step as only a trained person group can be used. Each time we create or change a group, a face or a person from a group, then that group should be trained again
  apex_web_service.g_request_headers.delete(2);

     l_clob := apex_web_service.make_rest_request(
        p_url => 'https://northeurope.api.cognitive.microsoft.com/face/v1.0/persongroups/'||lv_group_id||'/train',
        p_http_method => 'POST',
        p_body => '{body}');

END;
If no errors occurred, we have a group called users, with a person called Rodrigo Mesquita, a face for this person and this group is trained and ready. To check the training status we can call PersonGroup – Get Training Status but that is not necessary here as we have just one face so the training should only take seconds.
Create the face ID authentication in the APEX app
I used my free account on the Oracle Autonomous database to create this demo. It is a simple app with just one page.
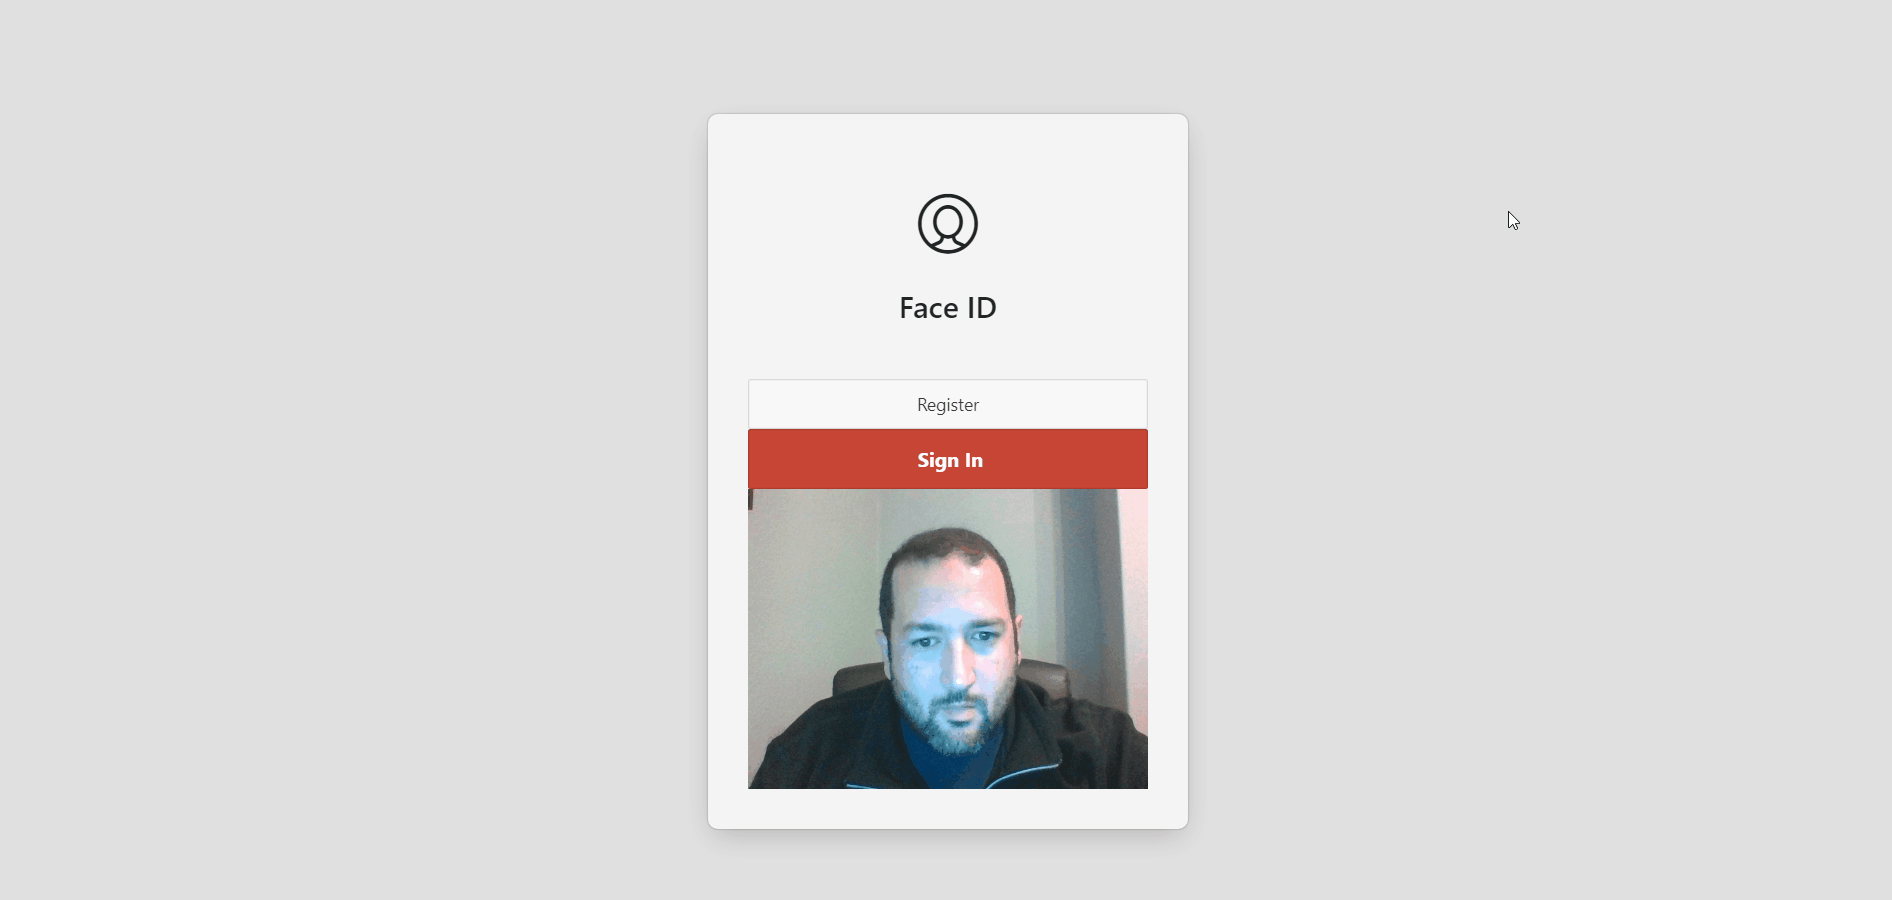
1. Change the login screen
The APEX login screen should be able to take a picture, detect the face using the Face API and store the faceId in a Page Item (P9999_FACE_ID) used by custom authentication scheme to verify the user’s identity and perform the authentication. The following modifications should be done on the app login screen
1.1 We just need the login button; we can hide or remove other page items like username and password.
1.2 The webcam.js library is used to take the user’s picture. Upload the webcam.min.js Shared Components \ Static Application Files.
1.3 On the login screen, include the JavaScript file URL (#APP_IMAGES#webcam.min.js).
1.4 Change the Login button action to Redirect to URL and the URL to javascript:takePicture();
1.5 Change the login process and remove the references for username and password
apex_authentication.login(
 p_username => 'nobody',
 p_password => '' );
1.6 Add the code below to the Function and Global Variable Declaration on page level
$('.t-Login-region').append('<div id="camera" style="width: 320px;height: 240px;display: none;" ></div>');

function showError(message){
        apex.message.showErrors([
            {
                type:       "error",
                location:   "page",
                message:    message,
                unsafe:     false
            }
        ]);
}

Webcam.set({
    width: 320,
    height: 240,
    image_format: 'jpeg',
    jpeg_quality: 90
});
Webcam.attach('#camera');

function takePicture() {
    Webcam.snap(function(data_uri) {
        base_image = new Image();
        base_image.src = data_uri;
        base_image.onload = function() {
            fetch(data_uri)
                .then(res => res.blob())
                .then(blobData => {
                    $.post({
                            url: "https://northeurope.api.cognitive.microsoft.com/face/v1.0/detect?returnFaceId=true&returnFaceLandmarks=false&recognitionModel=recognition_01&returnRecognitionModel=false&detectionModel=detection_01",
                            contentType: "application/octet-stream",
                            headers: {
                                'Ocp-Apim-Subscription-Key': '<add the API KEY here>'
                            },
                            processData: false,
                            data: blobData
                        })
                        .done(function(data) {
                            if (data.length) {
                                apex.item('P9999_FACE_ID').setValue(data[0].faceId);
                            }else{
                                showError('Face not detected, try again');
                            }

                        })
                        .fail(function(err) {
                            console.log(JSON.stringify(err));
                        })
                });
        }
    });
};
2. Create the Custom Authentication Scheme:
2.1 On the Shared Components\ Authentication Schemes click on create. Select a name and the schema type = ‘Custom’
2.2 In the Authentication Function Name field add AUTHENTICATE_USER and POST_LOGIN_ID on Post-Authentication Procedure Name field.
2.3 Create two application items called NAME and USER_DATA to store the user details.
2.4 In the source PL/SQL Code we are going to use the code below. We also have the option to create a package and add those procedures and just call it from here.
PROCEDURE POST_LOGIN
IS
BEGIN
APEX_CUSTOM_AUTH.SET_USER(:USER_DATA);
END;

FUNCTION AUTHENTICATE_USER
  (p_username in varchar2,
   p_password in varchar2)
return boolean
is
    l_clob       CLOB;
    l_body       clob;
    l_paths      APEX_T_VARCHAR2;
    l_person_id  VARCHAR2(1000);
begin
--
    apex_web_service.g_request_headers(1).name := 'Ocp-Apim-Subscription-Key';
    apex_web_service.g_request_headers(1).value := '<add the API KEY here>';
    apex_web_service.g_request_headers(2).name := 'Content-Type';
    apex_web_service.g_request_headers(2).value := 'application/json';

    APEX_JSON.initialize_clob_output;
    APEX_JSON.open_object;
    APEX_JSON.write('PersonGroupId', 'users');
    APEX_JSON.open_array('faceIds');
    APEX_JSON.write(:P9999_FACE_ID);
    APEX_JSON.close_array;
    APEX_JSON.write('maxNumOfCandidatesReturned', '1');
    APEX_JSON.write('confidenceThreshold', '0.5');
    APEX_JSON.close_object;
    l_body := APEX_JSON.get_clob_output;
    APEX_JSON.free_output;

     l_clob := apex_web_service.make_rest_request(
             p_url => 'https://northeurope.api.cognitive.microsoft.com/face/v1.0/identify',
             p_http_method => 'POST',
             p_body => l_body);

           l_clob := replace(replace(l_clob,']',''),'[','');
           APEX_JSON.parse(l_clob);
           l_paths := APEX_JSON.find_paths_like (p_return_path => 'candidates');

            FOR i IN 1 .. l_paths.COUNT loop
              l_person_id := APEX_JSON.get_varchar2(p_path => l_paths(i)||'.personId');
            END LOOP;
          IF l_person_id IS NOT NULL
          THEN
          l_clob := apex_web_service.make_rest_request(
                 p_url => 'https://northeurope.api.cognitive.microsoft.com/face/v1.0/persongroups/users/persons/'||l_person_id,
                 p_http_method => 'GET',
                 p_body => '{body}');
           APEX_JSON.parse(l_clob);
           APEX_UTIL.SET_AUTHENTICATION_RESULT(0);

           :USER_DATA := APEX_JSON.get_varchar2(p_path => 'userData');
           :NAME      := APEX_JSON.get_varchar2(p_path => 'name');
              return true;
          ELSE
            -- The Person did not match
            APEX_UTIL.SET_AUTHENTICATION_RESULT(1);
          return false;
          END IF;

exception
    when others then
        APEX_UTIL.SET_AUTHENTICATION_RESULT(7);
        APEX_UTIL.SET_CUSTOM_AUTH_STATUS('A Face authentication error has occured, Please try again');
        return false;

end authenticate_user;
2.5 Click on create and make sure to use this authentication as the current.
2.6 I also changed the breadcrumb on Page 1 to add a welcome message to the user.
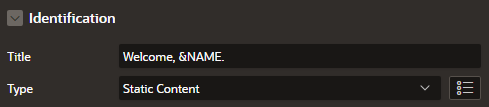
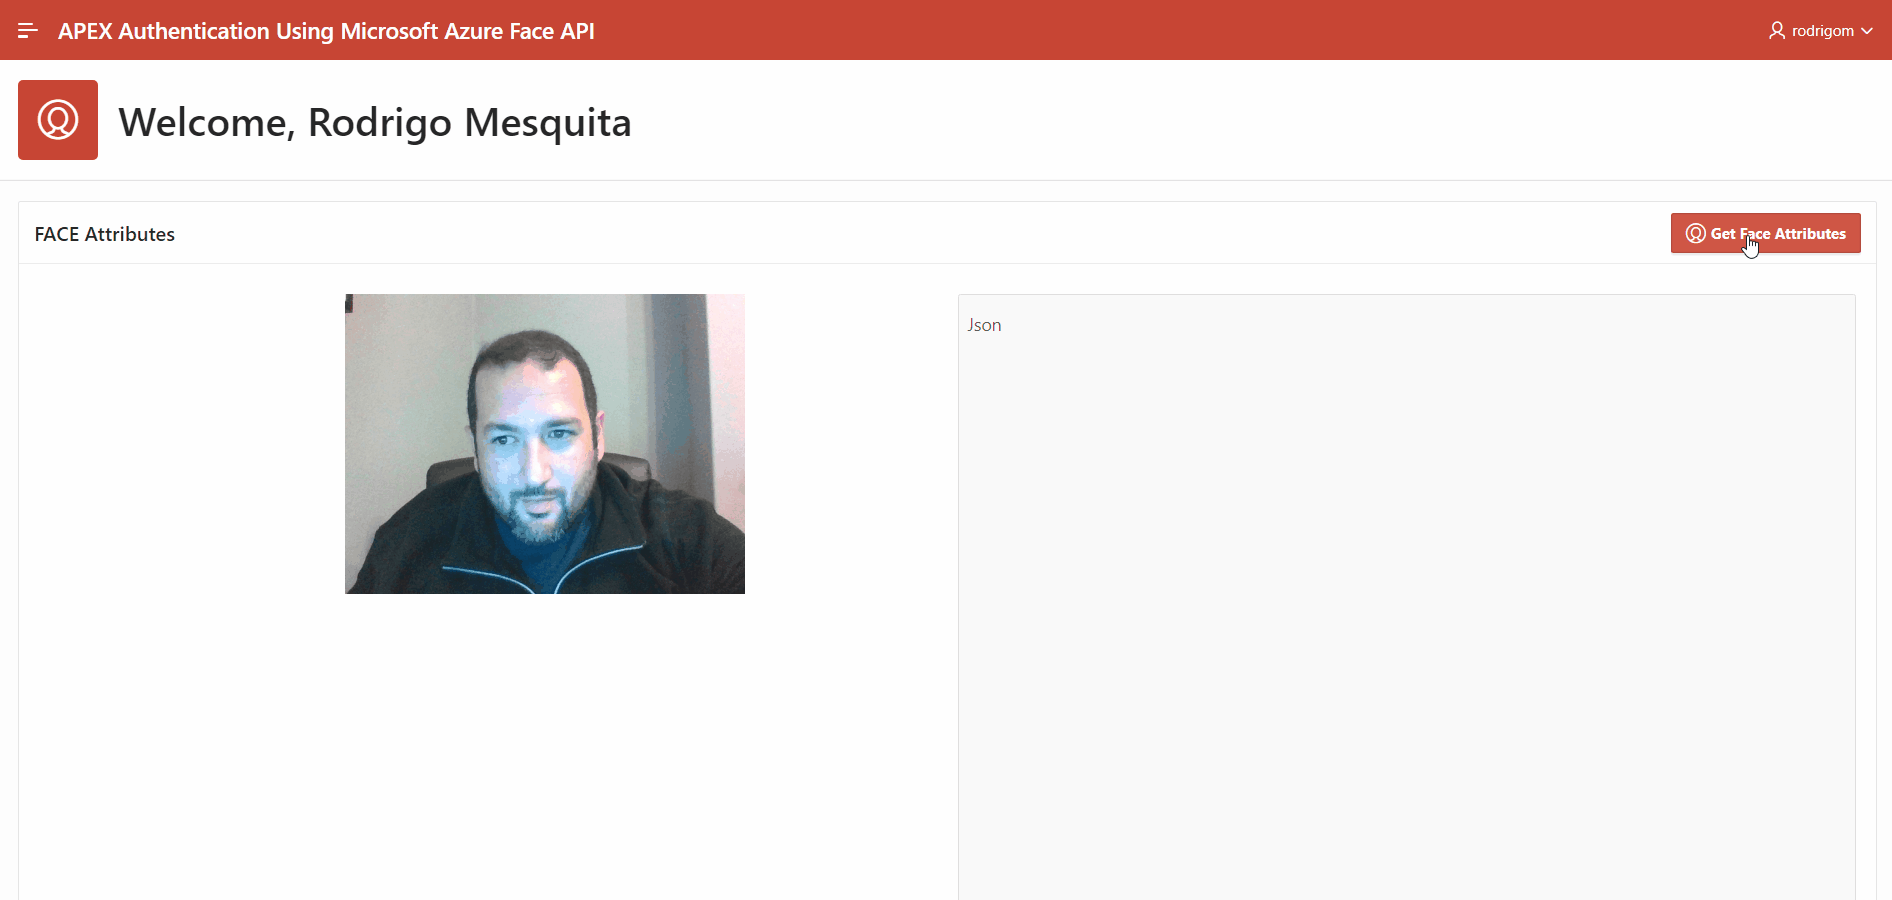
Now we can run the app and forget about boring usernames and passwords.
*This blog demonstrates how easy is to integrate APEX with Microsoft Azure Face ID, I recommend additional validation checks to detect pictures, videos and also request random user interaction during the validation process (e.g. Request user to blink twice or look left or cover the mouth…etc.)
If you liked this blog, check out our other APEX blogs here.
Author: Rodrigo Mesquita
Job Title: Oracle APEX Development Consultant
Bio: Rodrigo is an Oracle ACE and APEX Developer Expert certified by Oracle and is an experienced software engineer with emphasis in analysis, design and development of bespoke Oracle applications utilising development tools such as PL/SQL, APEX and Forms for a variety of international businesses. Rodrigo speaks regularly at Oracle community events and enjoys creating APEX plugins and writing blogs.