- Services

Getting to know us
- Industries
Recent case study:
Oracle EBS Cloud Deployment
Consolidating and Migrating assets into Oracle Cloud Infrastructure.
.png?width=250&name=stonewater-logo%20(1).png)
Most Visited Pages
-
- Resources
DSP-Explorer acquires leading Oracle Applications Managed Services Provider, Claremont, to further extend its data management capabilities.

Resources
- Contact us
APEX behind a Custom Domain using Oracle Cloud and NGINX
Contents
Oracle provides both the most capable database and the most popular low-code platform. So why not pair them with the most popular web server? [1]
The NGINX web server is fast, reliable, and easy to configure, and the steps in this blog will explain how to set up a reverse proxy [2] in front of an Oracle Autonomous Database and configure it to accept incoming traffic from a custom domain securely.
A spiritual successor to several blogs from the 'Best and Cheapest Oracle APEX hosting: Free Oracle Cloud' series by Dimitri Gielis [3]. This blog covers several of those topics, streamlines the steps taken, reflects the latest Oracle Cloud interface/configuration options and improves the certificate auto-renewal setup.
Why a Web Server?
For all the benefits of using a free autonomous database provided by Oracle Cloud, there is at least one issue; the URL to access your APEX instance begins:
https://g29ff0ee73ee766-example.adb.uk-london-1.oraclecloudapps.com/ords/
Not so much of an issue for personal or research projects but certainly undesirable for public-facing applications. As it happens, I've already purchased a domain and would like to make use of it here to achieve:
Given the objective, the most flexible and well-rounded solution would be to configure an Oracle Cloud hosted web server to route traffic coming from apex-labs.dev to our database. There are a few additional benefits when taking this approach:
- Certificates auto-renew i.e. maintenance-free (at the time of writing this can't be achieved when using an Oracle Cloud provided load balancer to route traffic).
- NGINX can also act as a load balancer if that is one of your requirements.
- Can be used to install and configure customer-managed ORDS.
- Can be used to host a website.
- Can be used to host static application/workspace files (APEX CDN is still recommended for APEX files).
Starting with the infrastructure requirements, we will create our free autonomous database and compute instance, configure the VCN (virtual cloud network) and DNS (domain name system) to accept and route web traffic, and then install and configure NGINX.
Autonomous Database
1. Open the main menu.
2. Click the 'Oracle Database' category and then the 'Autonomous Database' header from the expanded menu.
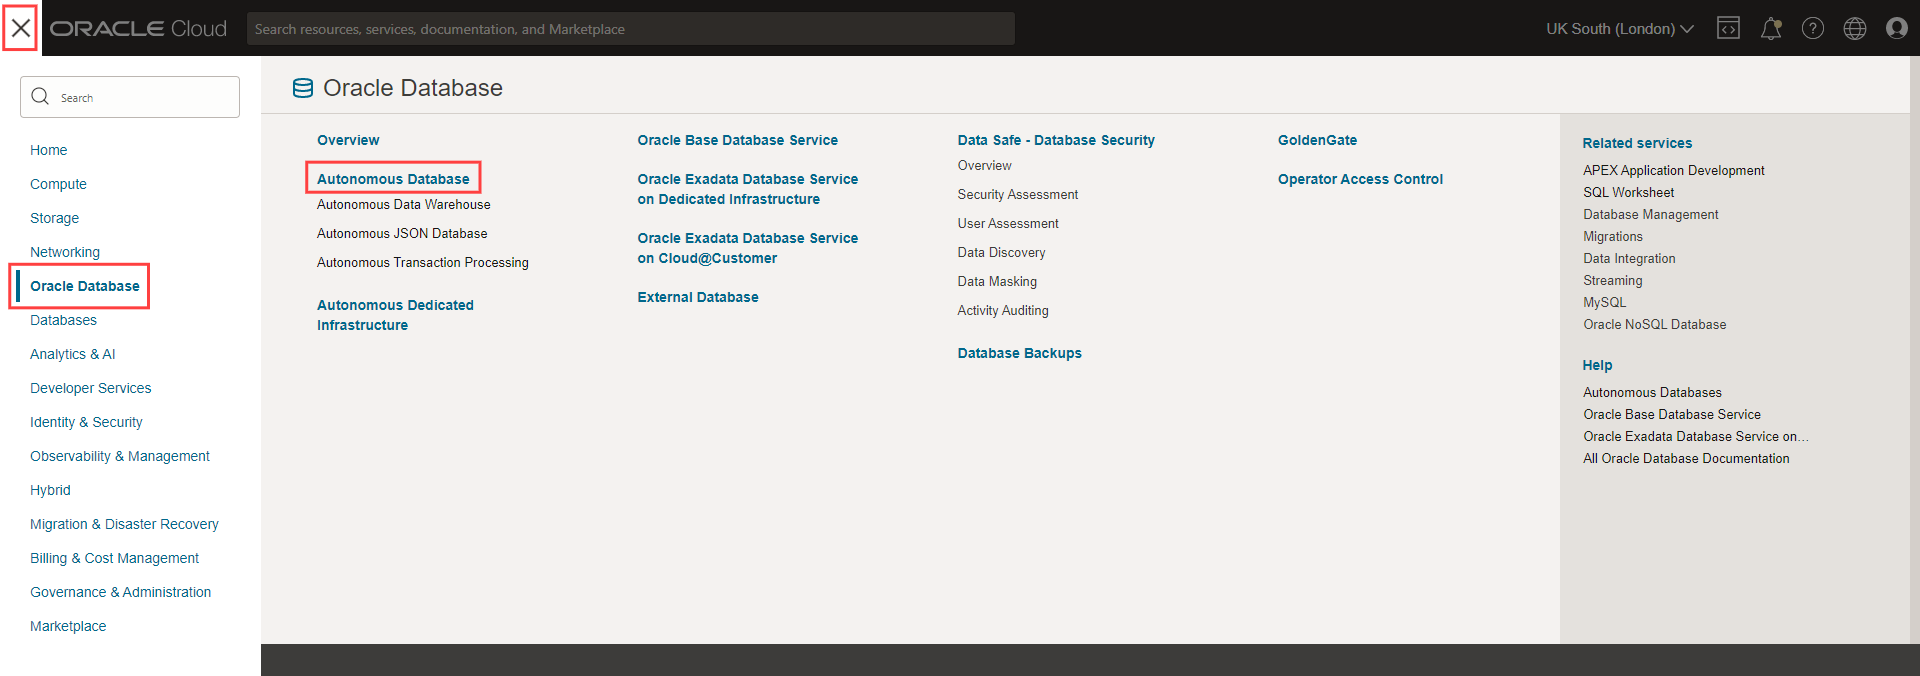
3. Click the 'Create Autonomous Database' button.
4. Choose a workload type.
APEX is available with all database types, but I’d recommend either 'Transaction Processing' or 'APEX' types, depending on the environment. The main difference between the two is a database of type 'APEX' does not accept direct connections [4] but is two/three times cheaper than a database of type 'Transaction Processing', which does allow direct connections.
As two 'Always Free' databases are allowed per tenancy, and assuming we are catering for small businesses and startups, I would suggest the following:
Production: 'APEX' type (Paid)
Test: 'APEX' type (Always Free)
Development: 'Transaction Processing' type (Always Free)
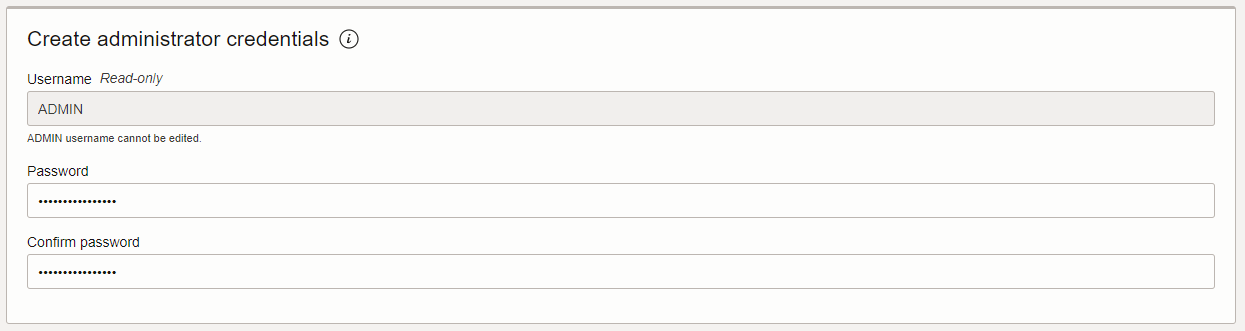
5. Under 'Create administrator credentials', type and confirm a password for the database 'ADMIN' user. Remember to make a note of the password.
6. Click the 'Create Autonomous Database' button.
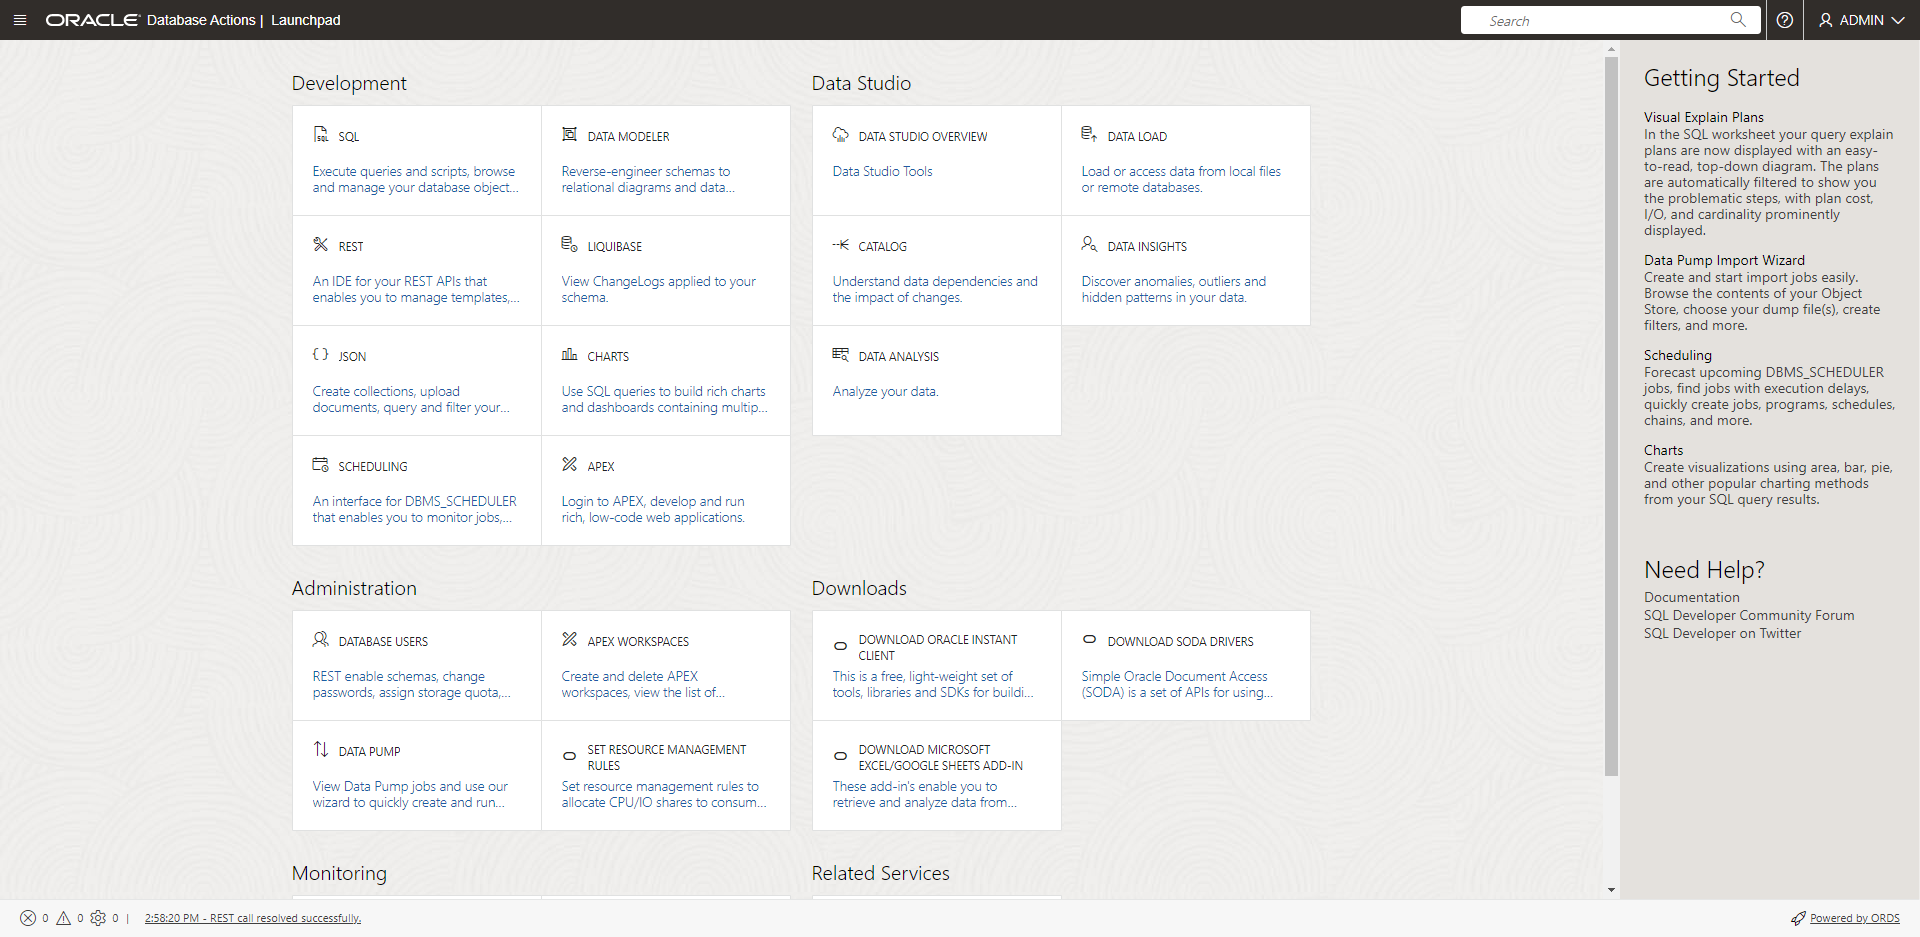
7. Now on the 'Autonomous Database details' page, wait for the database status to change from 'PROVISIONING' to 'AVAILABLE' and for the icon to turn green. Then click the 'Database actions' button.

8. Wait for the page to load, then make a note of the FQDN (fully qualified domain name) e.g. https://g29ff0ee73ee766-example.adb.uk-london-1.oraclecloudapps.com
Compute Instance
1. Open the main menu.
2. Click the 'Compute' category and then the 'Instances' option from the expanded menu.
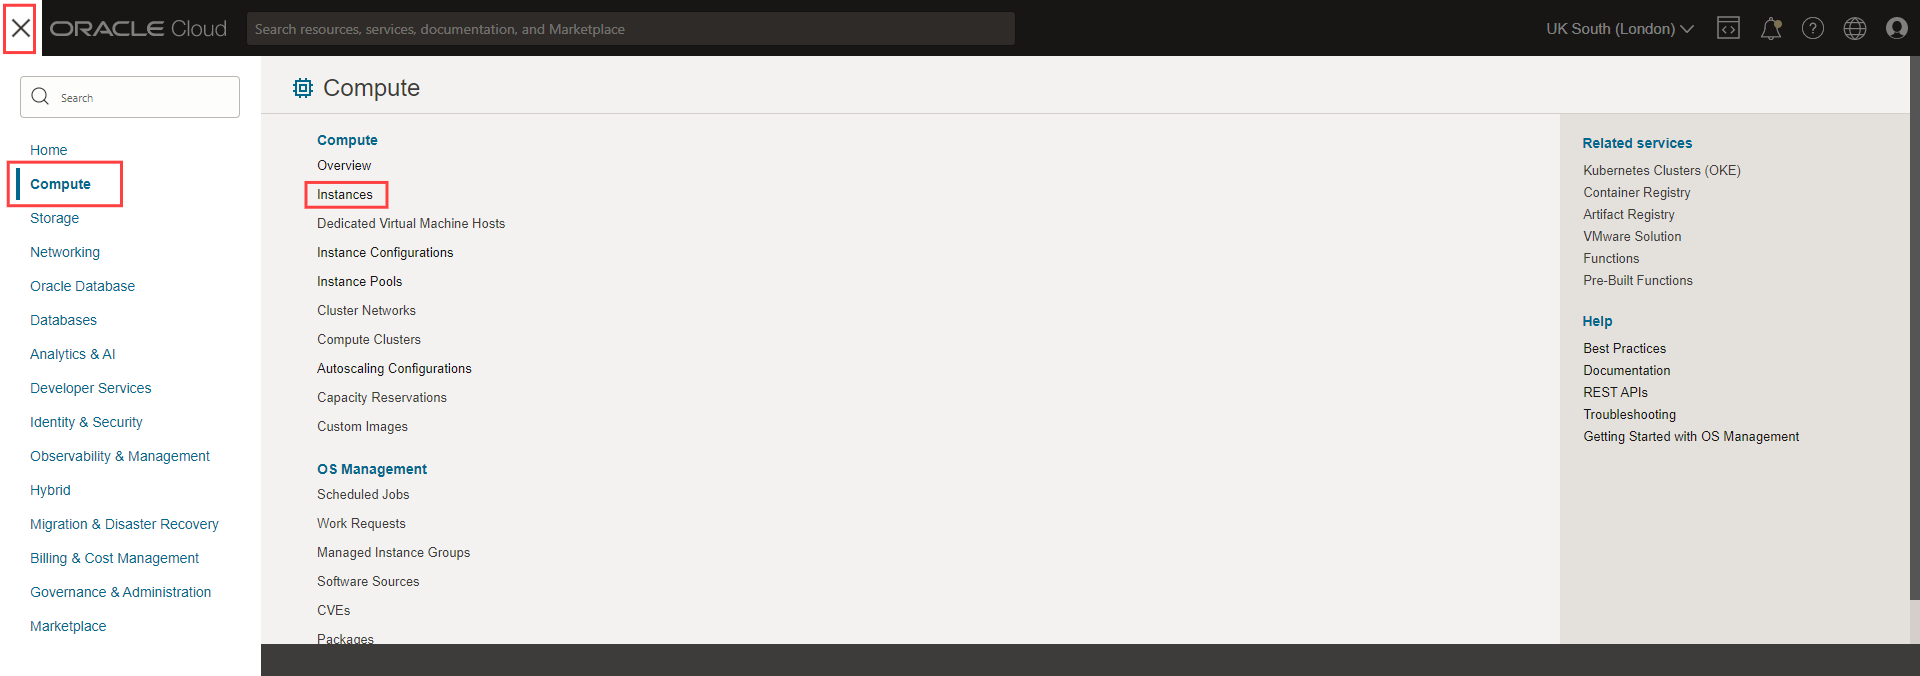
3. Click the 'Create instance' button.
4. Under 'Image and shape' leave as default.

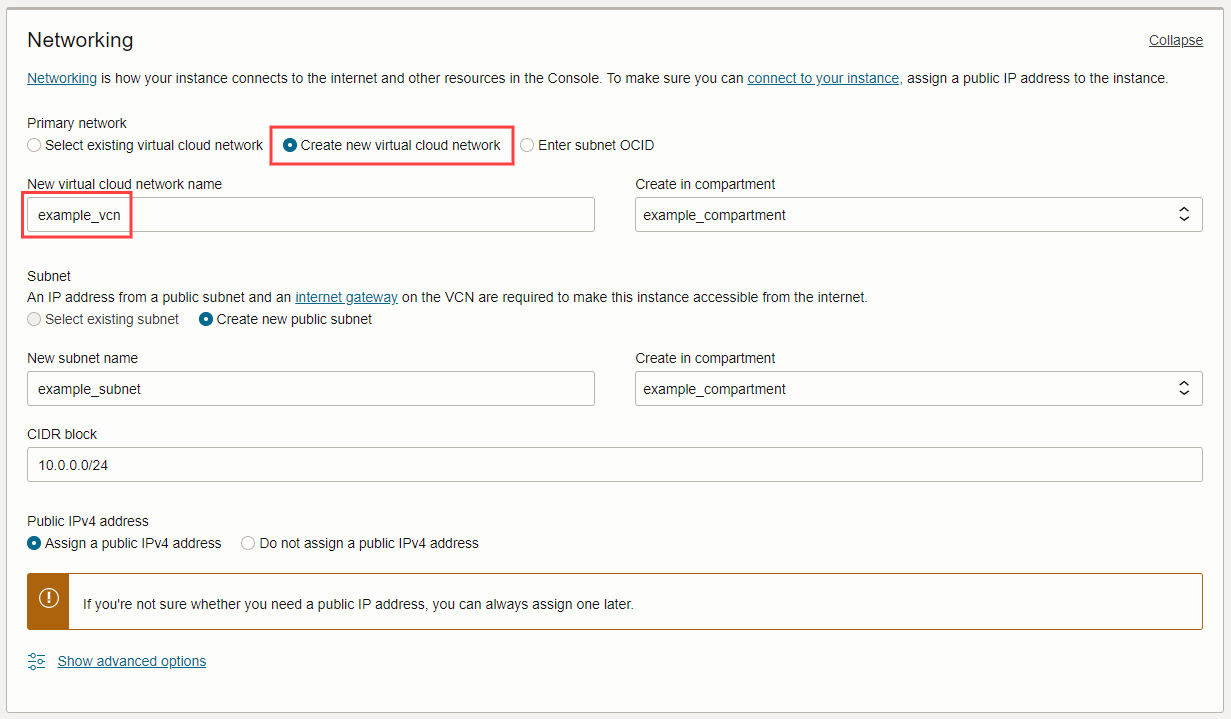
5. Under 'Networking' click the 'Edit' link, then select 'Create new virtual cloud network'. After selection, the section should automatically populate with default values. Make a note of the 'New virtual cloud network name'.
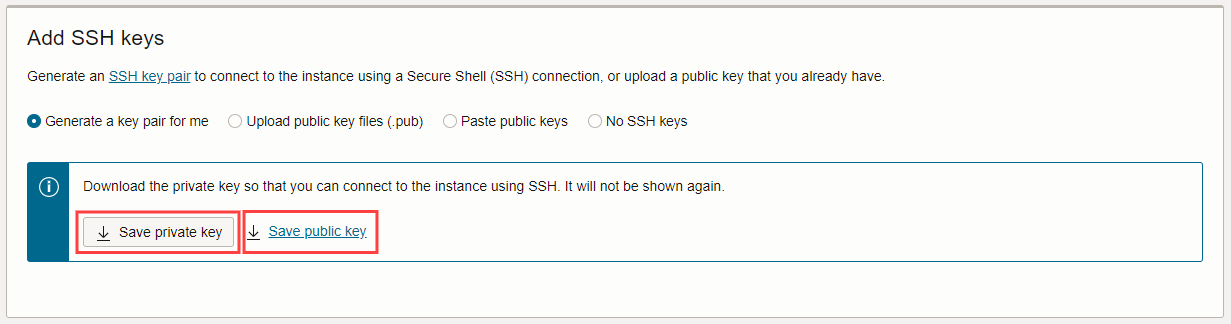
6. Under 'Add SSH keys', click the 'Save private key' button and 'Save public key' link.
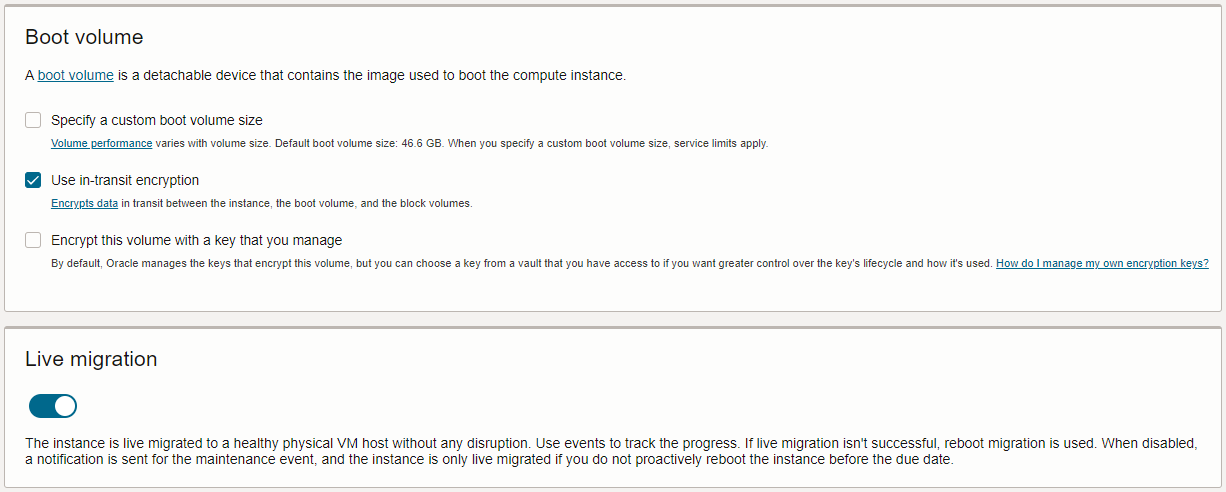
7. Under 'Boot volume' and 'Live migration' leave as default.
8. Click the 'Create' button.
9. Now on the 'Instance details' page, wait for the instance status to change from 'PROVISIONING' to 'RUNNING' and for the icon to turn green.
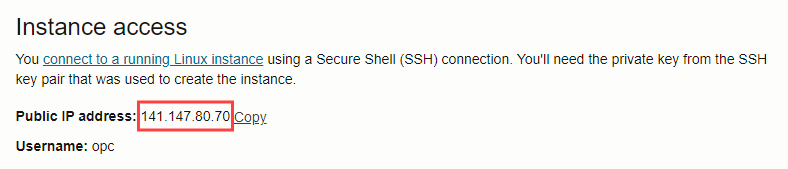
10. Make a note of the 'Public IP address'.
VCN and DNS
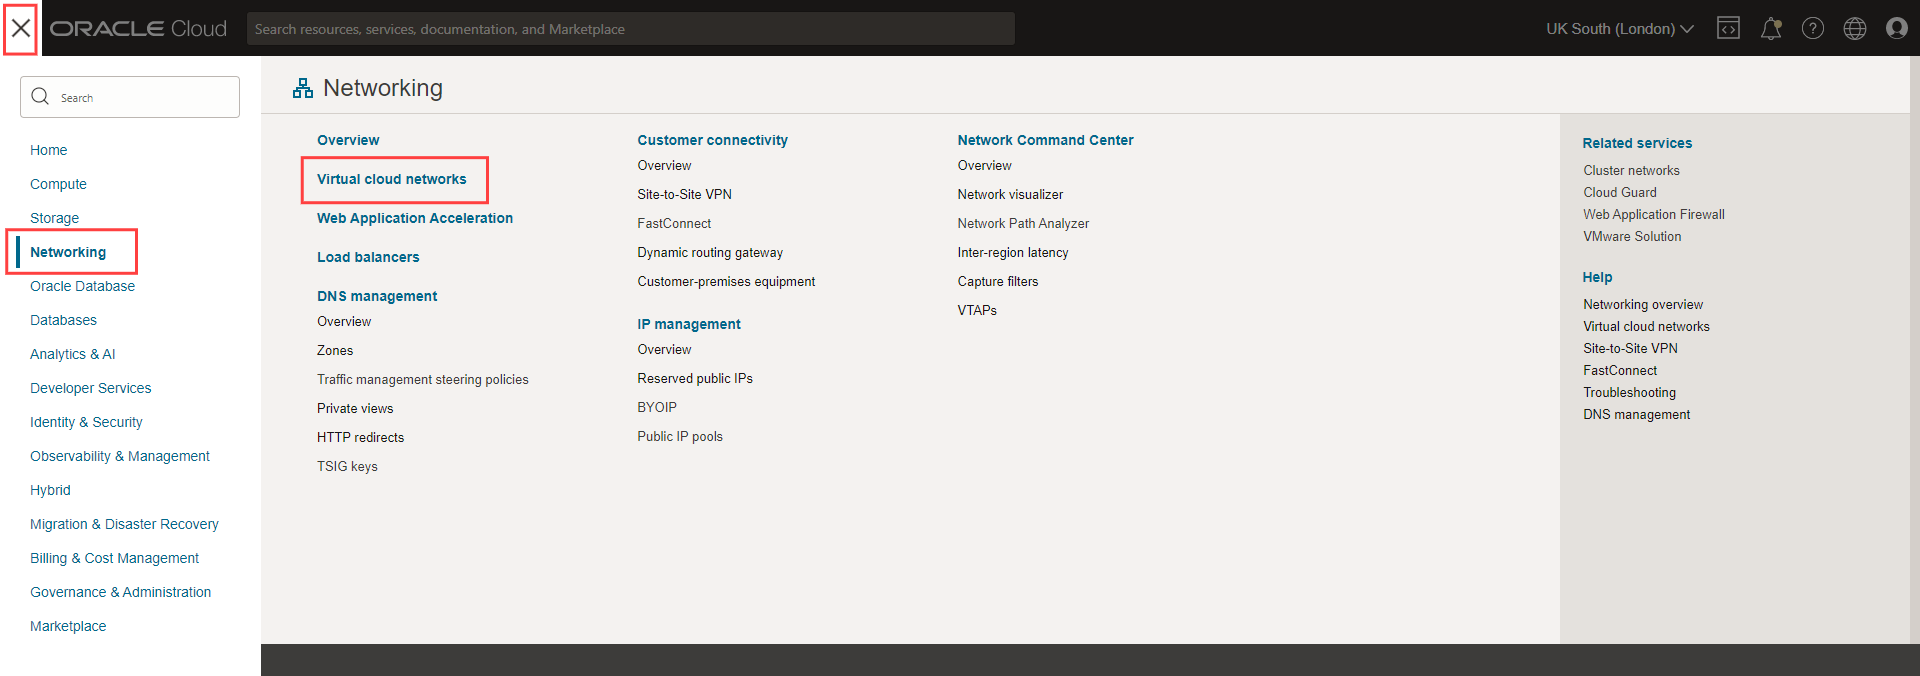
1. Open the main menu.
2. Click the 'Networking' category and then the 'Virtual cloud networks' headers from the expanded menu.
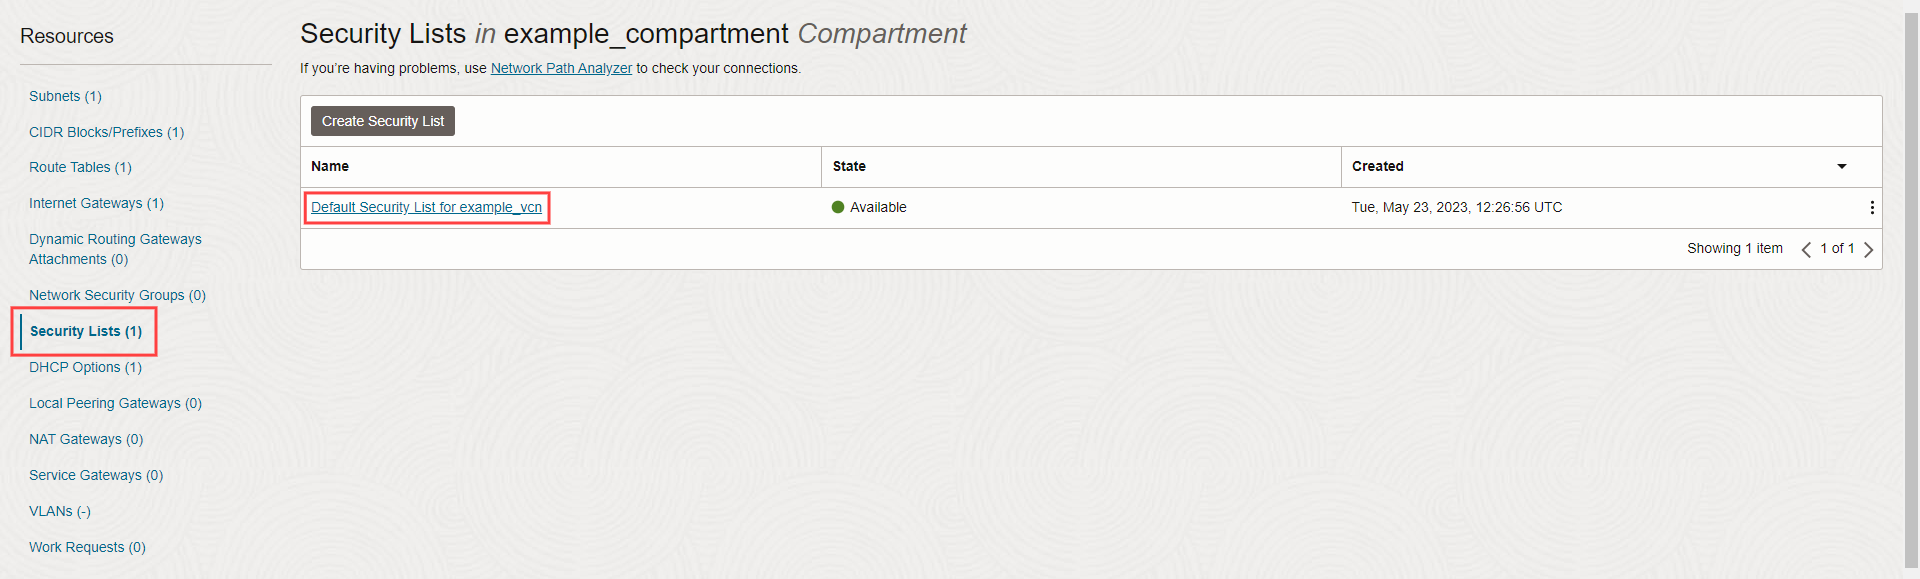
3. Click the name of the VCN created during the compute instance setup.
4. Click 'Security Lists' under 'Resources', then select the 'Default Security List for …' Security List.
5. Click 'Add Ingress Rules'.
6. Under 'Ingress Rule 1' add the following:
Source CIDR: 0.0.0.0/0
Destination Port Range: 80
7. Click '+Another Ingress Rule'.
8. Under 'Ingress Rule 2' add the following:
Source CIDR: 0.0.0.0/0
Destination Port Range: 443
9. Click 'Add Ingress Rules'.

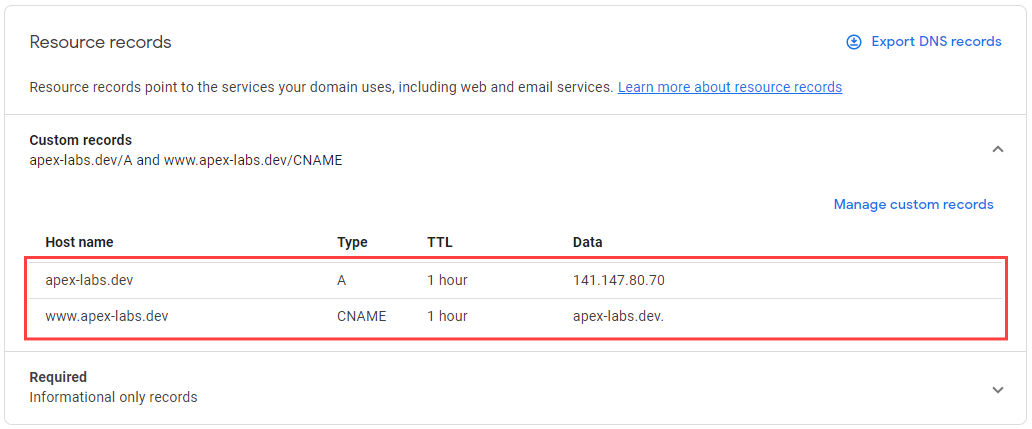
10. Navigate to your domain provider, in my case, this is Google Domains.
11. For your chosen domain:
a. Enter the following 'A' record:
i. Detail: IP address (public IP address of compute instance noted earlier)
b. Enter the following, 'CNAME' record:
i. Name: www
ii. Detail: domain name
NGINX Domain Config
1. Using the private key saved earlier, connect to your compute instance using your SSH client of choice.
2. Run the following commands to install NGINX:
$ sudo su
$ yum update
$ yum install nginx
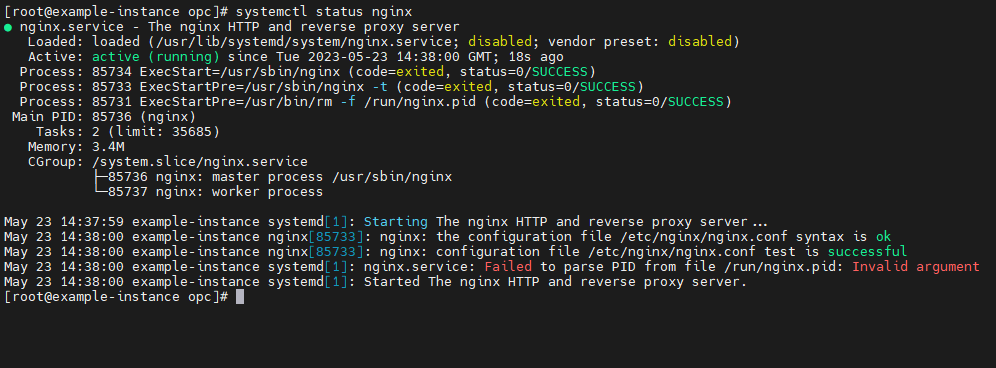
$ systemctl start nginx
$ systemctl status nginx
3. The NGINX service should report that it has loaded successfully and is running.
"Failed to parse PID from file /run/nginx.pid" is a known false negative that sometimes occurs on single-core systems. It is safe to ignore and does not affect the NGINX service.
4. Run the following commands to open the compute instance firewall to web traffic:
$ firewall-cmd --permanent --zone=public --add-service=http
$ firewall-cmd --permanent --zone=public --add-service=https
$ firewall-cmd --reload
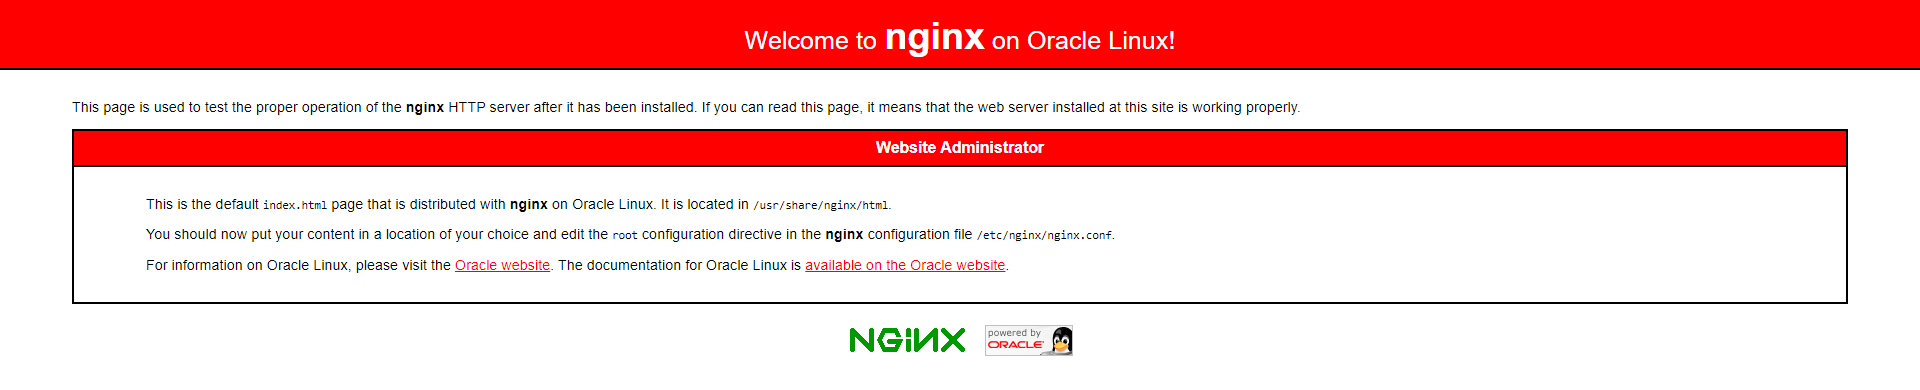
5. Confirm the firewall is open by entering the public IP address into your browser.
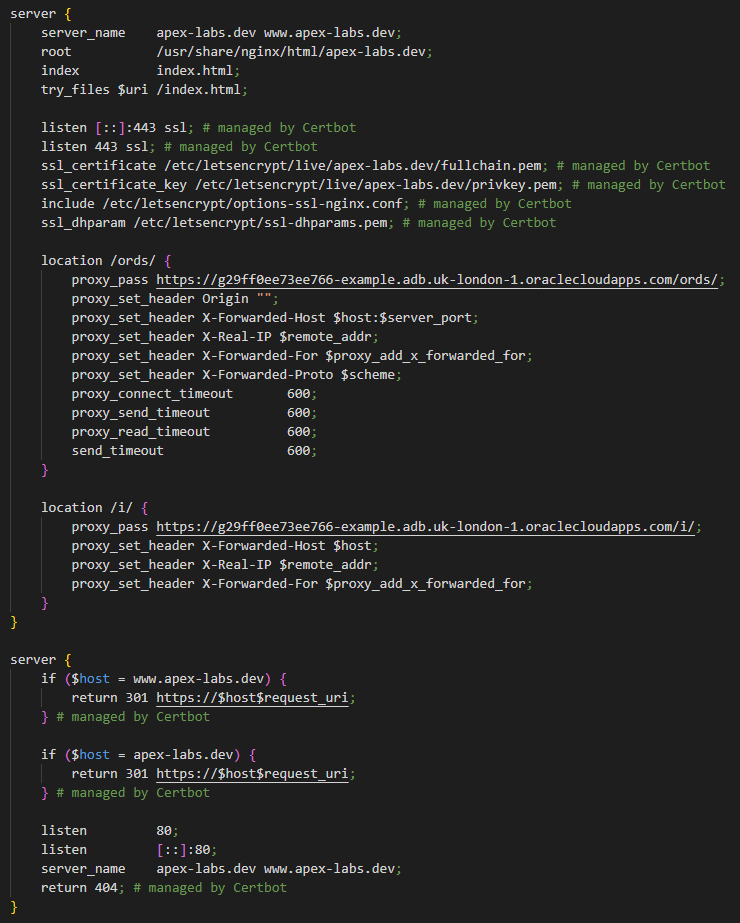
6. Locally, create a file named your_domain.conf (e.g. apex-labs.dev.conf) with the following data (amending for your domain):
server {
listen 80;
listen [::]:80;
server_name apex-labs.dev www.apex-labs.dev;
root /usr/share/nginx/html;
index index.html;
try_files $uri /index.html;
}
7. Locally, use the SCP command to transfer the file to the compute instance.
$ scp -i local_path_to_private_key apex-labs.dev.conf opc@141.147.80.70:/home/opc
8. From the compute instance, run the following commands to load and confirm the NGINX configuration file for your domain:
$ cp /home/opc/apex-labs.dev.conf /etc/nginx/conf.d/apex-labs.dev.conf
$ nginx -t

$ nginx -s reload
9. Run the following commands to install snap [5]:
$ dnf install https://dl.fedoraproject.org/pub/epel/epel-release-latest-8.noarch.rpm
$ dnf upgrade
$ yum install snapd
$ systemctl enable --now snapd.socket
$ ln -s /var/lib/snapd/snap /snap
10. To complete the installation, disconnect and reconnect to the compute instance, then wait ~30 seconds before proceeding.
11. Run the following commands to install and run certbot [6]:
$ sudo su
$ sudo snap install core; sudo snap refresh core
$ snap install --classic certbot
$ ln -s /snap/bin/certbot /usr/bin/certbot
$ certbot --nginx
12. Confirm your NGINX domain configuration is working by entering your domain into your browser e.g. www.apex-labs.dev
NGINX APEX Config
1. Certbot automatically updates the NGINX configuration file we uploaded earlier. Locally, run the following commands to retrieve the updated file:
$ scp -i local_path_to_private_key opc@141.147.80.70:/etc/nginx/conf.d/apex-labs.dev.conf apex-labs.dev.conf
2. Update the configuration file with the following blocks (amending the 'proxy pass' FQDNs with the one you made a note of during the autonomous database setup):
location /ords/ {
proxy_pass https://g29ff0ee73ee766-example.adb.uk-london-1.oraclecloudapps.com/ords/;
proxy_set_header Origin "";
proxy_set_header X-Forwarded-Host $host:$server_port;
proxy_set_header X-Real-IP $remote_addr;
proxy_set_header X-Forwarded-For $proxy_add_x_forwarded_for;
proxy_set_header X-Forwarded-Proto $scheme;
proxy_connect_timeout 600;
proxy_send_timeout 600;
proxy_read_timeout 600;
send_timeout 600;
}
location /i/ {
proxy_pass https://g29ff0ee73ee766-example.adb.uk-london-1.oraclecloudapps.com/i/;
proxy_set_header X-Forwarded-Host $host;
proxy_set_header X-Real-IP $remote_addr;
proxy_set_header X-Forwarded-For $proxy_add_x_forwarded_for;
}
1. Locally, use the SCP command to transfer the file to the compute instance.
$ scp -i local_path_to_private_key apex-labs.dev.conf opc@141.147.80.70:/home/opc
2. From the compute instance, run the following commands to load and confirm the NGINX configuration file for your domain:
$ cp /home/opc/apex-labs.dev.conf /etc/nginx/conf.d/apex-labs.dev.conf
$ nginx -t
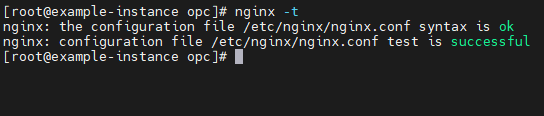
$ nginx -s reload
3. Run the following command to allow the compute instance to initiate a network connection to the autonomous database (required because the 'Use in-transit encryption' option was enabled for the compute instance):
$ setsebool httpd_can_network_connect 1 -P
4. Finally, we can set NGINX to start automatically in case the compute instance is ever rebooted (e.g. either manually to clear a stuck process or automatically due to Oracle Cloud maintenance).
$ systemctl enable nginx
5. Confirm your APEX URL configuration is working by entering your APEX URL into your browser e.g. www.apex-labs.dev/ords/apex.
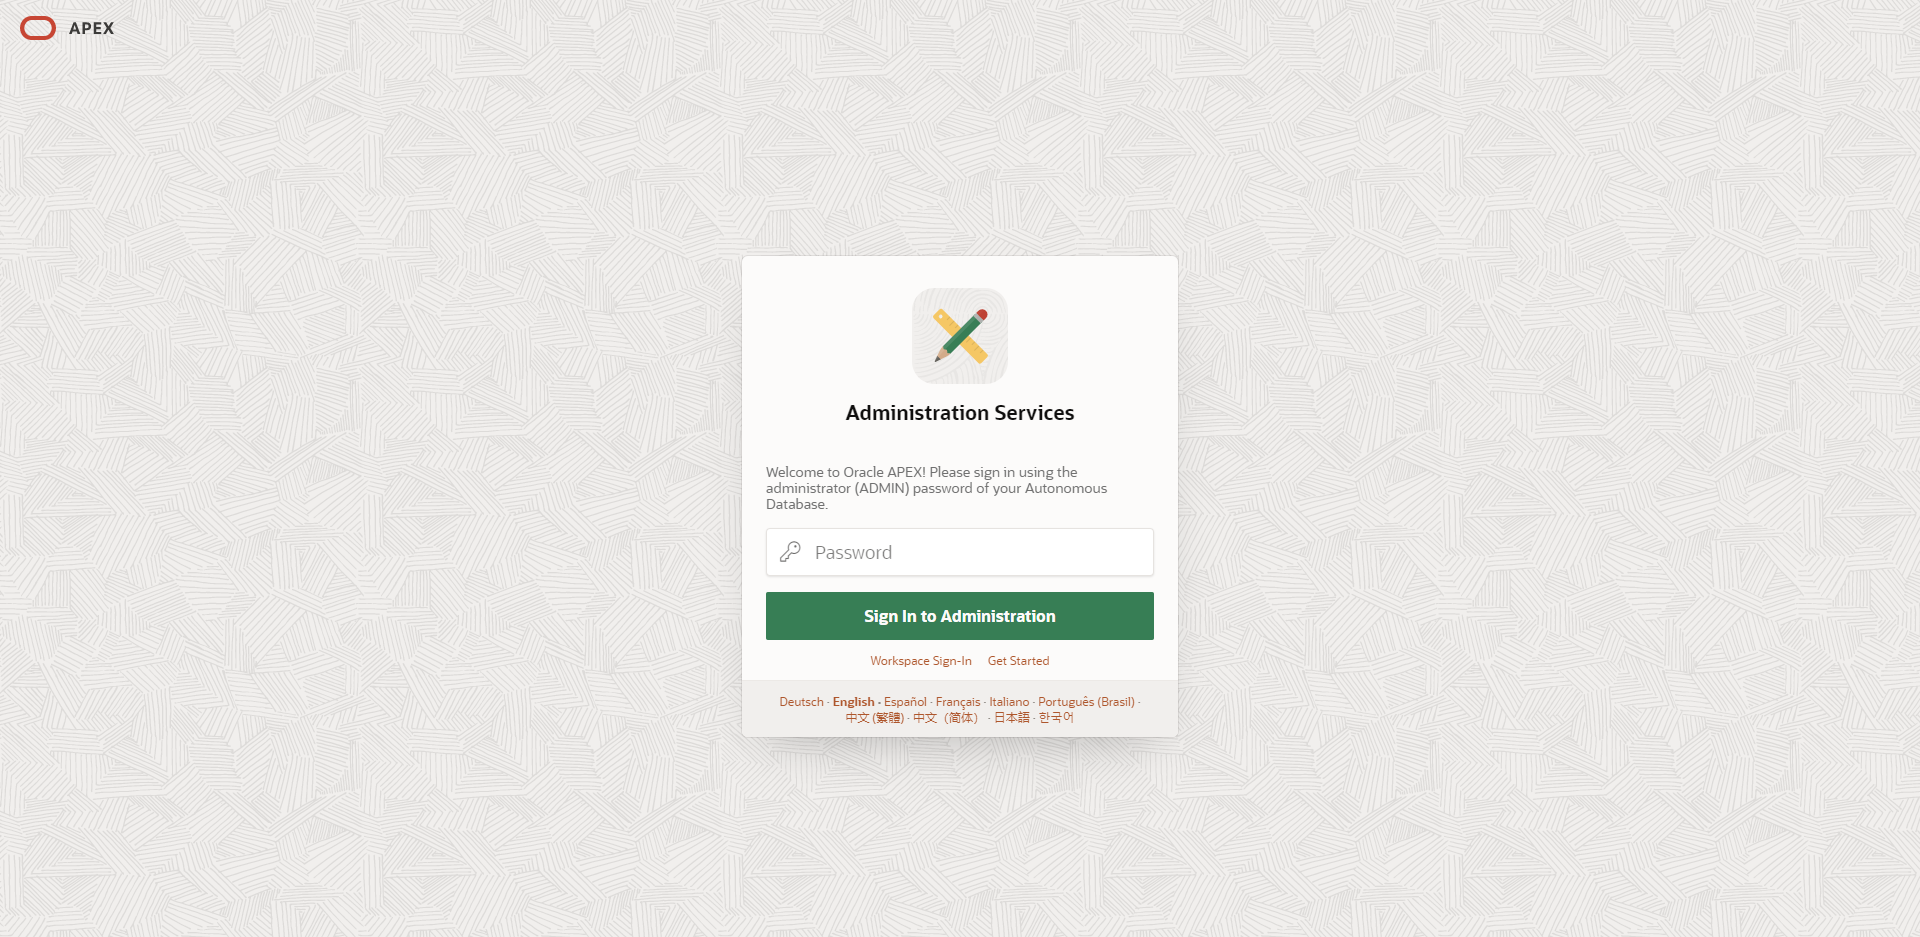
6. Sign In using the 'ADMIN' password you made a note of during the autonomous database setup.
Conclusion
In summary, taking on the mantle of cloud/network/systems engineer, we have provisioned an autonomous database and a compute instance, updated the associated VCN and DNS settings to route traffic, and remotely connected to the compute instance to install various packages and configuration files allowing us to process that traffic in a secure, user-friendly, and maintenance-free way.
For more information, check out our APEX services, and if you liked this blog, check out our other APEX blogs here.
[1] 34.4% of all known web servers. See the full list at https://w3techs.com/technologies/overview/web_server
[2] Learn more about reverse proxy servers at https://www.nginx.com/resources/glossary/reverse-proxy-server/.
[3] Read the blog series at https://dgielis.blogspot.com/2019/09/best-and-cheapest-oracle-apex-hosting.html.
[4] Like those coming from SQL Developer or SQLcl. Instead, use SQL Developer Web from within Oracle Cloud or SQL Commands from within APEX.
[5] A package host and distribution platform. Learn more at https://snapcraft.io/. Install steps taken from https://snapcraft.io/docs/installing-snap-on-red-hat.
[6] An open-source tool used to automate the provision and renewal of Let’s Encrypt certificates. Learn more at https://certbot.eff.org/. Install steps taken from https://certbot.eff.org/instructions?ws=nginx&os=snap.