- Services

Getting to know us
- Industries
Recent case study:
Oracle EBS Cloud Deployment
Consolidating and Migrating assets into Oracle Cloud Infrastructure.
.png?width=250&name=stonewater-logo%20(1).png)
Most Visited Pages
-
- Resources
DSP-Explorer acquires leading Oracle Applications Managed Services Provider, Claremont, to further extend its data management capabilities.

Resources
- Contact us
Using APEX Workflows
Contents
APEX 23.2 introduced the new Workflow Designer, which works with the existing Task Definitions to create workflows and automate business processes. My colleague, James Sanna, wrote a Workflow Designer overview blog a few months ago, which you can read here. In this blog, I will be detailing the steps I took to test the Workflow Designer to see how to use it for a combination of human and automated approvals.
Scenario
To test APEX Workflows and the new designer, I am going to create a simple application to review and approve (or reject) expense claims. The rules I will use are as follows:
- All claims above £1000 (high value) must be manually reviewed by the Finance Manager, John Smith, and can be approved or rejected.
- Claims under £1000 (low value) are automatically approved.
- Low-value claims submitted by senior management are automatically approved immediately. All other claims must be put on hold for 24 hours before being approved.
Base Application
1. The first step is to create a table to store the details of the claims, which will consist of the following columns.
| Name | data type | comments |
| CLAIM_ID | NUMBER | Auto-generated Primary Key |
| CLAIM_TITLE | VARCHAR2(50) | |
| CLAIM_VALUE | NUMBER(10,2) | |
|
CLAIM_TYPE |
VARCHAR2(20) | Values: STANDARD or MANAGER |
| CLAIM_STATUS | VARCHAR2(20) | Values: PENDING, APPROVED or REJECTED |
| CREATED_ON | DATE |
2. Next, I will use the APEX Create Page wizard to create an interactive report (page 1) with a linked modal form (page 5) over the CLAIMS table.
3. I will remove the edit link from the interactive report page, as I only need the create option for this application.
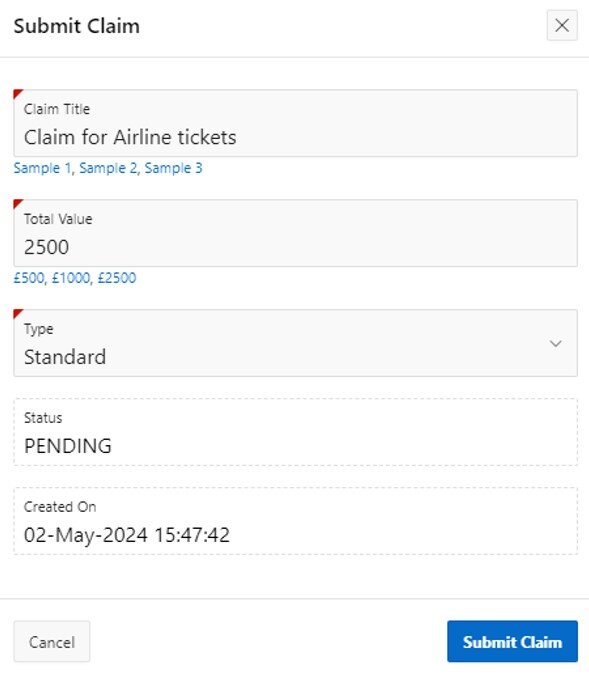
4. To aid testing, on the modal form page, I am going to add some quick picks for the claim title and value and use a select list for the type.
5. The status and created date will be set as display-only items and have their values defaulted to PENDING and SYSDATE, respectively.
Task Definition
Before building the workflow itself, I need to define a human task for the approval of any high-value claims, as this will be needed by the workflow.
1. From Shared Components, select Task Definitions and click on Create.
2. Create an approval type task named Claim Approval as follows:
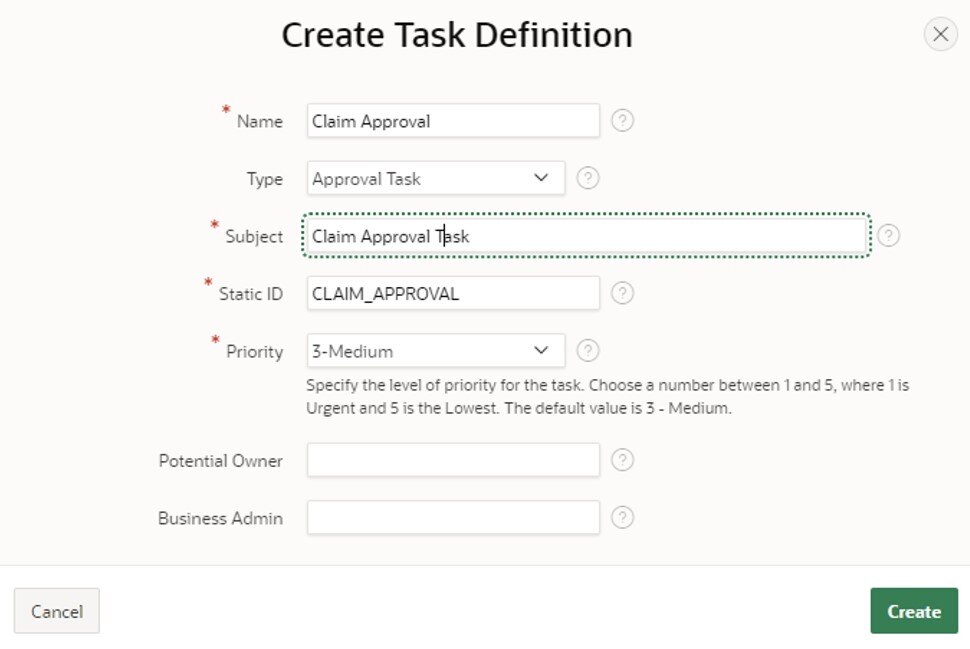
3. Click the Create button to generate the base task and open the details.
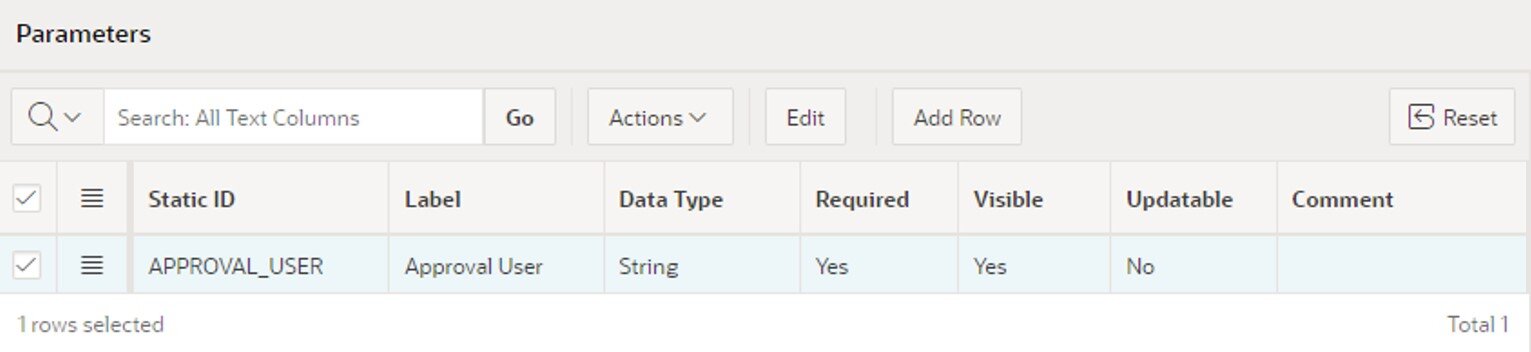
4. Add a required string parameter to hold the approval user.
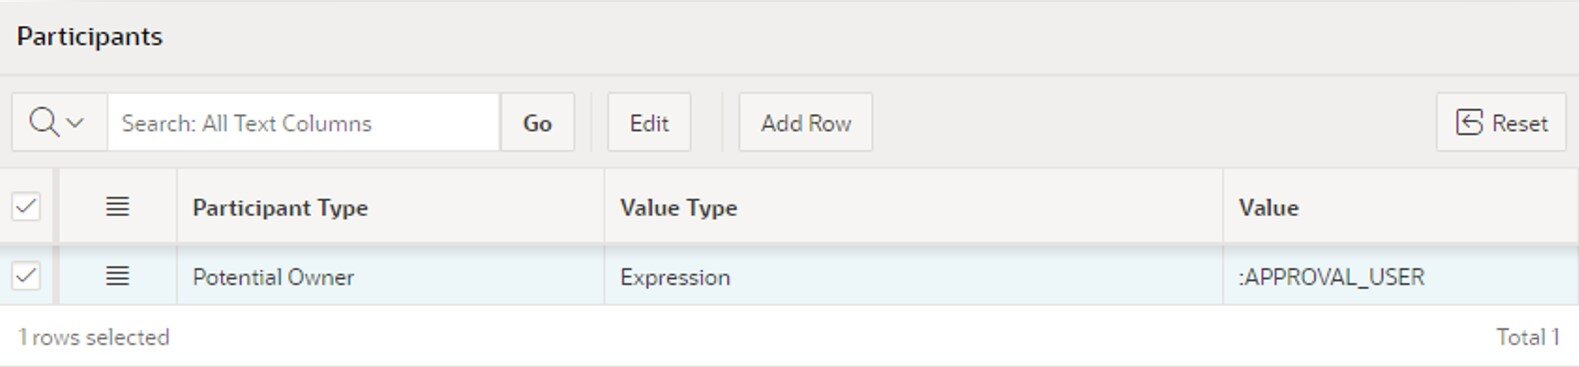
5. Add Potential Owner participant with the value set by an expression with the value set to the APPROVAL_USER parameter we just added.
6. Enter a page number for the Task Details Page and click the Create Task Details Page button.
Workflow Designer
Now we have created the application to view and submit claims and added a human approval task, we can use the new workflow designer to create the workflow for our process.
The workflow designer is accessed from the application's shared components and creates a basic workflow for you to modify. The workflow designer looks and feels like the page designer, so I found it very easy to understand how to use the interface to draw workflows.
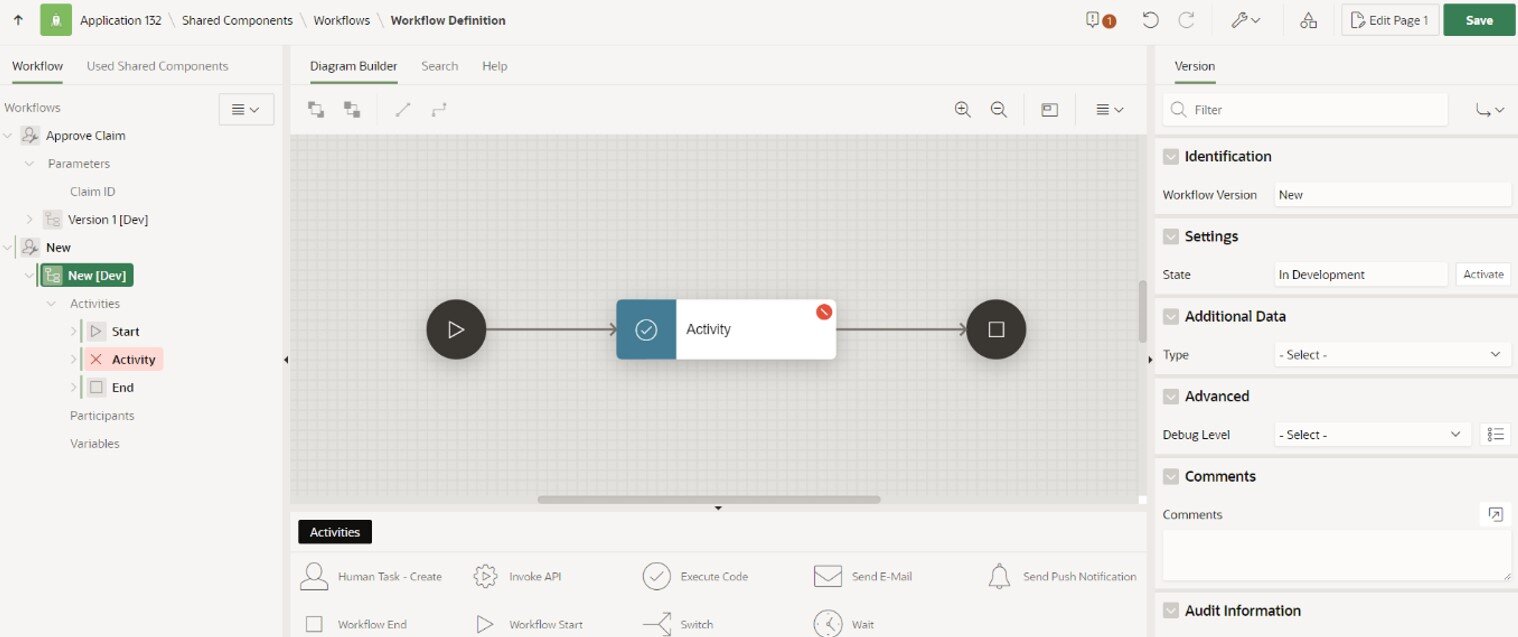
Designer Tree
On the left side of the page is the designer tree. This contains the definition of the workflow, which can have multiple versions but only ever one live version. Each workflow consists of parameters, activities, participants and variables.
Activities Pallet
At the bottom of the page is the pallet of activities used to build your workflows. There are various types of activity, such as ‘human task’, ‘execute code’, ‘switch’, and ‘send email’, etc. Each activity is a logical step in the workflow and performs a process. This can be an automated activity or one that requires human input.
Diagram Builder
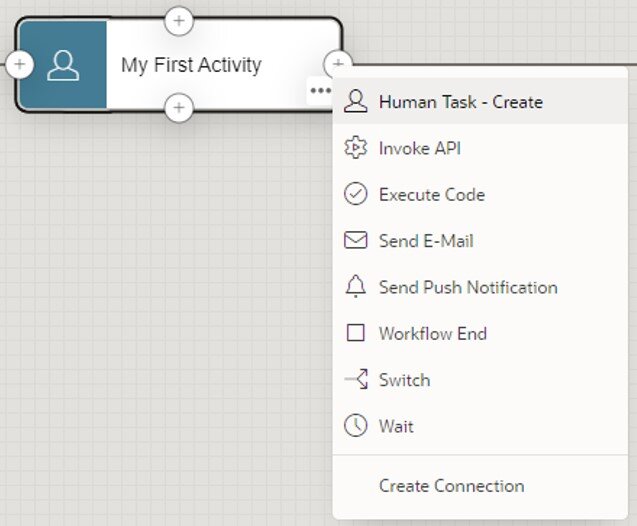
In the centre of the page is the diagram builder, where you draw your workflow by dragging activities from the pallet and connecting them together. Clicking on a connection point for an activity brings up the connect tool menu, where you can create a connection to a new activity, which is then created for you or can be connected to an existing activity.
Activity Properties
The properties for each activity are set using the activities panel on the right side of the page. These will differ depending on the type of activity selected.
Building my Workflow
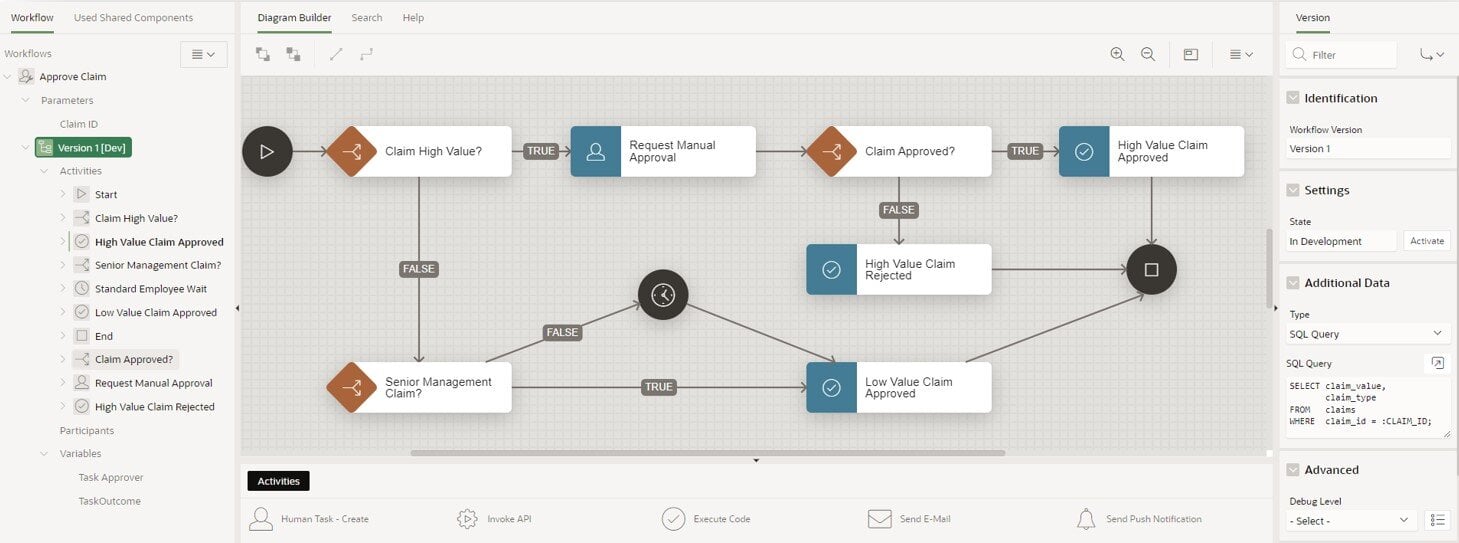
The test workflow I am going to build will consist of the following 10 activities.
- Workflow Start.
- Switch - to evaluate if a claim is of a high value.
- Human Task - to request approval of a high-value claim.
- Switch - to check if a high-value claim was approved by the human task.
- Execute Code – process an approved high-value claim.
- Execute Code – process a rejected high-value claim.
- Switch - to evaluate if a low-value claim was submitted by a senior manager.
- Wait – for low-value claims submitted by anyone, not a senior manager.
- Execute Code – process automatically approved low-value claim.
- Workflow End.
Base Workflow Definition
I will need a parameter to pass in the Claim ID when I submit a new claim from my application modal page and create the workflow. Two variables will also be needed for the human task used to approve/reject a high-value claim.
- TASK_APPROVER - The username of the approver.
- TASK_OUTCOME – The outcome of the human task, typically APPROVED or REJECTED.
Building the workflow is a simple process of dragging each activity into the diagram from the pallet and setting the relevant properties. A basic In Development workflow version has already been created for me, consisting of start/end points and an ‘execute code’ activity. These are the steps I took to build my workflow. I decided to create all my activities first and add the connections afterwards.
1. Within the tree, select the workflow header and update the following properties.
| Identification | |
| Name & Title | Approve Claim |
2. Right-click on the Approve Claim workflow and select Create Parameter.
3. Update the following properties.
| identification | |
| Static ID | CLAIM_ID |
| label | |
| Label | Claim ID |
| variable | |
| Data Type | NUMBER |
4. Click on the New [Dev] version in the tree and update the following properties.
| Identification | |
| Name | Version 1 |
| additional data | |
| Type | SQL Query |
| SQL Query |
SELECT claim_value, claim_type |
When the workflow is activated, the CLAIM_ID parameter will be passed in, and the SQL query will be executed to return the values for the CLAIM_VALUE and CLAIM_TYPE. These values can then be utilised by the workflow activities.
5. Right-click on the Variables section within the tree and create a new variable using the following properties.
| Identification | |
| Static ID | TASK_APPROVER |
| label | |
| Label | Task Approver |
| variable | |
| Data Type | VARCHAR2 |
| value | |
| Type | Expression |
| Language | PL/SQL |
| PL/SQL Expression | hr_api.finance_manager_id |
The function finance_manager_id is a function I have added to a local database package named hr_api and returns the Finance Manager USER ID. It will be used by the human approval task later.
6. Create a second variable using the following properties.
| identification | |
| Static ID | TASK_OUTCOME |
| label | |
| Label | Task Outcome |
| variable | |
| Data Type | VARCHAR2 |
This variable will store the outcome of the human task and be used later in the workflow.
Activities
Now we have set the basic workflow properties and created the required parameters and variables, we can add the activities.
- On the diagram, select the outgoing connection coming from the activity and delete it.
- Select the activity and update using the following properties.
| identification | |
| Name | Claim High Value? |
| Type | Switch |
| Switch | |
| Type | True False Check |
| Condition | |
| Condition Type | Expression |
| Expression | :CLAIM_VALUE >= 1000 |
When the workflow is created, the first switch activity will evaluate the claim value and return TRUE if it is £1000 or more and FALSE if less.
3. Drag a Human Task activity from the Activities pallet, place it to the right of the Claim High Value switch and update using the following properties.
| identification | |
| Name | Request Manual Approval |
| Settings | |
| Definition | Claim Approval |
| Subject | Please review claim &CLAIM_ID. |
| Outcome | TASK_OUTCOME |
| Owner | TASK_APPROVER |
When the workflow requires human approval, the user held in the TASK_APPROVER variable will be passed in, and the outcome will be returned into the TASK_OUTCOME variable.
4. Drag a Switch activity from the Activities pallet, place it to the right of Request manual approval and update using the following properties.
| identification | |
| Name | Claim Approved? |
| Switch | |
| Type | Check Workflow Variable |
| Compare | |
| Compare Variable | TASK_OUTCOME |
5. Drag an Execute Code activity from the Activities pallet, place it to the right of Claim Approved and update using the following properties.
| identification | |
| Name | High Value Claim Approved |
| Source | |
| PL/SQL Code | UPDATE claims SET claim_status = 'APPROVED' WHERE claim_id = :CLAIM_ID; |
When a claim is approved by the human task, this code will update the status to APPROVED for the linked claims record.
6. Drag an Execute Code activity from the Activities pallet, place it underneath Claim Approved and update using the following properties.
| identification | |
| Name | High Value Claim Rejected |
| Source | |
| PL/SQL Code | UPDATE claims SET claim_status = 'REJECTED' WHERE claim_id = :CLAIM_ID; |
When a claim is rejected by the human task, this code will update the status to REJECTED for the linked claims record.
7. Drag a Switch activity from the Activities pallet, place it underneath Claim High Value and update using the following properties.
| identification | |
| Name | Senior Management Claim? |
| Type | Switch |
| Switch | |
| Type | True False Check |
| Condition | |
| Condition Type | Expression |
| Expression | :CLAIM_TYPE = 'MANAGER' |
When a claim is identified as low value (under £1000), this switch will evaluate the CLAIM_TYPE value to check if it was submitted by a manager or not.
8. Drag a Wait activity from the Activities pallet, place it to the right of the Senior Management Claim and update using the following properties.
| identification | |
| Name | Standard Employee Wait |
| Settings | |
| Static Value | PT1M |
The wait value is entered in ISO format. The requirement was for low-value claims not submitted by a senior manager to wait 24 hours, which would require the value to be PT24H. As I don’t want to wait that long while testing, I will set it to 1 minute instead (PT1M).
9. Drag an Execute Code activity from the Activities pallet, place it to the right of Senior Management Claim and update using the following properties.
| identification | |
| Name | Low Value Claim Approved |
| Source | |
| PL/SQL Code | UPDATE claims SET claim_status = 'APPROVED' WHERE claim_id = :CLAIM_ID; |
Connections
Now we have added all the activities, we need to add the connections to complete the diagram.
1. Click on the right activity point of the Claim High Value switch, select Create Connection, and update using the following properties.
| identification | |
| Name | True |
| Condition | |
| When | True |
| Activity | |
| To | Request Manual Approval |
2. Click on the bottom activity point of the Claim High Value switch, select Create Connection, and update using the following properties.
| identification | |
| Name | FALSE |
| Condition | |
| When | False |
| Activity | |
| To | Senior Management Claim |
3. Click on the right activity point of the Request Manual Approval human task, select Create Connection and update using the following properties.
| identification | |
| Name | Manual Approval Complete |
| Activity | |
| To | Claim Approved |
4. Click on the right activity point of the Claim Approved switch, select Create Connection and update using the following properties.
| identification | |
| Name | TRUE |
| Condition | |
| Operator | Is Equal To |
| Value | APPROVED |
| Activity | |
| To | High Value Claim Approved |
5. Click on the bottom activity point of the Claim Approved switch, select Create Connection and update using the following properties.
| identification | |
| Name | False |
| Condition | |
| Operator | Is Not Equal To |
| Value | APPROVED |
| Activity | |
| To | High Value Claim Rejected |
6. Click on the right activity point of the Senior Management Claim switch, select Create Connection and update using the following properties.
| Identification | |
| Name | FALSE |
| Condition | |
| When | False |
| Activity | |
| To | Standard Employee Wait |
7. Click on the right activity point of the Senior Management Claim switch, select Create Connection and update using the following properties.
| identification | |
| Name | TRUE |
| Condition | |
| When | True |
| Activity | |
| To | Low Value Claim Approved |
8. Click on the right activity point of Standard Employee Wait, select Create Connection and update using the following properties.
| Identification | |
| Name | Auto Approve Claim |
| Activity | |
| To | Low Value Claim Approved |
9. Click on an activity point of the High Value Claim Approved Execute Code activity, select Create Connection and update using the following properties.
| identification | |
| Name | Complete |
| Activity | |
| To | End |
10. Click on an activity point of the High Value Claim Rejected Execute Code activity, select Create Connection and update using the following properties.
| identification | |
| Name | Complete |
| Activity | |
| To | End |
11. Click on an activity point of the Low Value Claim Approved Execute Code activity, select Create Connection and update using the following properties.
| identification | |
| Name | Complete |
| Activity | |
| To | End |
12. Click on the SAVE button.
Completed Workflow Diagram
Complete Claims Application
Create Workflow Process
Now we have created our workflow, I need to update the modal page that creates a new claim to generate a workflow using the claim ID. To do this, all I need to do is add a workflow process to execute between the automatic row processing and the close dialog processes.
The process will be created using the following properties.
| identification | |
| Name | Create Workflow |
| Type | Workflow |
| Settings | |
| Type | Start |
| Definition | Approve Claim |
| Details Primary Key Item | P5_CLAIM_ID |
| Server-side Condition | |
| When Button Pressed | CREATE |
Workflow Console
To view and monitor workflows, I need to add the workflow console pages. This is easily done using the page creation wizard. Simply add a new page, select Workflow Console and ensure the report context is set to Initiated by Me.
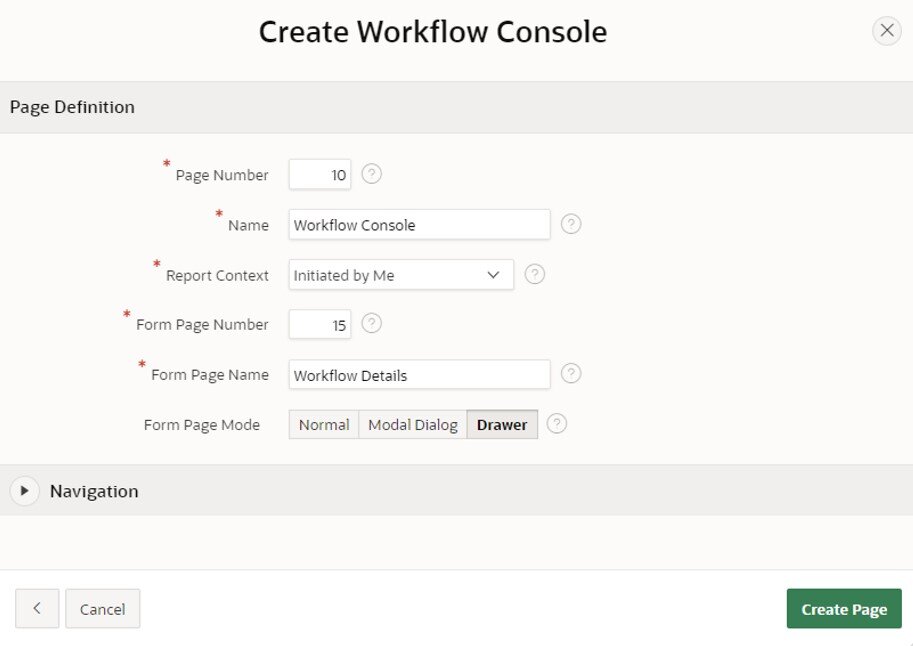
The wizard will create a reports page to list all workflows created by me and a modal page to display the details of the workflow.
Unified Task List (UTL)
Lastly, I need to add a unified task list page to the application in order to view and action any allocated tasks. To do this, simply add a new page and select Unified Task List from the page creation wizard.
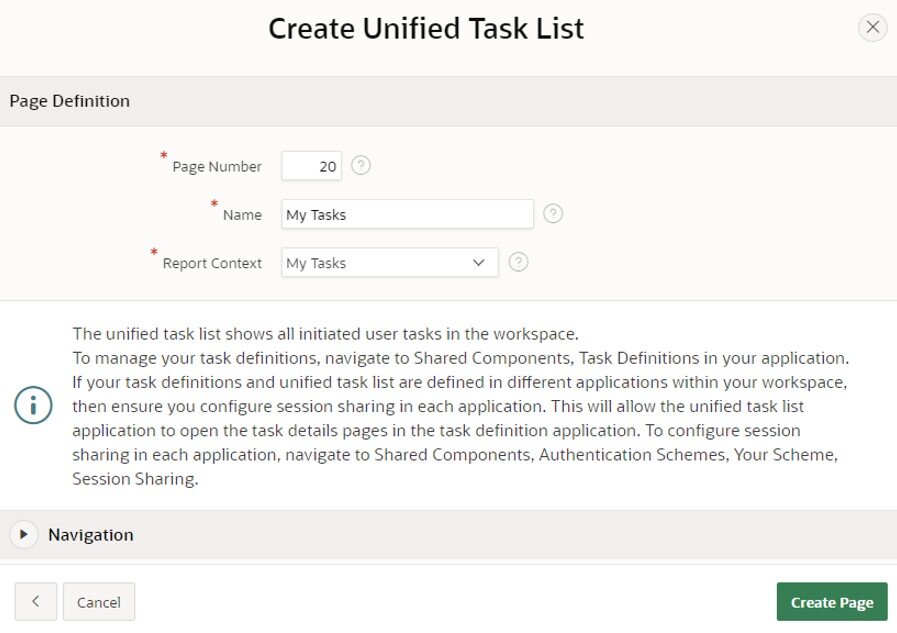
The wizard will create a page to list all tasks assigned to the logged-on user.
Testing The Workflow
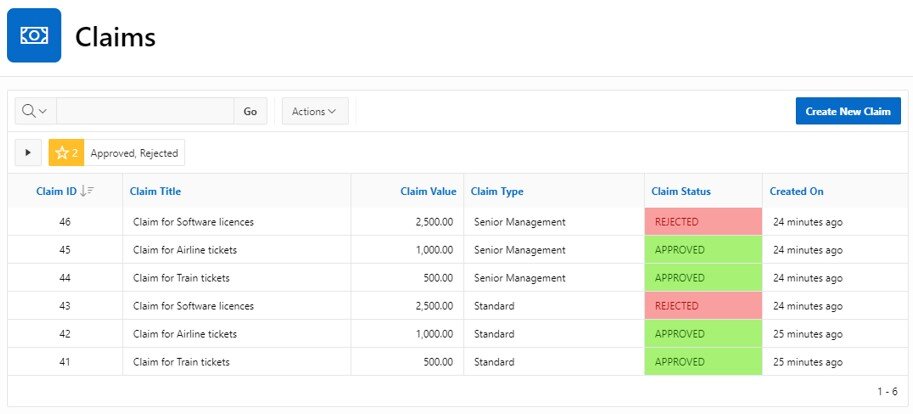
Now all the development is complete, it’s time to create some claims and test whether the workflow process works correctly. I am going to create the following claims to test each path/configuration through the workflow.
| Test | Task action | expected outcome |
| Standard employee for £500 | n/a | Set as low value and automatically approved after wait. |
| Standard employee for £1000 | Approve | Set as high value and manually approved using UTL. |
| Standard employee for £2500 | Reject | Set as high value and manually rejected using UTL. |
| Management employee for £500 | n/a | Set as low value and automatically approved immediately. |
| Management employee for £1000 | Approve | Set as high value and manually approved using UTL. |
| Management employee for £500 | Reject | Set as high value and manually rejected using UTL. |
Results
As you can see from the workflow console, the two low-value claims were both automatically approved as the switch activity correctly evaluated that they were under £1000, while the remaining four claims needed manual approval.
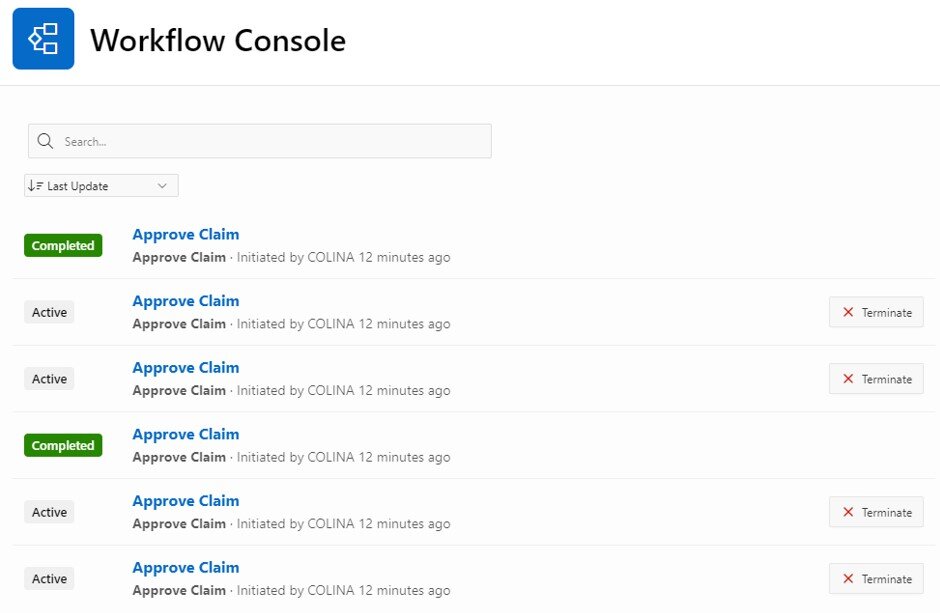
The claim by the management employee was approved immediately, while the one for the standard employee was approved after passing through the wait activity. Although the wait was set to 1 minute, this is a minimum time, therefore the actual time on this occasion was 4 minutes.
Each of the four high-value claims created human approval tasks assigned to the Finance Manager and accessed using the Unified Task List page.
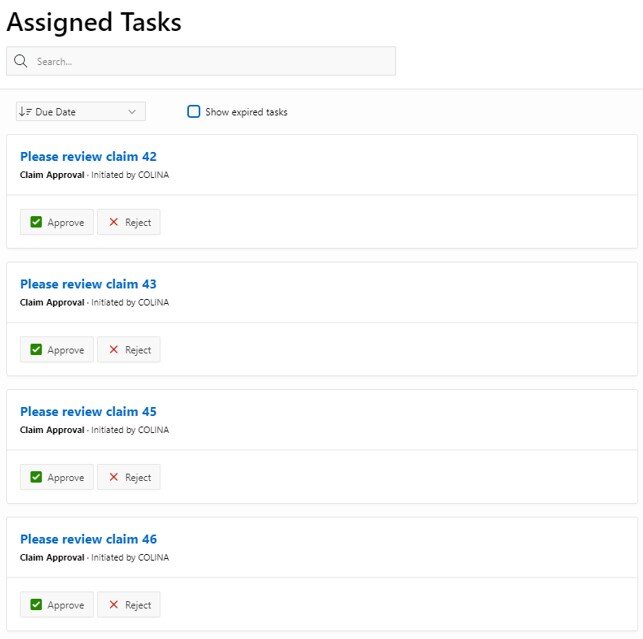
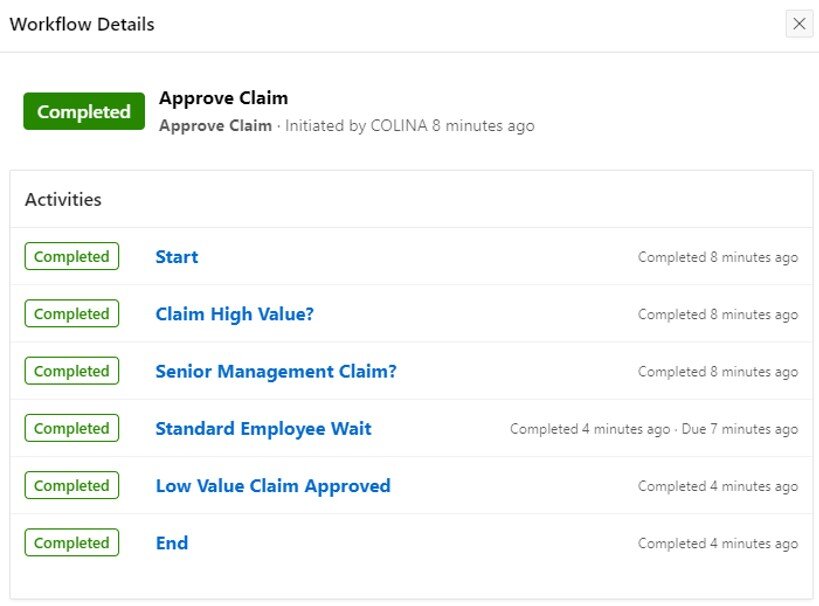
Claims 42 and 45 were approved, while claims 43 and 46 were rejected. As expected, each workflow was completed, and the limited records in the claims table were updated correctly.
Summary
The Workflow Designer is a great new feature for APEX, and I found the interface easy to understand. I was able to create this first test workflow in around 30 minutes. In theory, you should be able to build workflows for any combination of automated and human activities you require for your applications using the range of available activities. If there is not an activity to do what you need, they can be extended using process-type plugins. The built-in activities for sending emails and push notifications also make it easy to inform users they have a workflow to approve.
The workflow console also makes it easy to view the status of the workflows and allows you to drill into the details to see the route taken and the values of the parameters etc.
For more information, check out our Oracle APEX Services, and if you liked this blog, check out our other APEX blogs here.
Subscribe to Oracle APEX Insights if you want to stay tuned for more APEX updates.