- Services

Getting to know us
- Industries
Recent case study:
Oracle EBS Cloud Deployment
Consolidating and Migrating assets into Oracle Cloud Infrastructure.
.png?width=250&name=stonewater-logo%20(1).png)
Most Visited Pages
-
- Resources
DSP-Explorer acquires leading Oracle Applications Managed Services Provider, Claremont, to further extend its data management capabilities.

Resources
- Contact us
PWA: Progressive Web Applications
Contents
What are PWAs?
Progressive Web Applications (PWAs) are web applications where some code is installed on your device (desktop, tablet or mobile device) to deliver an experience similar to a native application, whilst other elements are delivered via the web. The user will have a launch icon installed on their home screen, and the application will be in a new window (desktop) or full screen (mobile) without an address bar. Although, in the background, the application still accesses Oracle APEX to leverage the pages and data displayed.
Introduced in APEX 21.2 and enhanced in each release since, PWAs are extremely easy to implement for existing applications and even easier when starting from the Create Application Wizard. We’ll explain exactly how to do this below, using features in APEX 22.2. But before we get there, why would you want to create a PWA?
Benefits of PWA compared to traditional APEX
- Look and Feel
The PWA runs full screen on a mobile device or in a separate window on a computer. A launch icon is added to the home screen for easy launching, providing the ability to add shortcut actions to access specific pages and is searchable from your device. - Device Integration
Device integration provides access to device facilities such as geolocation, camera, and sharing capabilities. - Faster Performance
Page rendering performance increases due to advanced caching provided by the installed device. - Lightweight
The APEX PWAs have a small footprint and take up very little space compared to native applications, as the bulk of the application is still stored within APEX and accessed via the web. It also has the benefit that the application can be updated without the need for the end user to update the native app. - Installs on any device
The PWA can be installed on any device, including desktop (Windows or MacOS) and mobile (iOS or Android), without downloading the app from an app store.
How to Create a New PWA
Thankfully, when creating a new application that needs to be a PWA, the additional steps necessary to achieve this are minimal, in fact in its basic form, it is a single click. Simply create a new application, give it a name and application number, and then select the checkbox labelled Install Progressive Web App, and that’s it. There will be some customisation options that we will go through later, but this single step is all you need to create a PWA.
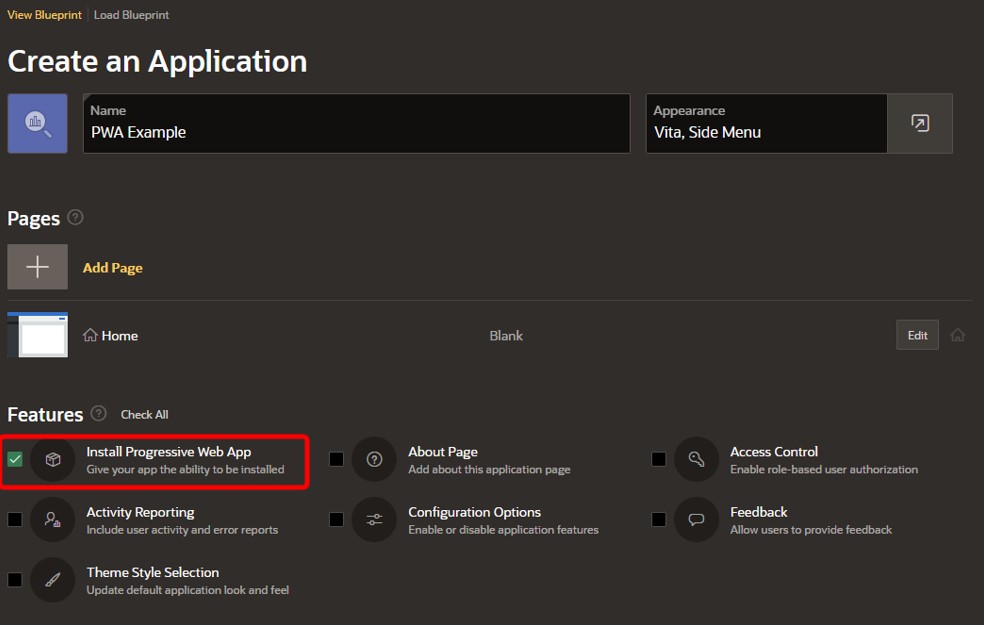
When the app is made, all the relevant code is created to allow the end user to install the application on their device.
One thing to note is that to use PWAs, the application must be set up to use Friendly URLs and be accessed by HTTPS, otherwise, it will not work. When creating a new application, APEX sets this up for you.
How to convert an existing app?
If you have an existing app that you want to convert to a PWA, don’t panic, you do not have to start from scratch. In fact, it’s almost as easy as creating a new PWA application and only involves a couple of steps.
In your existing application, navigate to the Edit Application Definition page and select the Progressive Web App menu item.
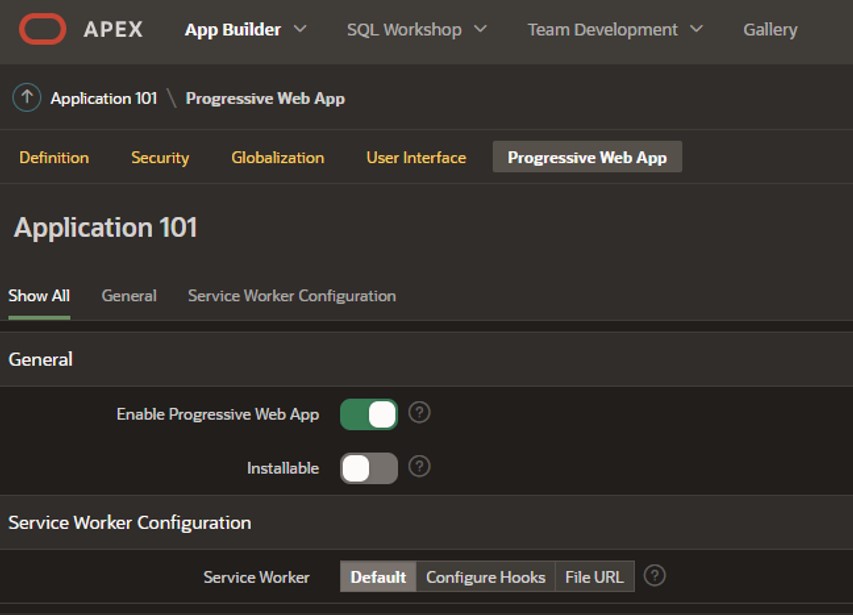
All that is required is to enable the Enable Progressive Web App switch and enable the Installable switch. Once done, click Apply Changes, and the application will be set up as a PWA. Again, there are additional options, but this will enable it with basic features.
How to Install the App
Once the application has been developed, or at least to a point where you want to start testing some of the features, you can run the application within APEX. Once logged in, you should be presented with a new menu link to install the application, located in the top right of the screen, as highlighted below.

Clicking the link will prompt the user to confirm that they want to install the application.
Once installed, users can open the app using an icon on their home screen and utilise the application in a standalone full-screen window separate from the browser. It will be searchable on their device.
PWA compatibility differs slightly by device and can be seen here, so you will need to know your end-user setup or provide some sort of warning to the end users if they may have a different setup.

PWAs can have screenshots uploaded to the Progressive Web App section of the Application Definition. These will then be displayed to the end-user when they are installing the application to improve the customer experience.
Creating an Application Icon
PWAs allow the end user to click on an Icon installed on their home screen, which can be specified to create individuality in your application. This icon can also provide shortcuts on some devices, but more on that later. So how do we customise the icon for our application?
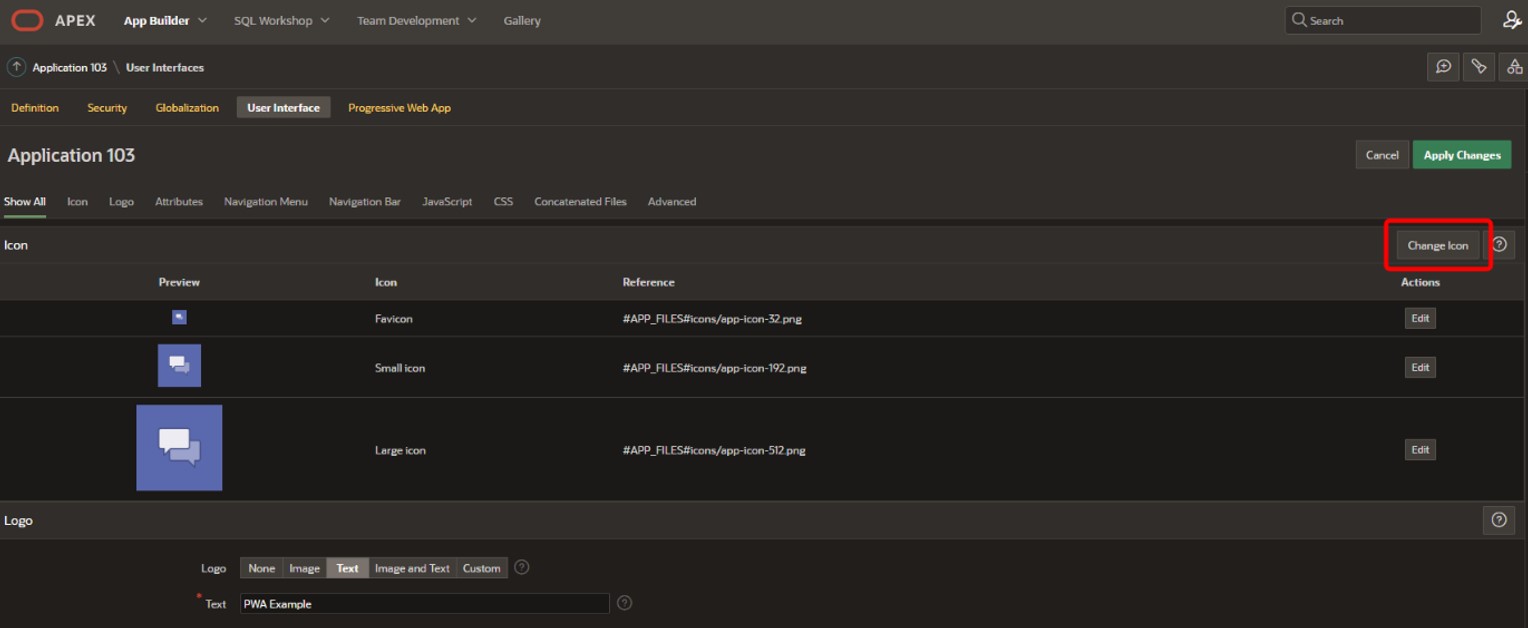
APEX will pick an icon for you, so your application will always have an icon, but if you want to change it the in the App Builder, go to the Shared Components and select User Interface Attributes from the User Interface selection. At the top of the User Interface Attributes is a section for Icon showing you the one currently assigned. You may select a new Icon from the pre-defined list or upload one you have created outside of the App Builder. Simply click on the Change Icon button.
Creating Shortcuts
Shortcuts can be added to the PWA to grant access directly to specific pages within the application. These shortcuts are displayed by long pressing the app icon (for touch-enabled devices) or right-clicking for non-touch devices. Unfortunately, not all devices are compatible with this feature, as detailed in the table below:

To create a shortcut, go to the Shared Components section in App Builder. Navigate to the Progressive Web App link in the User Interface section. Shortcuts need to be enabled first, and this is done by selecting Enable for Public Sessions or Enable for All Sessions depending on your needs (located near the bottom of the list of options).

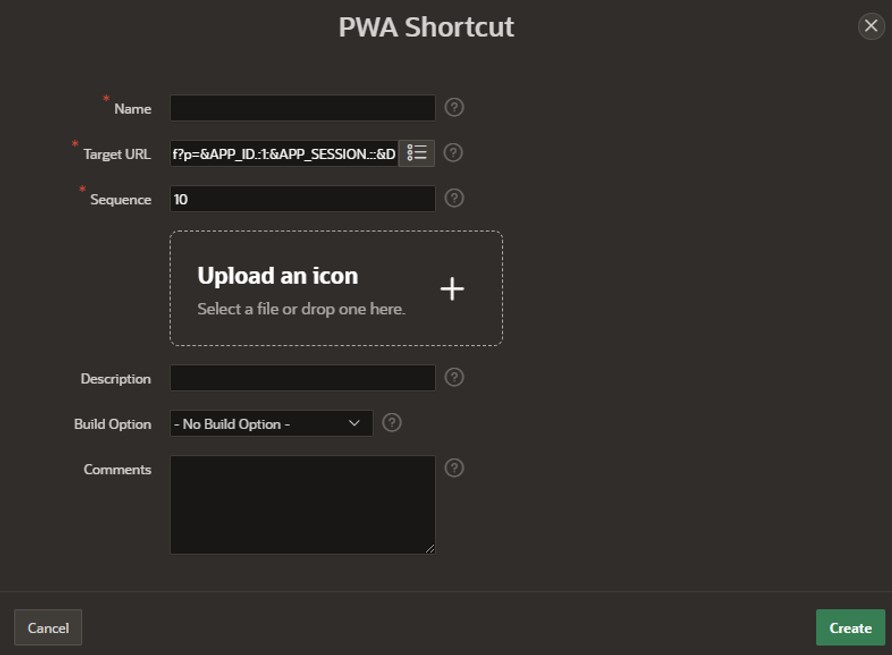
Once enabled, you can add a shortcut where you will be able to add a name, the target page, and the sequence that the shortcut will be displayed. You can also optionally provide an icon and a description.
Obtaining Geolocation
Retrieving the geolocation of the device is as simple as creating a dynamic action. You will need two items to store the latitude and longitude and a mechanism to instigate the dynamic action. I’m using a button click for simplicity.
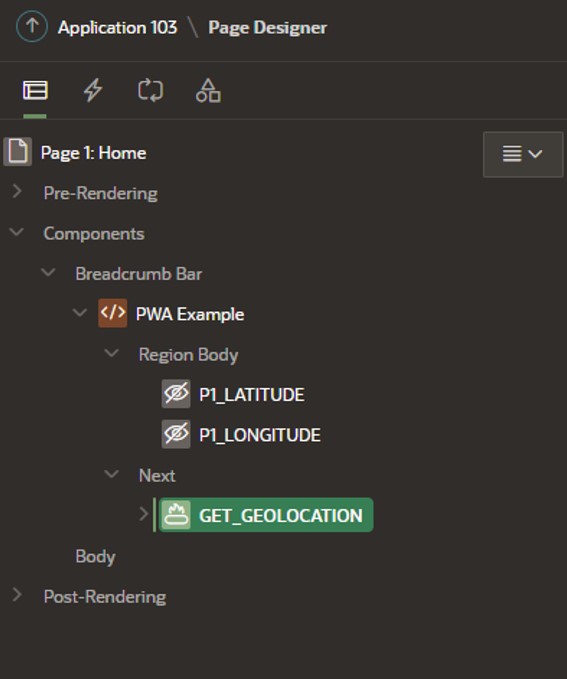
Once you have created these items, create an OnClick dynamic action tied to the button and amend the type to Get Current Position. The Return Type will default to GeoJSON, which will return the longitude and latitude in a JSON file that will then need to be parsed to get the information, or for simplicity, amend the Return Type to Latitude and Longitude. You then need to specify your 2-page items against the returning latitude and longitude.
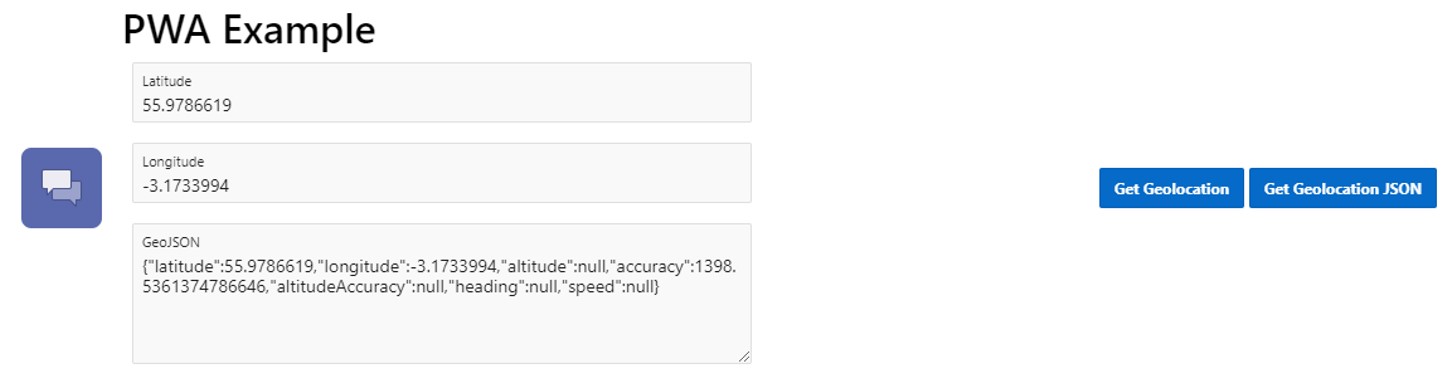
If you want more detailed information, you will need to return the GeoJSON, which contains information such as altitude, accuracy, speed, and others (if the device supports such information). The file returned will be in the following format:
{
    "latitude":55.9785619,
    "longitude":3.1735994,
    "altitude":null,
    "accuracy":1398.5361374786646,
    "altitudeAccuracy":null,
    "heading":null,
    "speed":null
}
The screenshot below shows the geolocation information obtained via both methods, as it is returned from the application communicating with the installed device.
Utilising Web Share
Web Share enables the APEX application to share data with other on-device applications. When the Share is initiated, the device’s native share menu appears to let the end user select contacts, social media, or other apps as the share destination. This can be used to create direct posts on social media and send a report directly to a contact via email or other messaging apps.
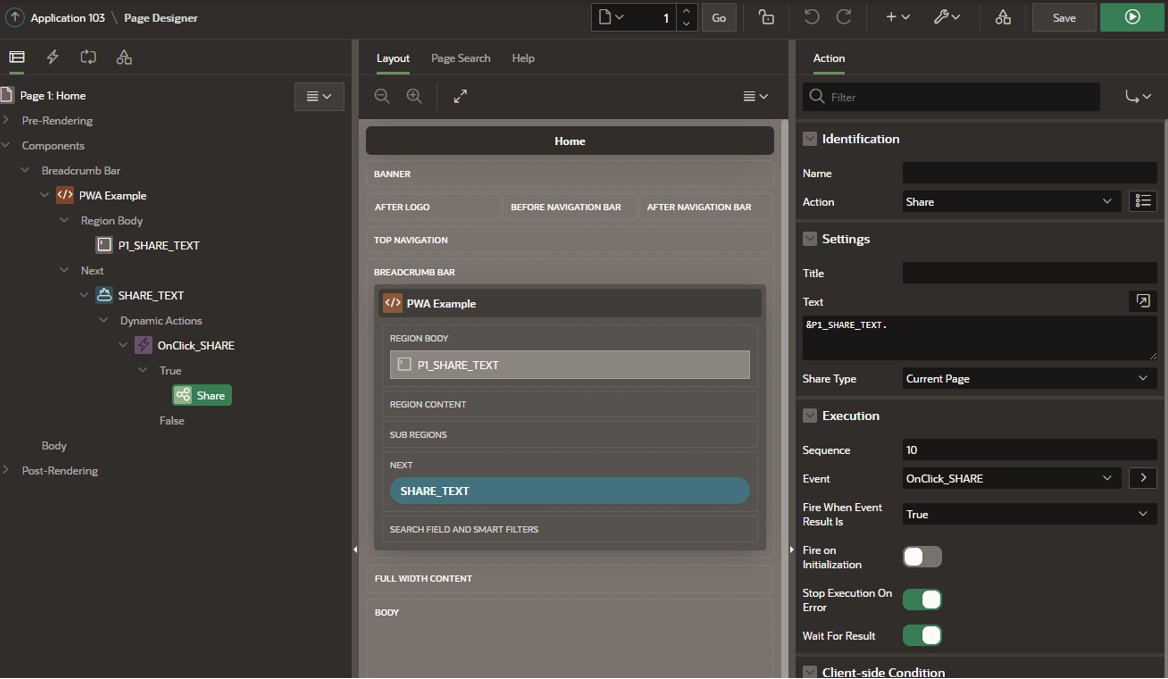
To enable Web Share, all we need is a dynamic action, again we are going to use a button click for simplicity. We have a page that contains a textarea item to allow a message to be entered, which we have a source defined as the text “Hello World!” and a button. Create a dynamic action linked to the OnClick event of the button and amend the action to Share. In the Text field of the action, enter the item name in the &xxxx. format, so in our example, it will be &P1_SHARE_TEXT. (don’t forget the trailing period).
Next, you will need to enable Meta Tags. Meta Tags are pieces of information that contain details of the page content. These are exposed to other systems to allow them to read the Meta Tags and determine how to react to requests. To enable Meta Tags, select the properties of the page and near the bottom, in the Advanced section, is a switch to Enable Meta Tags. Once done, you will be prompted to create at least one Meta Tag.
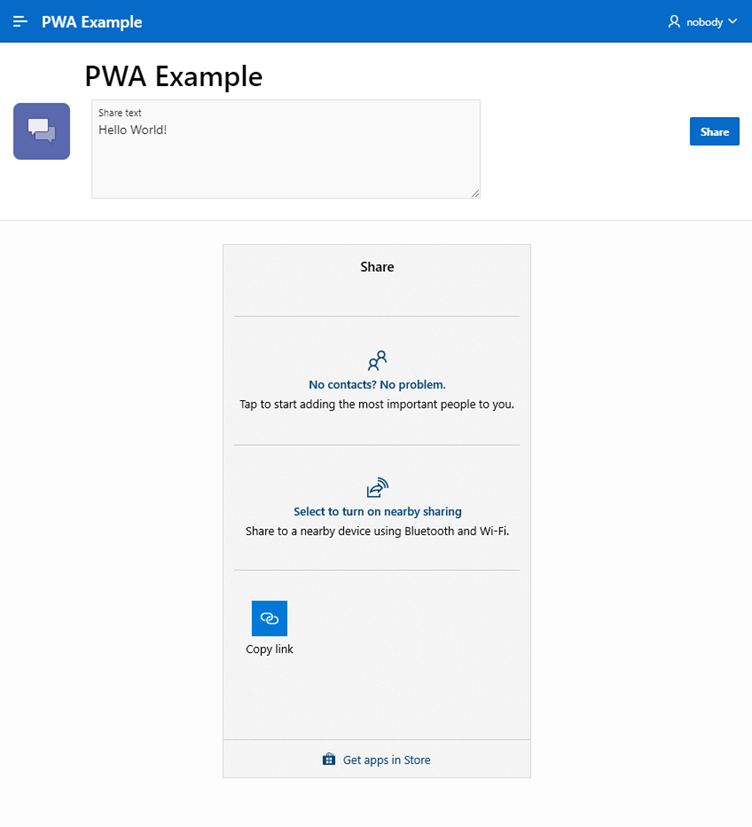
Running the page will show our text box and the share button. Clicking on the button brings up the Share menu, which will differ depending on the device and the other applications installed.
APEX 23.1
Oracle has recently announced that PWAs will be enhanced again in APEX 23.1 to provide on-device notifications to be sent to users. Developers will have access to APIs to enable notifications to be sent, and the user will have the ability to subscribe to certain notifications too. These notifications will allow the user to directly access your application or a specific page within the application.
APEX 23.1 is only currently in a pre-production release therefore instructions on how to achieve this will not be covered here as the details may change in the final release.
Final Thoughts
PWAs are a powerful addition to the APEX Developer’s toolbox. If the proposed solution is for a business where all users belong to that business, using traditional APEX, where the end-user interacts through a web browser, can be a little cumbersome. The end-user has to access their browser and then either select a bookmark or click on a pre-defined link on an intranet page. PWAs allow the user to have a look and feel of a native application, and this only improves the user experience.
The additional features of PWAs, such as sharing or geolocation, are also powerful tools, especially for users who travel and need to record where they are or to allow specific details to be immediately shared with contacts, some of which may not even work in the same company. Instead of building the ability to email from within APEX, PWAs leverage the power and applications of the device it’s running on. This improves functionality, retains a look and feel that the user is used to, and speeds up development time.
I believe that this is the way that APEX applications should evolve. There will be no PWA or native APEX. Once mature, every APEX application could be installed on a device with the business administrator deciding if the application will automatically install or not.
If this blog was of interest, be sure to discover more about our Oracle APEX Services here, we'd be happy to discuss the art of the possible with you! Or you can get in touch with our experts today.