- Services

Getting to know us
- Industries
Recent case study:
Oracle EBS Cloud Deployment
Consolidating and Migrating assets into Oracle Cloud Infrastructure.
.png?width=250&name=stonewater-logo%20(1).png)
Most Visited Pages
-
- Resources
DSP-Explorer acquires leading Oracle Applications Managed Services Provider, Claremont, to further extend its data management capabilities.

Resources
- Contact us
Implementing CKEditor 5 in APEX 19
Contents
As is the case with web technologies, time moves on, and so does the usability, design and features of these technologies. That is no less the case with rich text editors.
In previous versions of APEX, the rich text editor item used the CKEditor 4 editor, but with the release of 20.2, the CKEditor 4 editor was deprecated from APEX, and CKeditor 5 was the editor APEX started to use. This had more features and a more modern UI.
I was asked by a customer to implement the CKEditor 5 editor in a 19.2 APEX application. They were not planning to upgrade anytime soon but wanted to utilise the additional features of the newer editor. After a bit of research, I managed to create a PoC page with the CKeditor 5 implemented. I've outlined the steps I took to achieve this below:
Pre-requisites
- Create a hidden item that will store the value of the editor for loading and saving and populate it in a Before Region process.
- Download the CKEditor 5 install zip from the CKEditor website.
- Licensing terms should be read before deployment to a Production environment in case of any fees are required.
Install
After downloading the CKEditor 5 zip, extract the contents and add the JavaScript file to the Static Application or Workspace Files area. The JS file will then need to be referenced on the page that it will be used either globally if it is to be used in multiple places, or directly on the page by adding the Static File Reference to the Javascript File URLs on the page it is to be used on.

The editor then needs to be initialised:
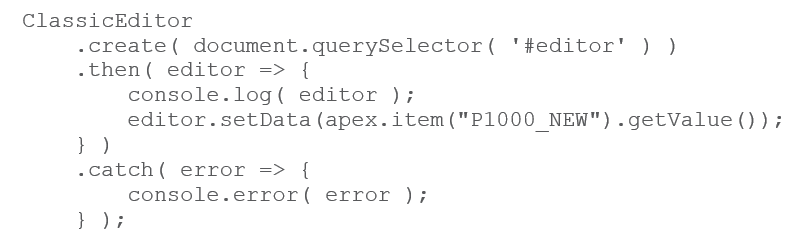
- To initialise the editor, first, create a Static Content region and add a <div> to the source of the region with an ID (ID=”editor” in this example) that will be referenced when replacing the Static Content region with the editor.

- Add the following JavaScript code to the Execute when Page Loads section of the page attributes. This will replace the (“editor”) region created in step 1 with the editor and will populate the editor with text from the specified item (P1000_NEW is this case).
This is enough to get the editor on the page and the text pre-populated with the item value created above.
The next step is to create the process of extracting the value from the editor and saving it back.
- Add the JavaScript code below to the Function and Global Variable Declaration section of the page attributes. This will set the item created above to be whatever the text in the editor is and then will submit the page with a Request of SAVE to execute a save process.

Summary
If you want the benefits of the newer CKEditor 5 but are not in a position to upgrade your APEX applications, then this is a simple way to implement the new editor. It allows you to initialise, use the new RTE and its features as well as send and retrieve text to and from the RTE in both pre and post-processing procedures.
If you would like any support regarding APEX speak to one of our expert Oracle APEX Consultants today. Alternatively, email us at enquiries@dsp.co.uk or book a meeting.