- About
Getting to know us
- Services
- Managed Services
- Application Services
- Cloud Services
- Data Science
- Consulting Services
- Technology Solutions
Managed Services
Application Services
Data Science
Consulting Services
Technology Solutions
- Industries
- Resources
Resources
- Contact
- Contact us
Computer Vision Models with Azure Machine Learning: Part 2
Contents
Introduction
In the previous blog post, I talked you through how to get up and running with Azure’s Machine Learning platform which massively simplifies the creation of ML models and allows you to deploy them to an API at the click of a button. To finish this series off I will demonstrate how you can repurpose the example computer vision model to classify anything you want! In my case, I wanted to see if DenseNet could learn to understand human emotion.
Emotion Recognition with Azure ML
Computer vision has very many practical use cases relating to the recognition of human faces and what we are communicating with them, using such technology you no longer require a password to unlock your phone, intelligence agencies can find wanted criminals, and transportation companies can verify that the person driving your train hasn’t fallen asleep on the job. Another branch of facial recognition is emotion recognition, what benefits this technology would provide are still up for debate but they range from early detection of mental illnesses to enhancing the emotional intelligence of Apple products. I thought it would be a fun experiment to see how easy it is to repurpose the Azure ML template which is currently identifying animals (dogs, cats, and frogs) to recognise human emotion instead.
This relies on a concept called Transfer Learning, the basis of this technique is that there is a certain amount of knowledge which is transferable, for example: if you have learnt how to play guitar then it is easier to learn how to play other stringed instruments. This concept also applies to deep learning models, if our model has been trained to recognise animals, then maybe it can also recognise human faces – and perhaps the emotions that they are communicating.
Transfer Learning Using Azure ML
The model we’re using is called DenseNet, it’s a deep learning algorithm characterised by its densely connected layers, but what’s more important is that Azure ML gives us the option to pre-train the DenseNet model shown here:
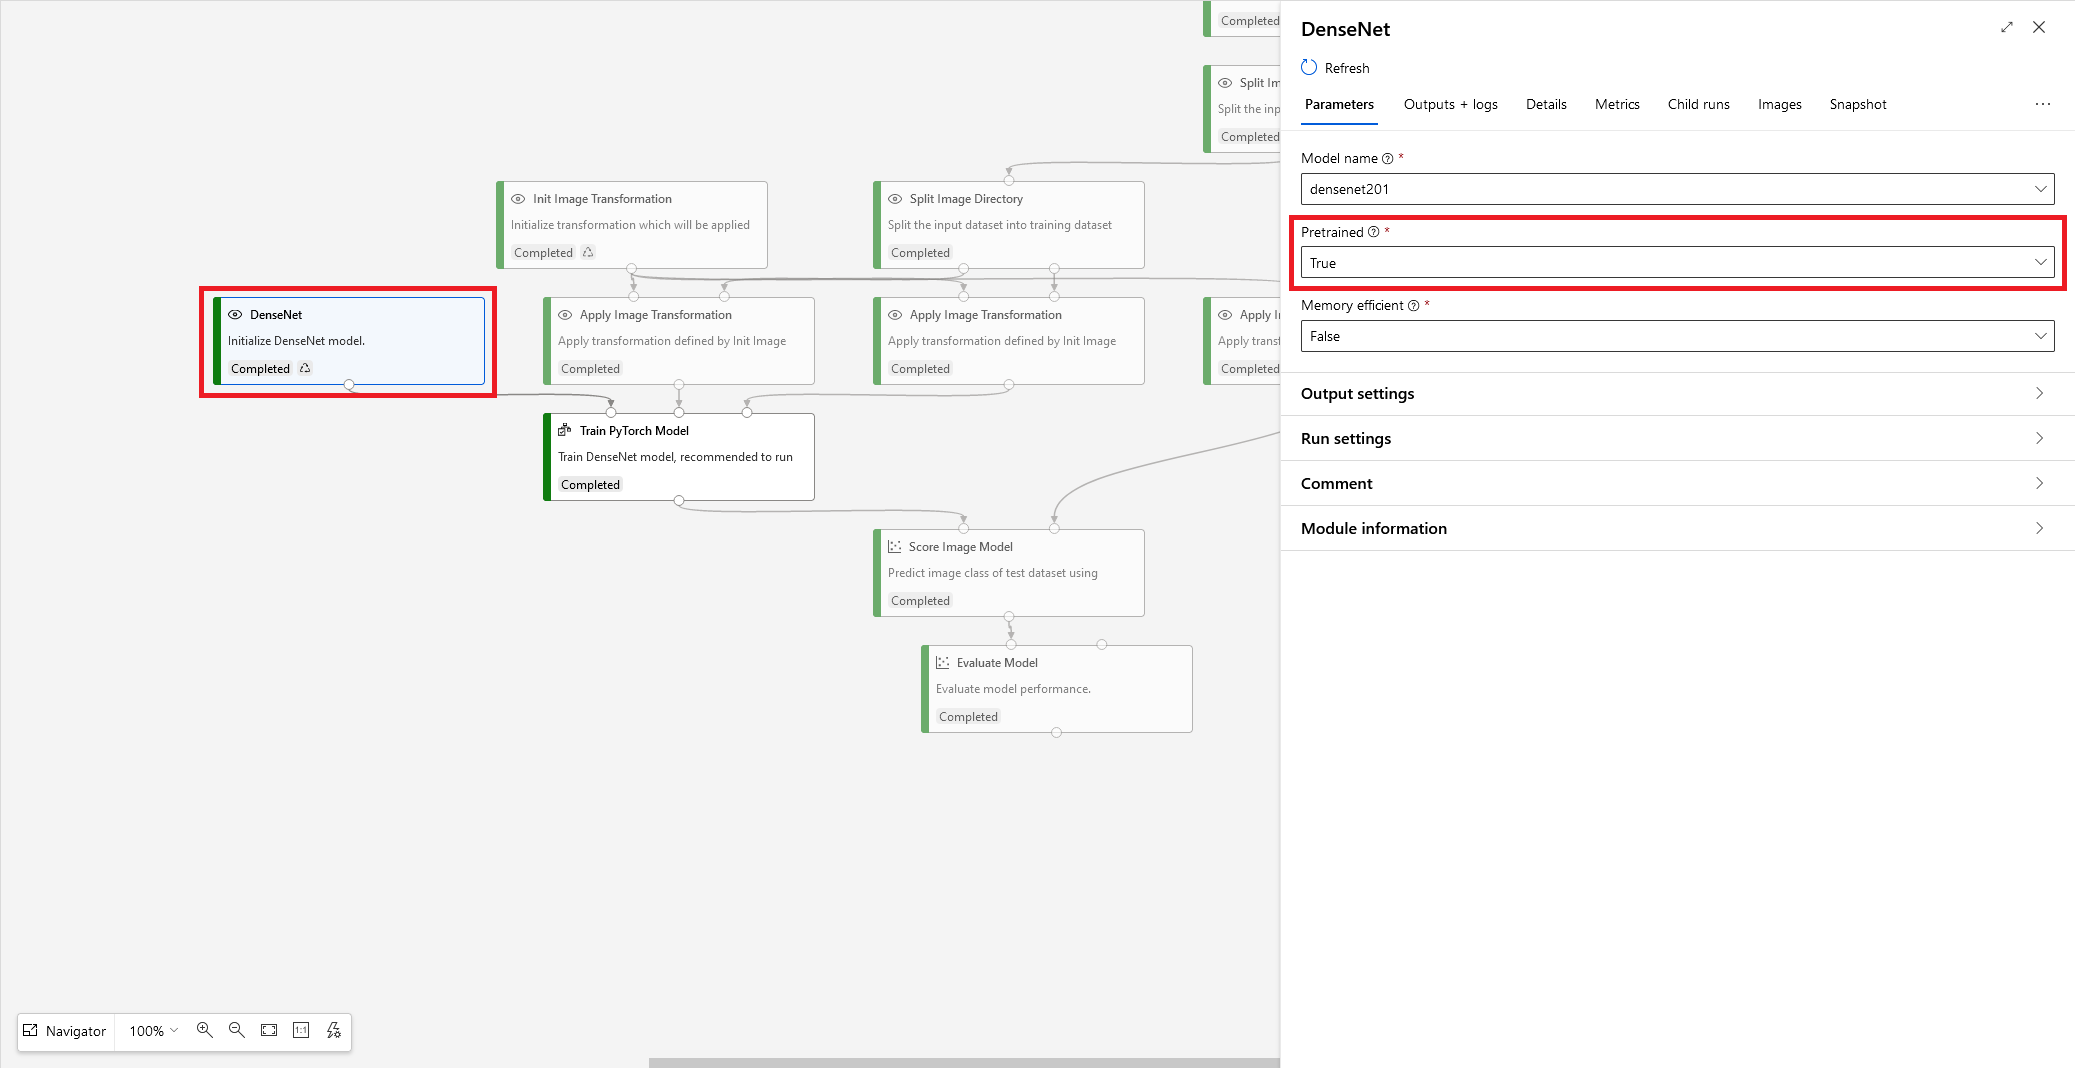
Reading the Azure documentation for this module we find that this provides us with a version of DenseNet which has been trained on ImageNet, a database containing over fourteen-million labelled images. What happens when we use this pre-trained network is the weights of the whole network are frozen except for the final output layer, i.e. the network retains the knowledge from the database of fourteen-million images, but we tune the final layer to make predictions on our own dataset. So, which dataset should we use?
Facial Expression Recognition Dataset
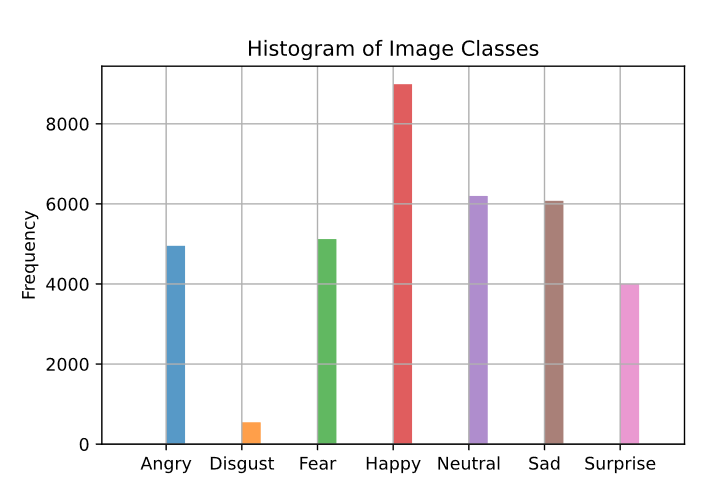
Facial Expression Recognition 2013, or Fer2013, is a dataset containing images of faces displaying various emotions, happiness, sadness, surprise, etc, it’s a publicly available dataset and I will share a copy here if you would like to follow along: this is a modified version of the original dataset, I have used a process called image augmentation to make the dataset balanced. In its original form there are many more examples of happy, shown below, than any other emotion and it’s a principle of machine learning to balance the classes within your dataset to reduce bias and improve model accuracy. To do this I took images from the underrepresented classes, applied a random sequence of modifications to the image (mirror image, rotation, adding noise, etc.), and saved those augmented images until there are an equal amount of every class. This process achieves class balance whilst also avoiding the problems associated with simply duplicating images which can also result in model bias. The notebook I used to perform the image augmentation can be found here. Below you can see the distribution of classes, there are less than 1000 disgusted samples and over 8000 happy samples – if we left this be then obviously our model would do a bad job of recognising disgusted faces!
Emotion Recognition in Azure ML
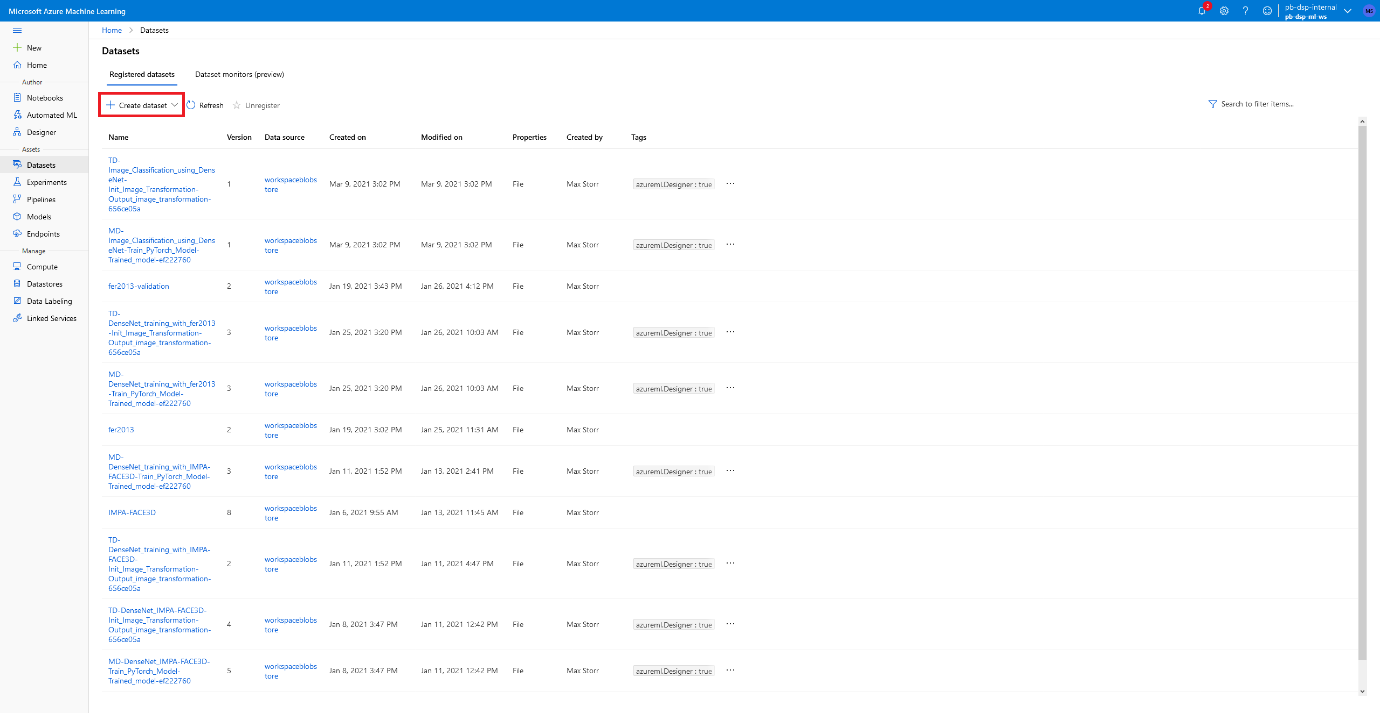
- We first have to upload our dataset in zip format to the Azure ML platform, in order to this find your way to the Datasets tab and follow the instructions to upload a file shown here.
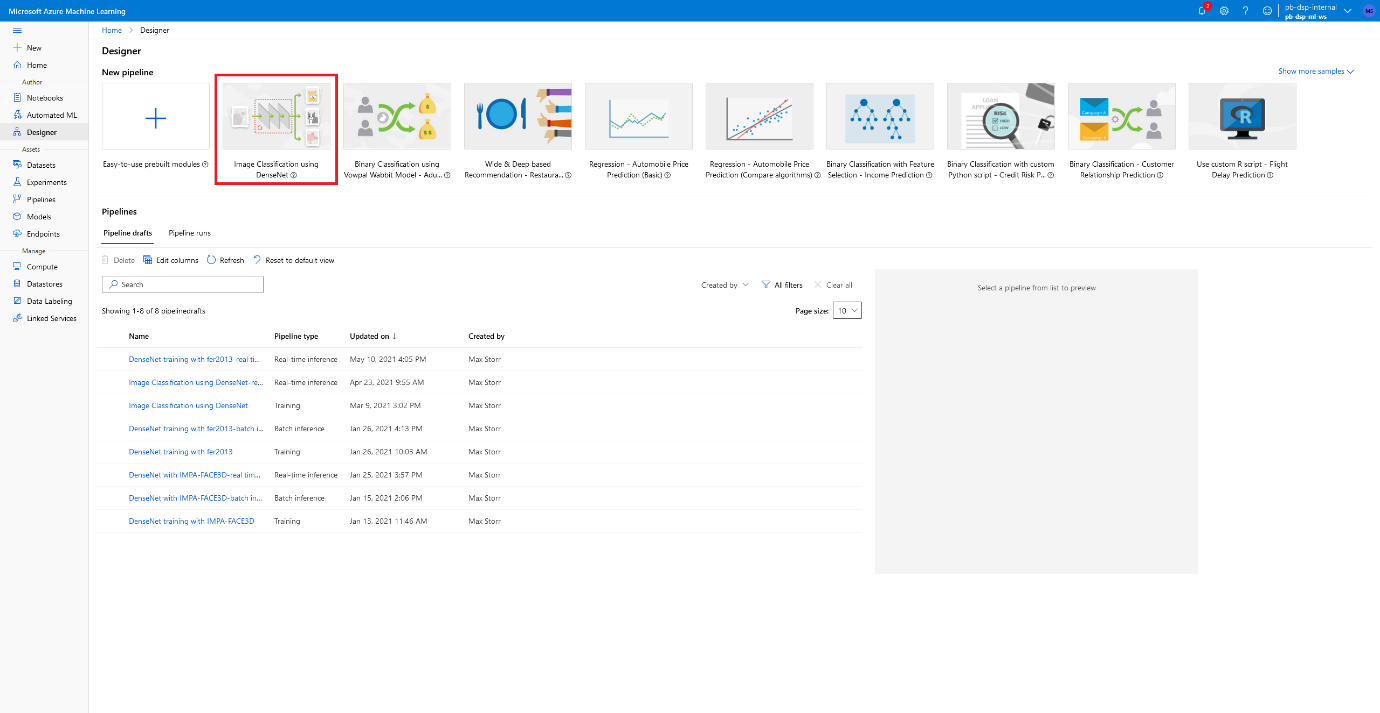
- We can now go back to the Designer tab and create the same template file we did before, titled ‘Image Classification using DenseNet’. We will repurpose this for our use-case.
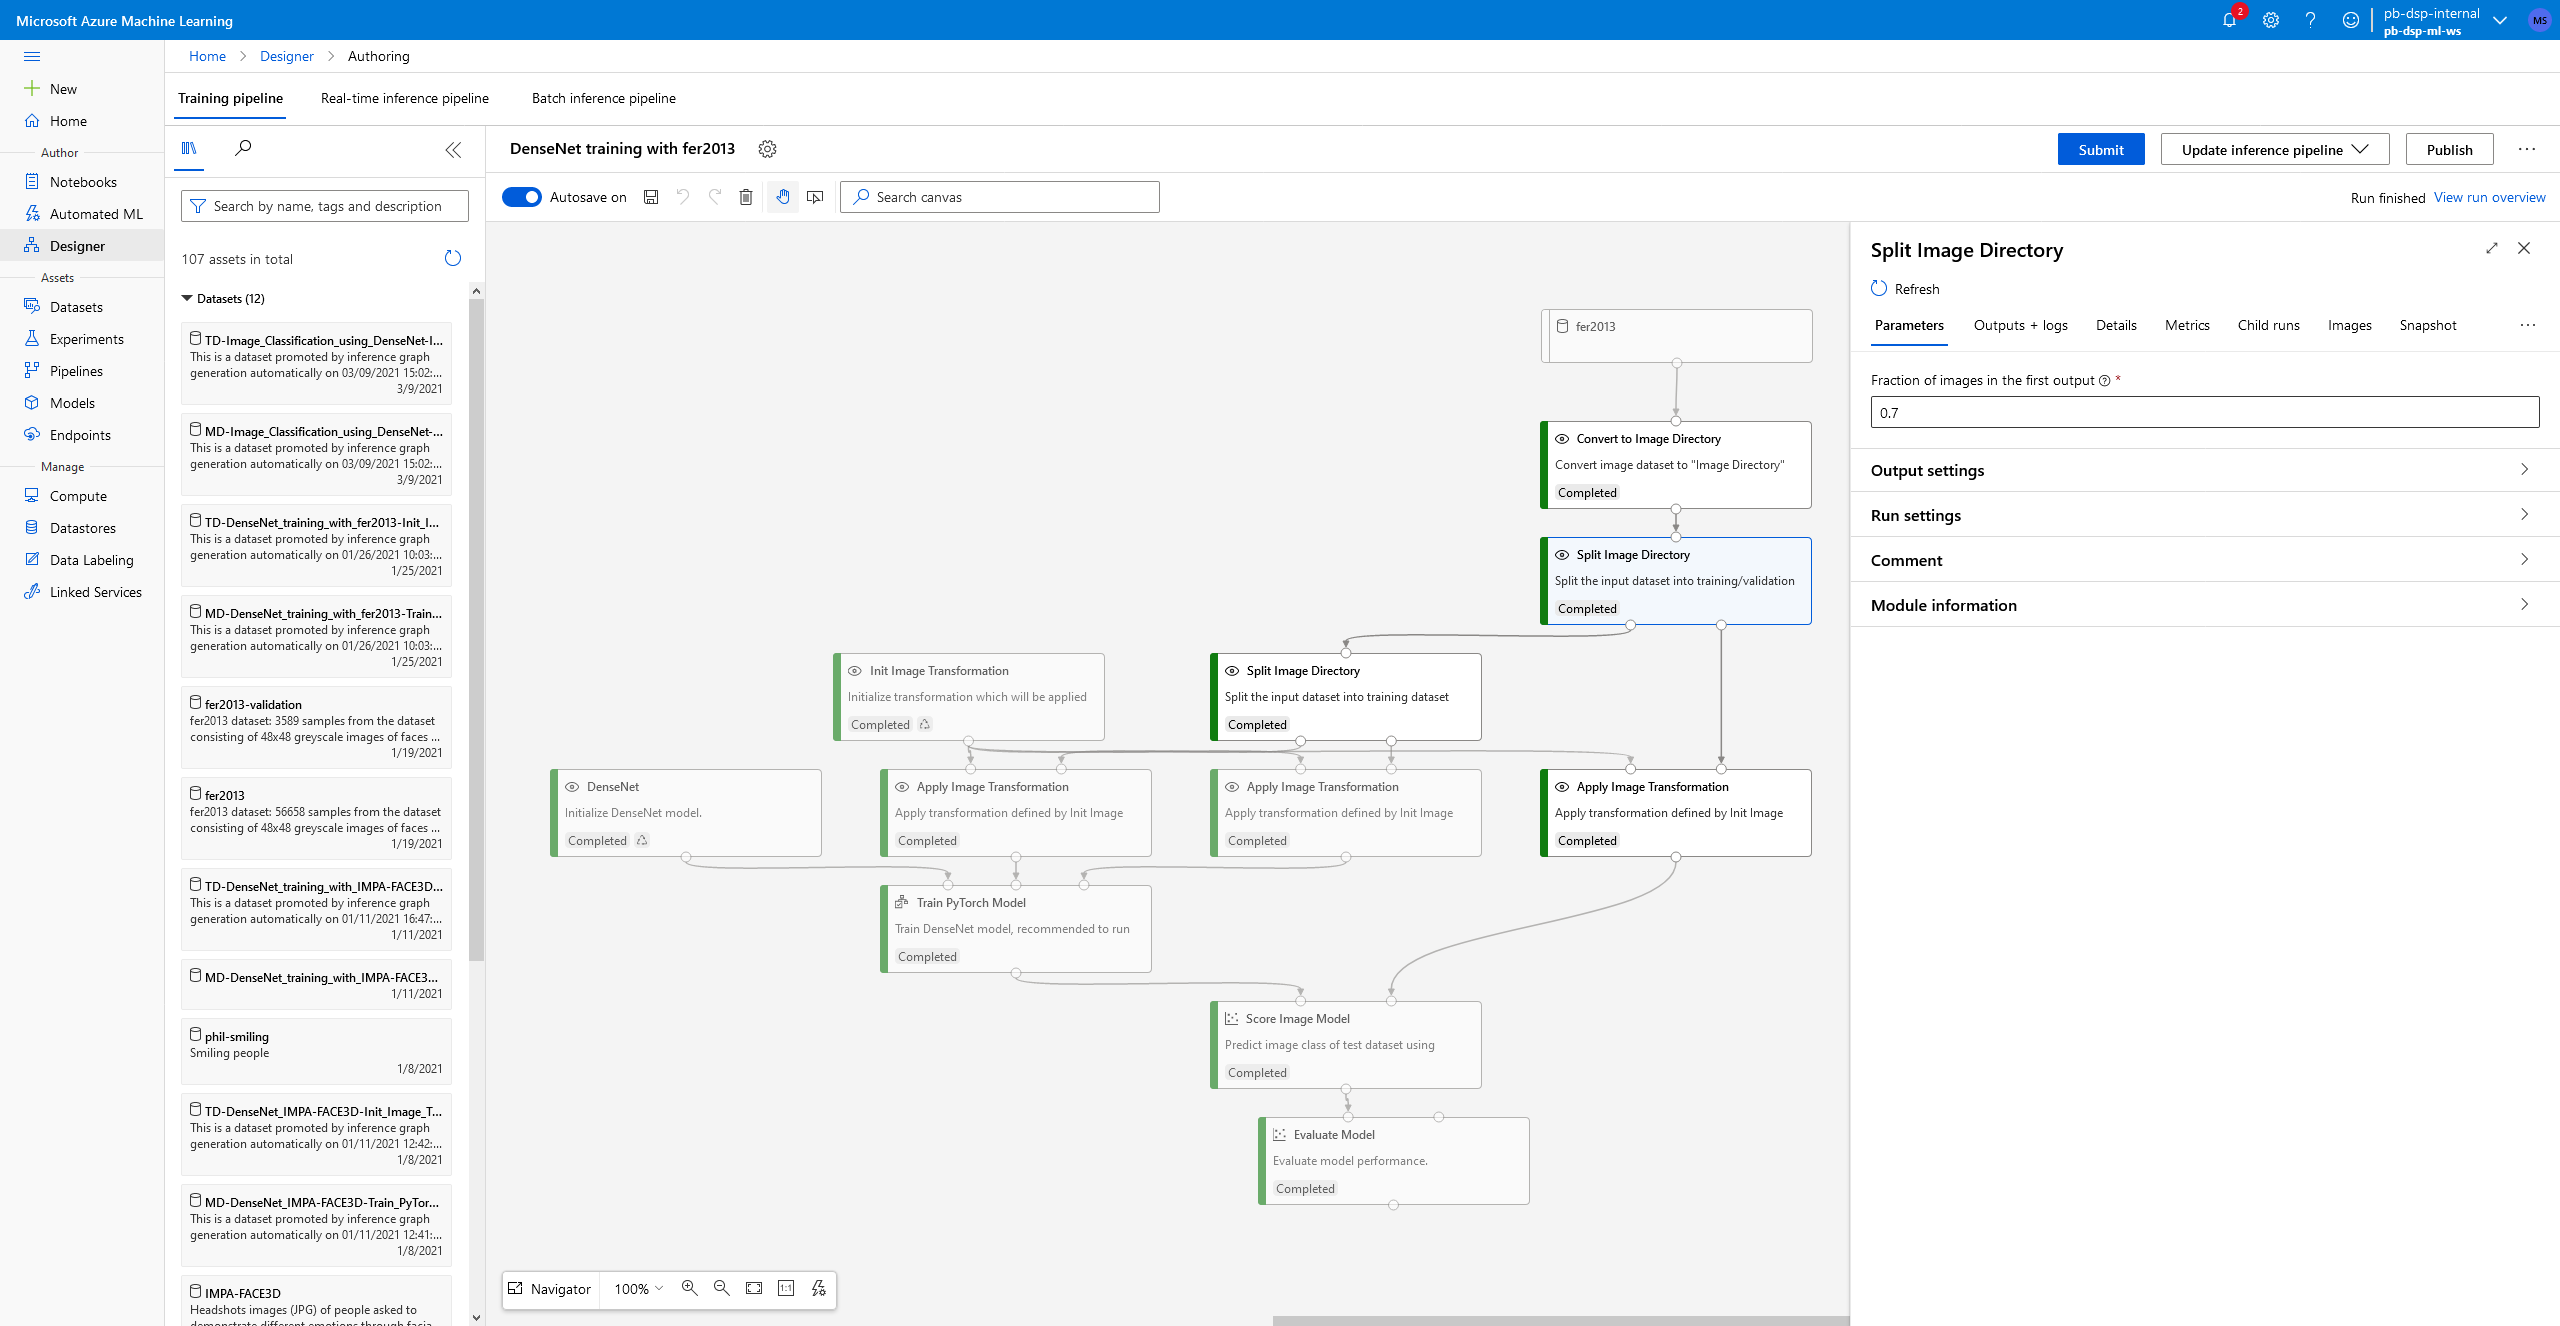
- We first have to replace the Animal Images Dataset (which is the input to the flowchart) with our uploaded dataset, I would then advise you to change the parameters of all Split Image Directory functions such that instead of splitting by a fraction of 0.9, we are splitting by a fraction of 0.7. This is because we have a relatively large dataset containing over fifty-six thousand images, so we can afford to use 30% of our dataset for testing. A test set is meant to encompass all possible patterns we are attempting to model, extending to as many edge cases as possible, therefore if we increase the size of our test set we increase the chance of catching those edge cases. I’ve shown how you can do this below, simply selecting the functions and altering their parameters.
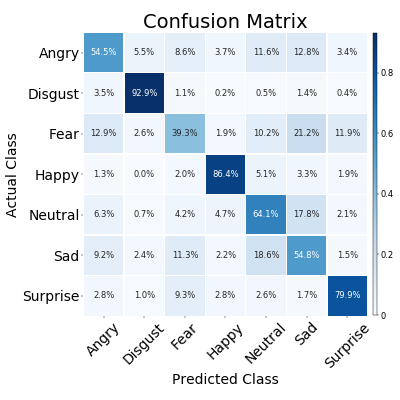
- You can now run the test as I’ve described in my previous blog post, following through the steps creating the compute cluster, running the experiment, and then creating an API for our use later. Here are my accuracies displayed in a confusion matrix format, which shows the actual classes on the y-axis and my model predictions on the x-axis. An ideal graph looks like a dark diagonal line, indicating each of the classes have been correctly identified as their ground truths. We can see that there are some classes our model struggles with, mostly the fearful examples. I thought this might be due to these examples being underrepresented in the original dataset, which would indicate that my image augmentation process was lacklustre, but as it turns out the most underrepresented class (Disgust) has the best accuracy. Looking closer at which emotions are mistaken for fear (look at the Fear row) we can see that sadness is often mistaken for fear, as well as anger and surprise. It’s interesting to note that for all of our classes, negative emotions are mistaken for other negative emotions more so than positive ones. This indicates that our model is doing a good job of understanding human emotion, but our model is struggling to discern between similar emotions such as fear and surprise. Moving forward I would be interested in seeing how other models perform on this dataset, so I might look towards leveraging Azure’s Automated ML to speed up the process of selecting an optimal model.
- Finally, having trained our model and deployed it as an API, I would like to be able to programmatically classify images of faces instead of having to manually upload them – this would massively improve the speed at which we could perform classification jobs. To do this we can head over to the Endpoints tab and click on Consume to be provided with a stub which allows us to make a scoring request to our API.
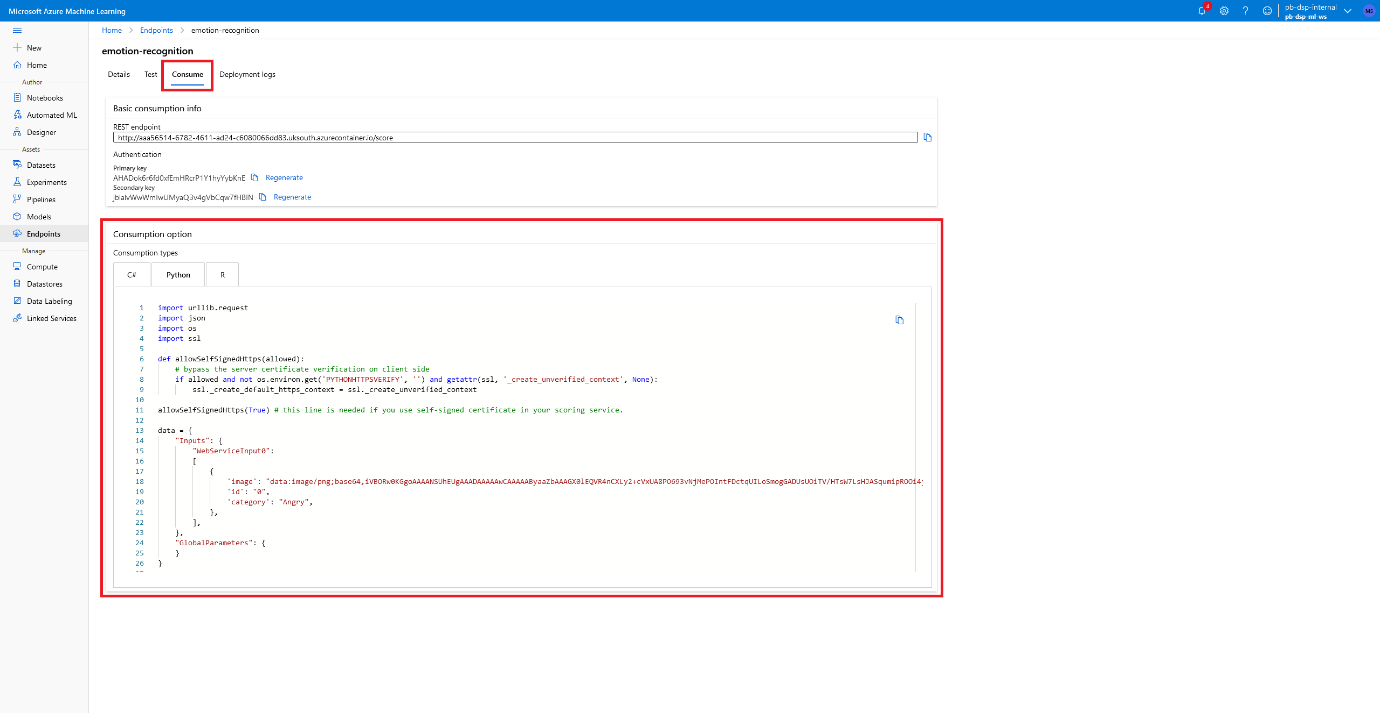
Copy and paste this into your favourite text editor or IDE, make sure to save it as a .py file or the extension that corresponds to your stub of choice, and we can start making this easier to use by adding some code to read an image from our computer and convert it to base64 so it can be added to the API request. I’ve used Python’s base64 library to do this and added the following lines below the imports:
import base64
# Read and base64 encode image
img = open('path/to/image', 'rb').read()
img_b64 = base64.b64encode(img).decode()
We can then change the data variable to include our img_b64 variable, like so:
data = {
"Inputs": {
"WebServiceInput0":
[
{
'image': f"data:image/png;base64,{img_b64}",
'id': "0",
'category': "Angry",
},
],
},
"GlobalParameters": {
}
}
Alternatively if you just want to download the python notebook to make the request it can be found here. You then need to modify the URL and API key in your own stub, and this will be unique to your API. Running the code will now provide you with your classification, here’s an example where I uploaded an image of myself and retrieved the class scores from my model! The scored label is ‘Happy’, so it’s made the correct prediction! Although it also thought I looked a little sad! Maybe I need to work on my smile a bit 😊

{
"Results":{
"WebServiceOutput0":[
{
"category":"Happy",
"id":"0",
"Scored Probabilities_Angry":0.05394163727760315,
"Scored Probabilities_Disgust":0.00010516428301343694,
"Scored Probabilities_Fear":0.0305302944034338,
"Scored Probabilities_Happy":0.3326261639595032,
"Scored Probabilities_Neutral":0.29099318385124207,
"Scored Probabilities_Sad":0.2867608964443207,
"Scored Probabilities_Surprise":0.005042679142206907,
"Scored Labels":"Happy"
}
]
}
}
Please do get in touch with our experts if you would like to find out more about Machine Learning on Azure, or book a meeting...

.png?width=250&name=stonewater-logo%20(1).png)

