- About

Getting to know us
- Industries
Recent case study:
Oracle EBS Cloud Deployment
Consolidating and Migrating assets into Oracle Cloud Infrastructure.
.png?width=250&name=stonewater-logo%20(1).png)
Most Visited Pages
-
- Resources
DSP-Explorer acquires leading Oracle Applications Managed Services Provider, Claremont, to further extend its data management capabilities.

Resources
- Contact us
Using REST Data Sources for APEX List of Values
Contents
There have been many new REST features and improvements added to APEX over the past few releases, so I thought now would be a good time to take a look at some of the newer REST features available within APEX in a series of blogs.
In my first blog I’m going to take a look at how you can use REST data sources for the List of Values shared component. This feature was introduced version 19.2 along with declarative display/return mappings for columns.
There are two options available for using REST as a data source for LOVs.
- Web Source Modules – Declaration of external RESTful Web Services using HTTP methods GET, POST, PUT and DELETE.
- REST Enabled SQL – An HTTPS web service that enables APEX to execute SQL or PL/SQL on a remote Oracle database with the results returned in JSON format.
Web Source Modules
Let’s start by building an LOV using a Web Source as the data source. I already have a GET method Web Service to return employee data, so the first step is to declare it in my APEX application as a new Web Source Module.
- From Shared Components select Web Source Modules within Data Sources, click CREATE and then choose the “From Scratch” option.
- Next we need to select the web source type and enter the URL endpoint. My example uses a REST Enabled object from an Oracle database, so the type is Oracle REST Data Service (ORDS).
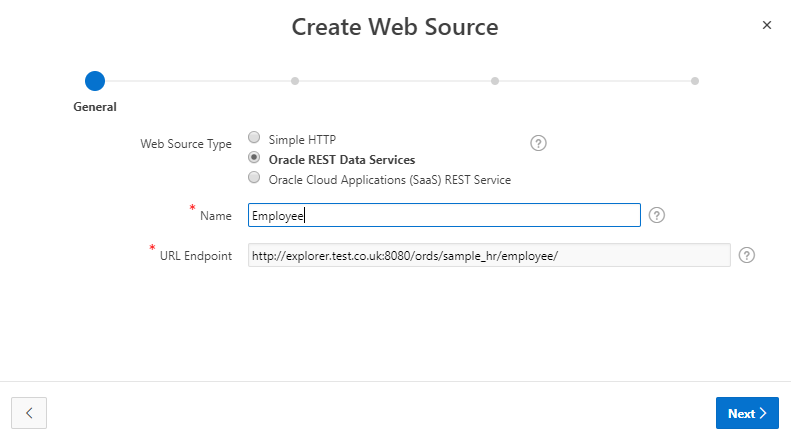
- Next click on DISCOVER to validate the Web Service.
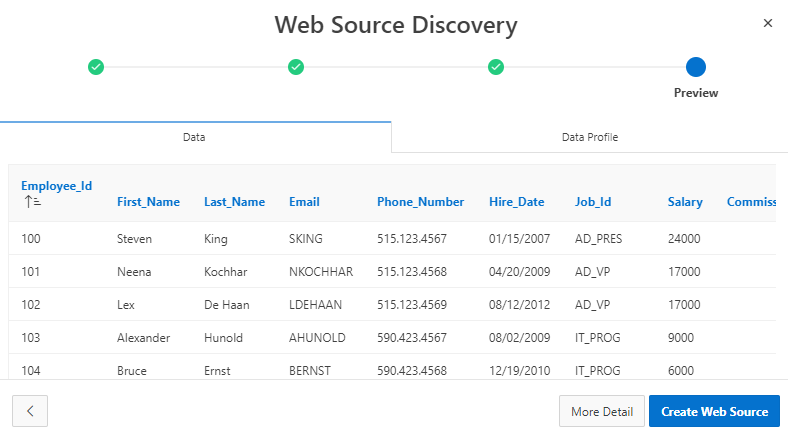
- Everything looks as expected so I can click on CREATE WEB SOURCE to finish.
Now we have a web source declared we can use it to create a list of values to use in our APEX application for item types such as Popup LOV, Select List, etc.
- From Shared Components select List of Values within the Other Components section, click CREATE and choose the “From Scratch” option.
- Enter a suitable name, select dynamic as the type and click NEXT.
- Change the data source to “Web Source” and select the web source module.
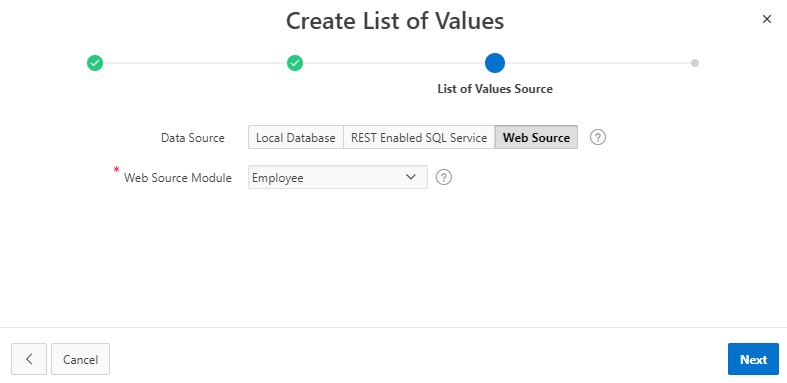
- Finally set the return and display columns to use from the web source and click CREATE.
.webp)
Now we have a List of values based on a web source we can test it by adding a Popup LOV item to an APEX page. In this example I have added a Popup LOV item to the page using the following properties.
| Identification | |
| Type | Popup LOV |
| Settings | |
| Display As | Modal Dialog |
| List of Values | |
| Type | Shared Component |
| List of Values | EMPLOYEES |
When I run the page and activate the Popup LOV I get a list of all employees returned via the web source with the ability to filter on the data by default.
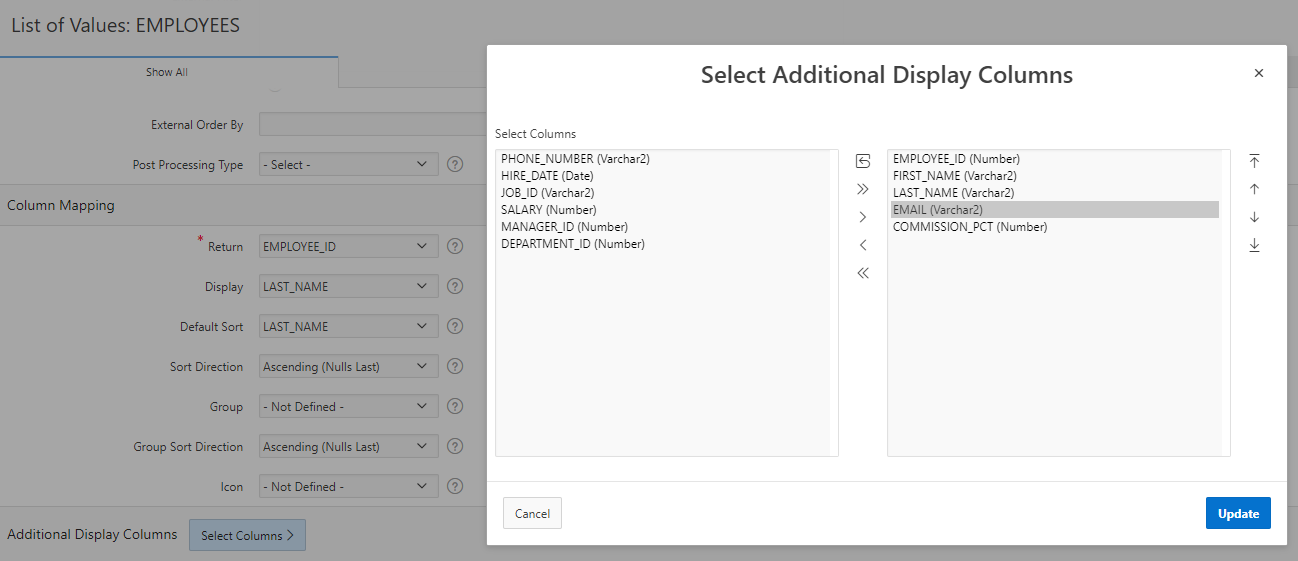
With the new multiple column mapping feature added to APEX 19.2 we can also include additional columns from the Web source to our LOV. For example I would like to see the first name, last name, email address and commission percentage when selecting an employee. To do this we can re-open the declared LOV within shared components and use the “Additional Display Columns” option to select the extra columns to display.
Now when we return to our test page and activate the popup LOV we can see the additional column, which are searchable by default.
.webp)
However, there are some more features we can use to improve the use of the Web Source. I would like rename the column headings, return the full employee name into the item and restrict the LOV to employees that have a commission percentage.
- Re-open the LOV from shared components and under the Advanced Web Source Attributes section change the Post Processing Type to “SQL Query”.
- We can now change the SQL query being executed on #APEX$SOURCE_DATA# to concatenate the employee names and to exclude any employees with no commission.
select EMPLOYEE_ID,
       FIRST_NAME || ' ' LAST_NAME FULL_NAME,
       EMAIL,
       COMMISSION_PCT
  from #APEX$SOURCE_DATA#
where  NVL(COMMISSION_PCT,0) > 0
- As the columns have been updated we need to re-select the display and return columns to use. As before, we will still return the employee_id column, but now we can use the new full_name column for the display.
- Lastly we can use the editable interactive grid in the additional display columns section to change the headings of the columns in the LOV. You can also make a columns non-visible, non-searchable and apply format masks.
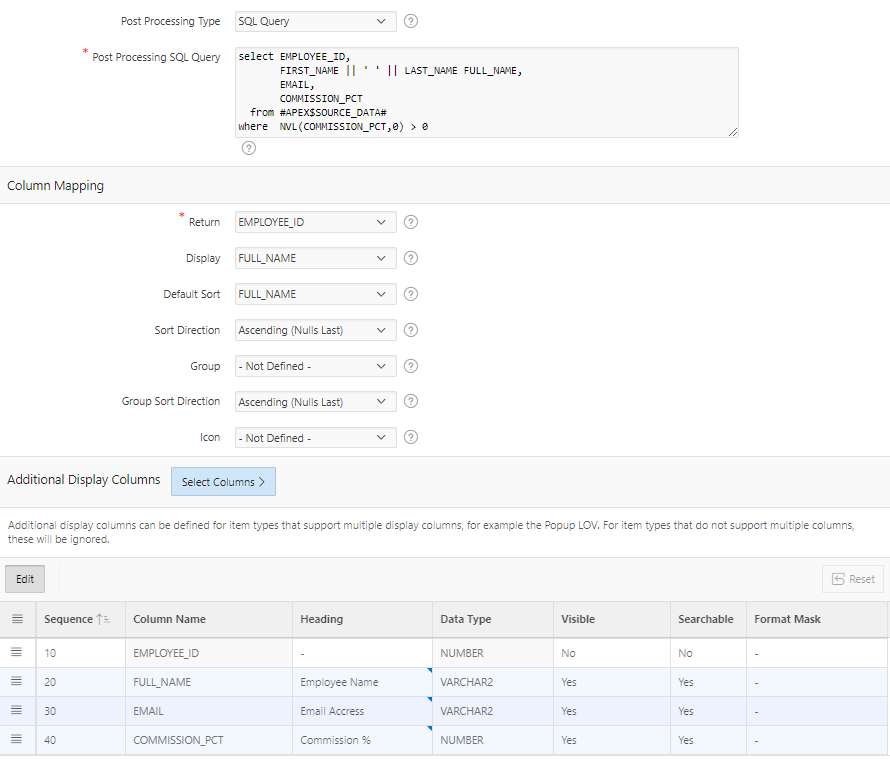
Now when we return to our test page and activate the popup LOV we can see it displays and returns the full employee name, has our defined column headings and excludes employees with no commission. By default we can also search on any displayed column.
.webp)
REST Enabled SQL Service
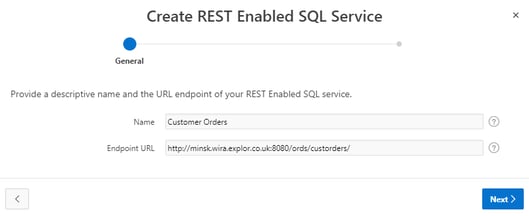
We can also create an LOV for a REST Enabled SQL data source. I already have another Oracle database that has been enabled for REST Enabled SQL, so the first thing I need to do is define my data source within shared components.
- 1. From Shared Components select REST Enabled SQL within the Data Sources section and select CREATE.
- Enter a name and URL Endpoint, for example https://explorer.test.co.uk:8080/ords/custorders/
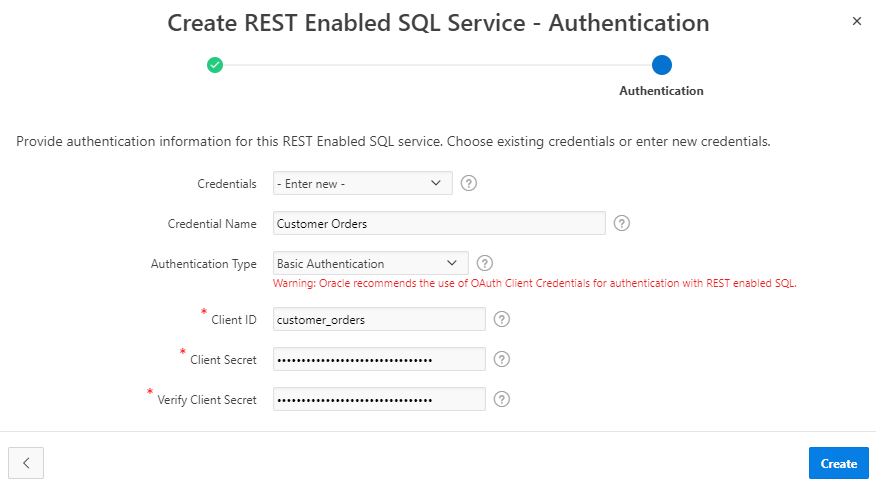
- Next we need to enter the authentication details. In this example I am using basic authentication as the database is local, so I need to enter the schema name and password.

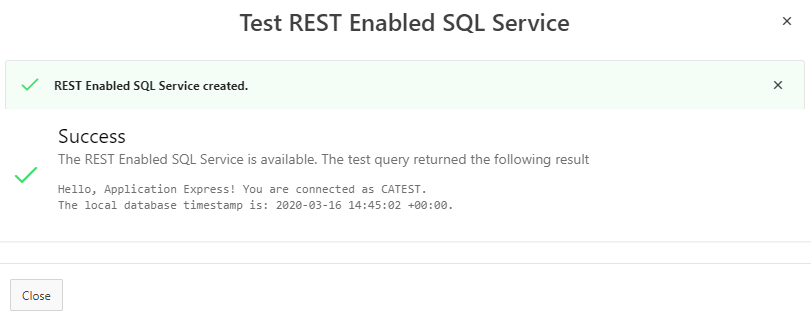
- APEX will then validate the URL endpoint and test the authentication. If everything is OK you will get a success message as follows.

Now we have declared REST Enabled SQL data source we can use it to create a List of values.
- From Shared Components select List of Values within Other Components, click CREATE and then choose the “From Scratch” option.
- Enter a suitable name, select dynamic as the type and click NEXT.
- Change the data source to “REST Enabled SQL Service” and select the service.
- You can either select a table or enter a SQL statement. For my example I will enter a SQL query on the OEHR_CUSTOMERS table to return a list of customers.
.webp?width=529&name=Create%20List%20of%20Values%20(2).webp)
- Lastly confirm the display and return columns and click on CREATE.
.webp)
Now we have a List of values on a REST Enabled SQL Service we can test it. This time I will add a Select List item to the page using the following properties.
| Identification | |
| Type | Select List |
| List of Values | |
| Type | Shared Component |
| List of Values | CUSTOMER |
When I run the page and activate the Select List I get a list of all customers returned via the REST Enabled SQL Service.
.webp)
As we did with the LOV based on the Web Source you add multiple columns to an LOV based on a REST Enabled SQL Service. However, there is no option to use Post Processing SQL as this is unnecessary given you can write the SQL query as required when you create it.
In my next blog I will be taking a look at REST enabled Forms, so if that’s an area you want to know more about please check back in a couple of weeks.
If this blog was of interest, be sure to discover more about our Oracle APEX Services, we'd be happy to discuss the art of the possible with you! Get in touch with our experts today!
Author: Colin Archer
Job Title: Senior Oracle APEX Development Consultant
Bio: Colin is a Senior Development Consultant at DSP with 20 years’ experience of analysis, design, and development of bespoke Oracle applications for a wide variety of business functions. Building on his previous experience of Forms and PL/SQL he is now focusing on developing high quality fit for purpose solutions using APEX.