- About

Getting to know us
- Industries
Recent case study:
Oracle EBS Cloud Deployment
Consolidating and Migrating assets into Oracle Cloud Infrastructure.
.png?width=250&name=stonewater-logo%20(1).png)
Most Visited Pages
-
- Resources
DSP-Explorer acquires leading Oracle Applications Managed Services Provider, Claremont, to further extend its data management capabilities.

Resources
- Contact us
Oracle APEX 24.2 AI Features
Contents
Oracle APEX 24.2 has expanded on AI integration within the development tools, and several new features are available as part of the 24.2 environment. In this blog, I'll explain about what these new options are and how to implement them.
Setup
You will need to establish a link to an AI provider to allow APEX to communicate with them. This is a pre-requisite for what comes next if you haven't done so already - you can find out how to link APEX to your AI provider here.
"Generate Text With AI" Dynamic Action
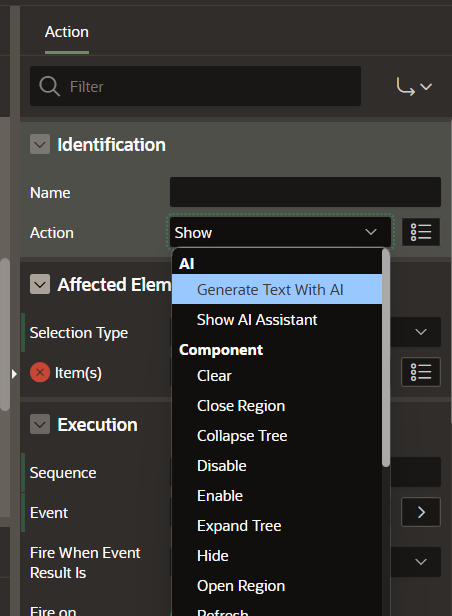
Within APEX 24.2, a new Dynamic Action has been added to allow the end users to utilise an AI provider from within your application. Although this was previously possible with APEX, the new Dynamic Action enables a simple and quick way to build this functionality.
To demo this new functionality, I'll start with a blank page. I've then added a static region with a simple text box for user input (P1_TEXT_INPUT), a button to allow the text to be processed and a text area for the response to be shown in (P1_RESPONSE). In APEX Builder, it looks like this:
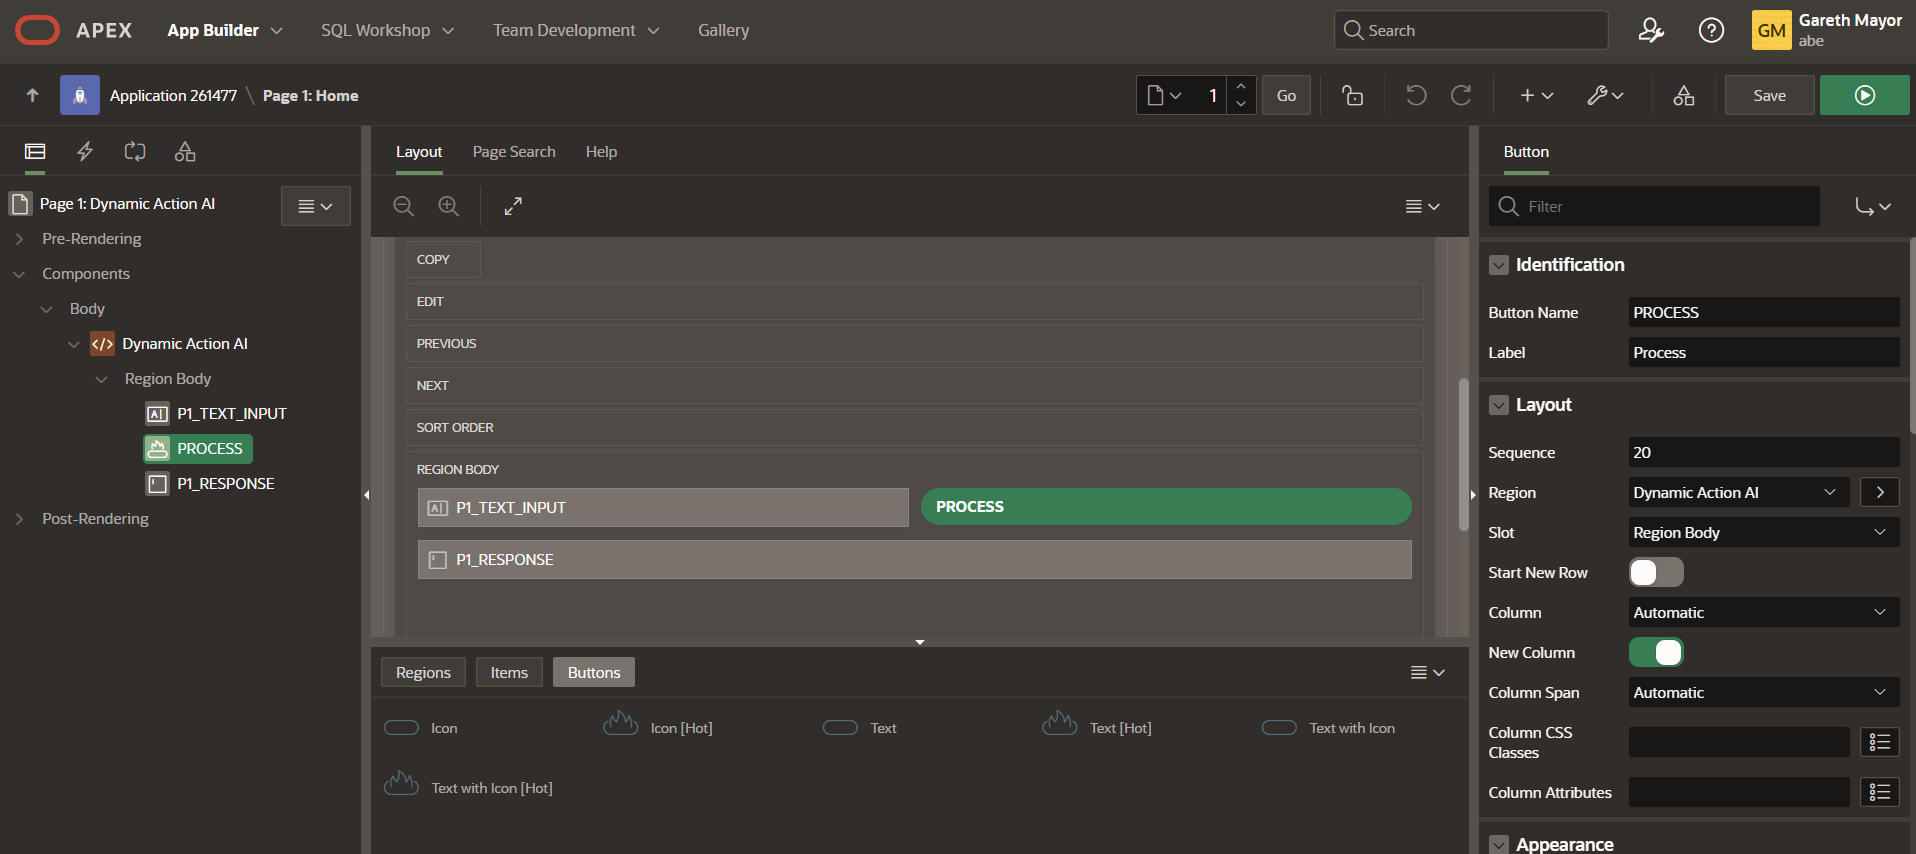
Next, we need to add the Dynamic Action to the button so that the text can be sent to the AI provider and the response shown on the screen. Right-click on the PROCESS button and add a Dynamic Action called Process Text. You can leave all the other properties as they are. Navigate to the True action and set the action to be the new Generate Text With AI option.
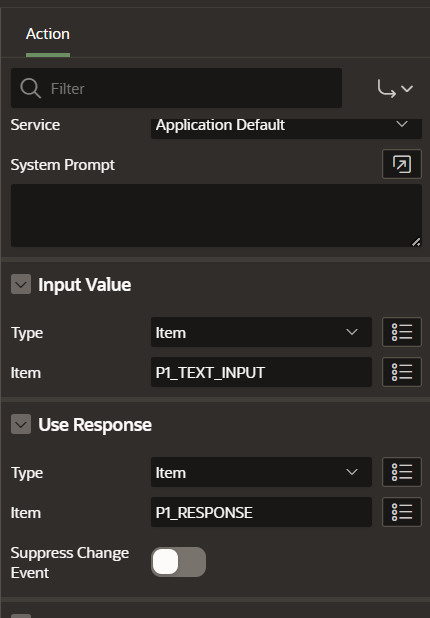
The first property to set is the Generative AI Service. This is set to the application default, and if you haven't set this, the service will not work. You can either select the service from this dropdown to the specific one you want or leave it as the application default and set that in the Application Definition under the AI tab.
You then need to specify the input text item and response item. In the Input Value properties section, leave the Type as Item and select the item to be P1_TEXT_INPUT (the name of the input field in your application). Finally, we need to tell APEX where to put the response from the AI, so in the Use Response properties section, leave the type as Item and set the item to P1_RESPONSE (the name of the field in your application that you want to save the response to).
Save the changes, and we are ready to chat with the AI. Run the application, and you should see something like this.

So, let's type a question and see what happens.
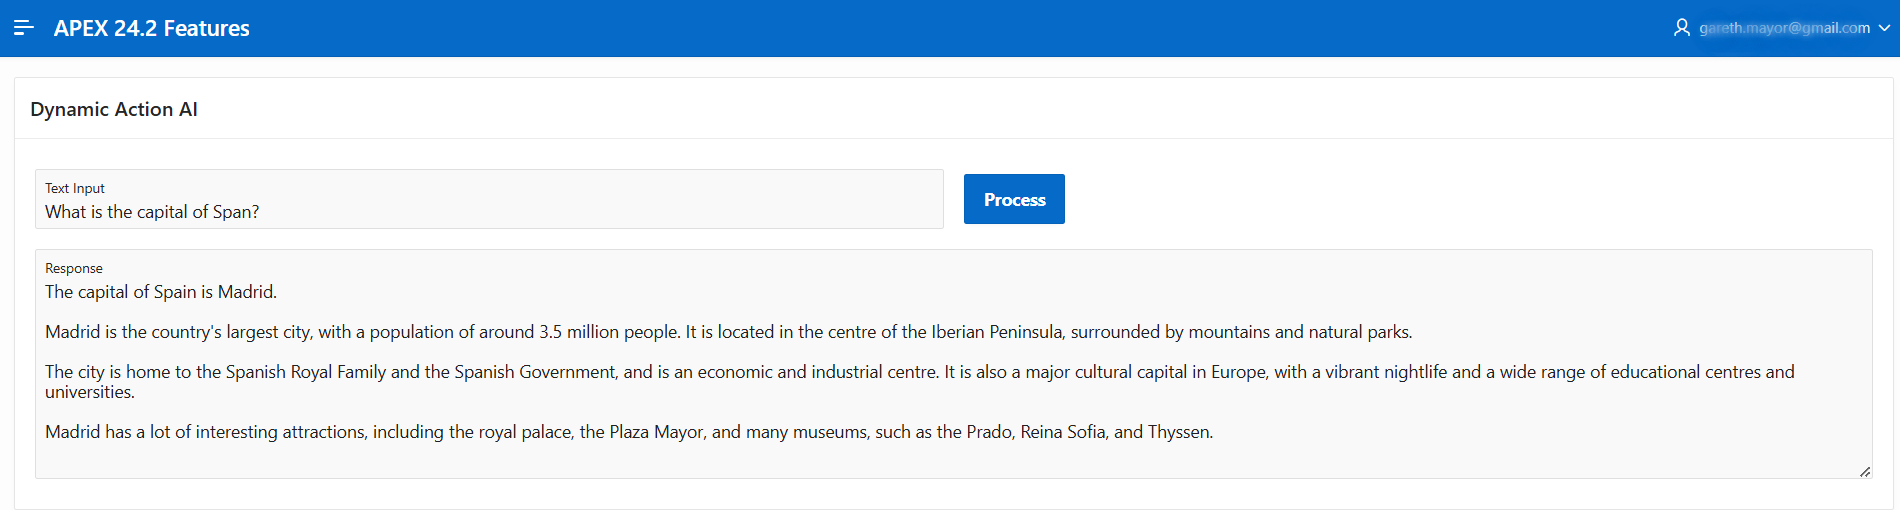
Note that a throbber appears next to the Response field as the AI processes the text, indicating to the user that the system is processing something. This is because the response is not instant and could take a while, depending on the query and the length of the response. AIs are not simple fact providers. I asked what the capital of Spain is, and it provided additional context about the city.
You will have noticed that there were additional Types that can be selected for the Input Value. We used Item, but there are two others: Only System Prompt and Javascript Code. Only System Prompt only sends the declared system prompt and RAG resource. Javascript Code allows you to specify a javascript expression as the user input. These are:
- this.triggeringElement – The DOM object of the element that triggered the request
- this.browserEvent – The event object that triggered the event
- this.data – Additional data that can be passed from the event handler
There are also two options for the User Response, the item type we have already used, but you can also specify Javascript Code. This allows you to write custom javascript code to handle the response and process it how you wish.
Create Data Model Using AI
Data Models have been available within APEX for some time now, and there are various ways to create them. However, none are as fast as the new Create Data Model Using AI. We're going to create a data model for a simple stock application that will have several products, locations and record sales.
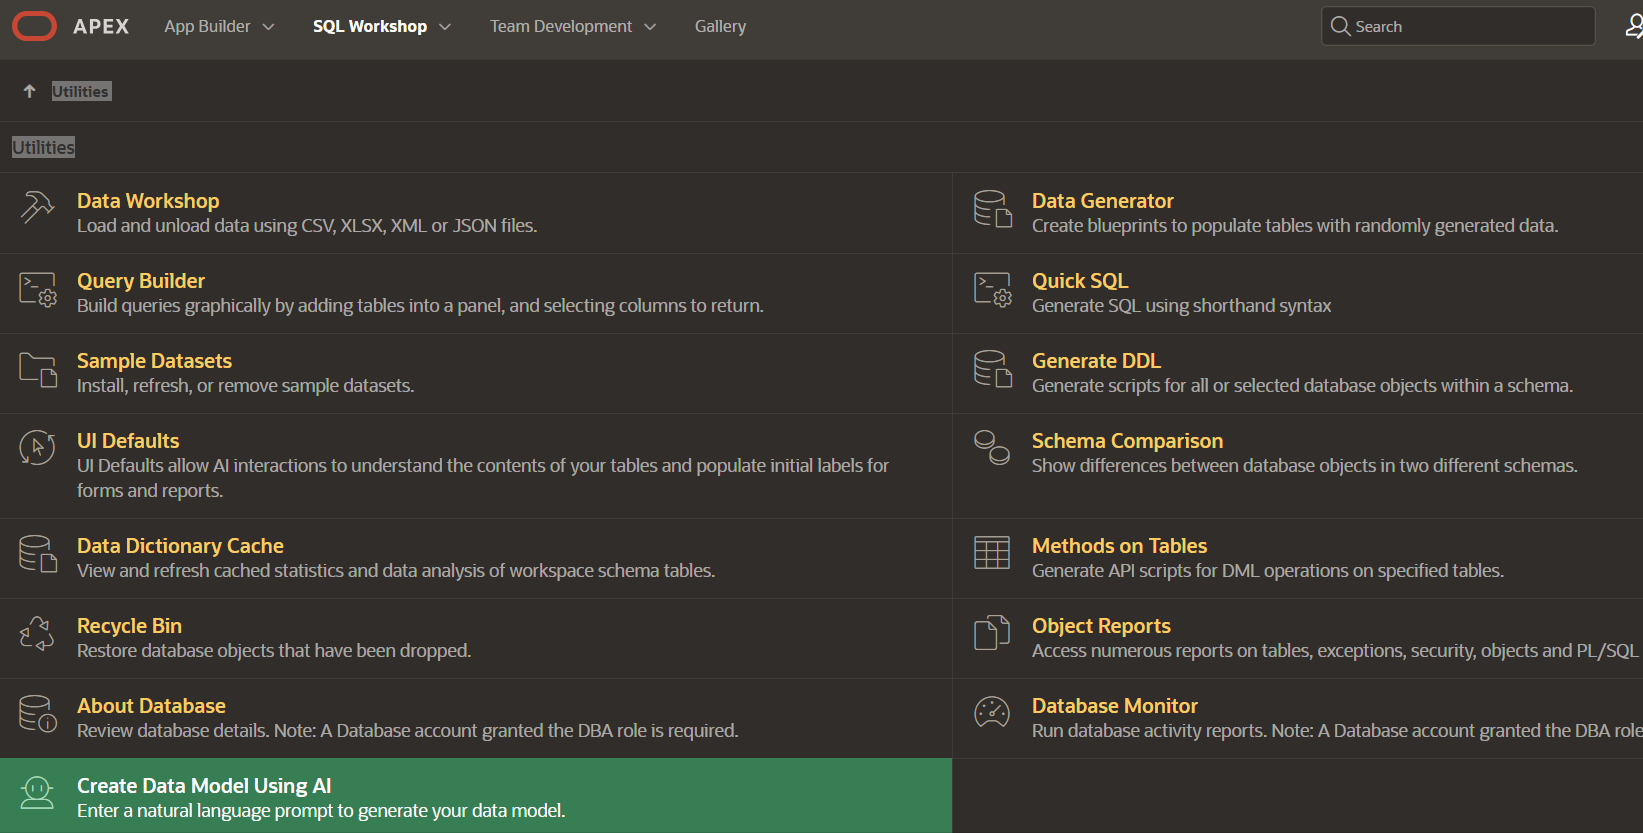
Firstly, we need to go to SQL Workshop from the main APEX menu page and click on the Utilities menu. You should see the new Create Data Model Using AI at the bottom of the list of Utilities.
The APEX Assistant should now appear, asking you to specify a data model using natural language. This may be a little difficult for an AI to understand fully, so let's see if it gets it right the first time. I'm going to ask it to build a data model for a stock system that will have locations holding products that can be purchased from the stores, replenished to the warehouse, and stock can be moved between the warehouse and the stores. To do this, I'll use the following:
create a data model for a stock system with entities like locations and products
Note that I have specified some of the entities that will be required. Here is what it came back with.

To see the full text, see here.
We have our table definitions for locations, products and stock. The AI knew it needed a table to store the stock levels at each location, even though I did not specify this. It has also added audit columns with created and updated information, again without me specifying it, which is an unexpected but nice feature. Further down, we even have the indexes for the tables and, finally, the triggers to automatically populate the audit information.
Note that at the bottom of the window, you can select either Oracle SQL or Quick SQL. Oracle SQL is the default and the one I will be showing here, but if you prefer Quick SQL, select it before submitting your query.
We'll go ahead and click on the Create Script button. This will take the full script and populate the Script Editor in SQL Workshop to allow you to run the script and create your tables. I have clicked on a few links, typed a single sentence and clicked a button, and now I have the bare bones of my database tables all ready to be created and all within the space of 5 minutes. Now that's fast!
Obviously, the more complex your system, the more you may need to tweak the provided Data Model.
Vector Search Support
Oracle AI Vector Search was introduced in Oracle 23ai and allows you to store vector embeddings alongside your business data, which allows for advanced semantic queries. This feature now comes to APEX.
To start with, we need to add a VECTOR data type column to a table. The VECTOR data type was introduced in Oracle 23ai and is the cornerstone that allows you to transform unstructured data into vector embeddings.
We then need to retrieve vector embeddings from a Vector Provider. So, what is a Vector Provider? It enables you to convert text into an embedding.
First, we need to create a Vector Provider. From the Workspace utilities menu in App Builder, select Vector Providers and then click on the Create button. The Provider Type needs to be set. I'm using a Generative AI Service (Cohere). Once selected, you will need to enter a name for the Vector Provider, which must be unique. You then must enter a unique Static ID, which will be used when calling the functions within the APEX_AI package. For the Generative AI Service, you then need to select the service set up previously as part of the initial setup process (I'm using Cohere).
Click Create, and you are done.
To retrieve the embeddings, you will need to utilise the APEX_AI.GET_VECTOR_EMBEDDINGS function and store the returning value in the VECTOR datatype column you previously created. You will need to provide the service_static_id for your Vector Provider service as well as the text you wish to search (Title and Description concatenated).
Next, we will need to create an Oracle Vector Search Configuration, which contains information about the searchable data source. From within App Builder, select the application you will be using and then Shared Components. In the Navigation and Search section, click on the Search Configurations option. From here, you will see all the search configurations you have set up. Click Create to create a new one.
Enter the name that you want to identify the search with and then select the search type to be Vector Search. Click on Next to select the source.
The Vector Provider needs to be set to the one you set up initially.
The remaining information is for the table that we added the VECTOR datatype, select the Source Type as Table, Table/View Owner as the Schema that the table is stored in, and the Table/View Name as the table name that contains the VECTOR datatype. Then click Next to move on to the final stage of the configuration.
The Column Mapping section is used to specify which columns will be used for the search.
- Primary Key Column needs to be the primary key on the table you are using.
- Vector Column must be the column that is the VECTOR datatype.
- Title Column is the column on the table that holds the title.
- Description Column is the column that holds the descriptive text.
- Icon Source will be displayed next to the search results and can be initials of the Title column, CSS Class, or the column in the table that holds the CCS Class used to display the icon.
Once this is all done, click on Create Search Configuration.
The final element is to now build the APEX page to utilise the Vector Search. Create a new page by running the Create Page Wizard and selecting Search Page. This will prompt you to select the search configuration you just created.
With the page created, you will see a page item PX_SEARCH (with X representing the page number) and a Search Results region. The Search page item is used by the end user to enter and submit their search text. The Search results region contains both the search results and the Search Source, which is mapped to the search configuration we created earlier.
Run the page, and you will be able to enter text into the search field, and when you press Enter, the search results will be displayed.
Vector Search is powerful but does require a significant amount of setup before you can start to see the benefits in the APEX pages. However, once done, the integration to APEX is simple and quick. The Vector Provider needs only be set up once, and, provided that the search configurations are established, multiple search pages can be quickly and seamlessly set up in a matter of minutes.
Conclusion
These three new features all complement each other and enhance yet further the offerings within APEX, as well as reaffirm the commitment to AI integration within the APEX environment.
Data Models are now much faster to produce with the integration to immediately run those scripts instead of copying and pasting or having to save a file from an AI and then load it into APEX. This means developers can start building APEX pages much earlier in the development lifecycle.
AI responses are even easier to integrate into your applications thanks to the new Dynamic Action, which leverages time for the developer to concentrate on more complex business requirements.
And finally, Vector Search allows the developers to leverage the full power of AI to allow complex semantic searching directly within the database.
For more information, check out our Oracle APEX Services, and if you liked this blog, check out our other APEX blogs here.
Subscribe to Oracle APEX Insights if you want to stay tuned for more APEX updates.